· Todd Martin · Home Care · 22 min read
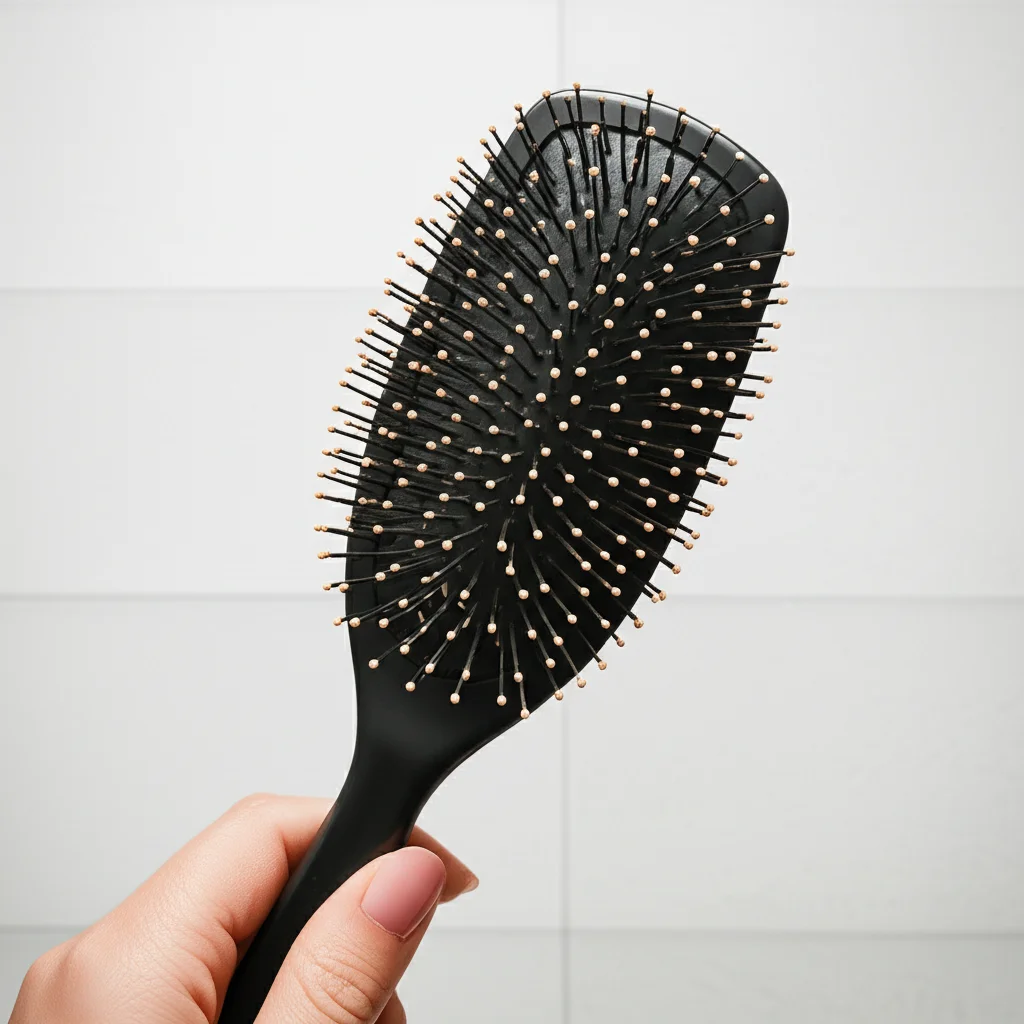
How To Clean Hair Brush
Unlock Shine: How to Clean Your Hair Brush Properly
Have you ever looked at your hair brush and seen a tangled mess of hair, dust, and product residue? It is a common sight. A dirty hair brush can undo all your efforts to keep your hair clean and healthy. Cleaning your hair brush is an important part of your beauty routine. It helps remove oils, dead skin cells, and old hair. This guide will walk you through the simple steps to clean hair brush types effectively. We will cover general methods and specific care for different brush materials. Let’s make your hair tools spotless.
Takeaway:
- Regularly remove loose hair from your brush to prevent buildup.
- Cleanse your hair brush with warm water and gentle soap to remove oils and product residue.
- Always dry brushes thoroughly to prevent mold and damage, especially wooden ones.
- Adapt cleaning methods based on brush type, like boar bristles or plastic.
- Sanitize your brush periodically to eliminate germs and bacteria.
How do you clean a hair brush effectively?
Cleaning a hair brush involves removing tangled hair, washing away dirt and product buildup with warm, soapy water, rinsing it well, and allowing it to air dry completely. The specific method may vary slightly depending on the brush’s material, such as wood or plastic, to ensure thorough cleaning without causing damage.
The Importance of Cleaning Your Hair Brush
Keeping your hair brush clean is more than just about appearances. A dirty brush can transfer grime back onto your clean hair. This makes your hair look dull or feel greasy. Over time, hair brushes accumulate dead skin, hair products, dust, and natural oils. This mixture becomes a breeding ground for bacteria and mold.
Using a dirty brush means you are putting all that back into your fresh hair. This can lead to various hair and scalp problems. These issues include oily hair, irritation, or even scalp infections. A clean brush helps keep your hair healthy and shiny. It also extends the life of your hair brush, saving you money in the long run. Many people do not realize how crucial this simple chore is. A few minutes of cleaning can make a big difference for your hair.
A clean brush distributes natural oils from your scalp through your hair better. This helps moisturize your hair naturally. It also prevents oil from building up in one spot. Regular cleaning removes the barrier that prevents the brush from doing its job well. This means your hair looks and feels better. I always notice my hair feels lighter after brushing with a freshly cleaned tool. It is a small but mighty step in any hair care routine.
Step-by-Step Guide: Basic Hair Brush Cleaning
Cleaning most hair brushes follows a straightforward process. This method works well for standard plastic and metal brushes. You only need a few common household items. This includes a pair of scissors, a comb, gentle shampoo or soap, and warm water. Following these steps ensures a thorough clean.
First, remove all the loose hair from the brush. You can do this by hand if there isn’t too much. For stubborn tangles, use a pair of scissors to carefully cut through the hair. Make sure not to cut the bristles. Then, use a comb or a pointed object to pull out the remaining hair from the base of the bristles. I usually use the end of a rat-tail comb. This step is critical. It prepares the brush for washing. You want to get as much hair out as possible before wetting it.
Next, prepare a cleaning solution. Fill a basin or sink with warm water. Add a few drops of gentle shampoo or dish soap. Mix the water until suds form. Submerge the head of the hair brush into the soapy water. Avoid submerging wooden handles. Let the brush soak for 5-10 minutes. This helps loosen dirt and product buildup. For more stubborn residue, you might need a bit more time. This soaking period is important for breaking down oils.
After soaking, use an old toothbrush or a small cleaning brush to gently scrub the bristles and the base of the brush. Pay attention to the areas where buildup is visible. Rinse the brush thoroughly under clean, running water. Make sure no soap residue remains. Shake off excess water and place the brush bristles down on a clean towel to air dry. Ensure the brush is completely dry before using it again. This prevents mildew growth. For a more detailed look at tackling stubborn grime, consider learning how to clean buildup on hair brush.
Deep Cleaning Specific Hair Brush Types
Different hair brush materials require specific cleaning approaches. Applying the wrong method can damage your brush. Understanding these differences helps extend your brush’s life. It also ensures it stays effective for your hair.
Cleaning Plastic Hair Brushes
Plastic hair brushes are quite durable and easy to clean. You can fully submerge most plastic brushes in warm, soapy water. Use a gentle shampoo or dish soap. After removing hair, let them soak for 10-15 minutes. This helps dissolve product buildup. Then, scrub the bristles with an old toothbrush. Rinse thoroughly under cool, running water. Shake off excess water. Place the brush on a clean towel, bristles down, to air dry. Ensure it is completely dry before storing. For more tips on this type, you can refer to how to clean plastic hair brushes. This method works well for paddle brushes and detangling brushes too. A clean plastic brush works best.
Cleaning Wooden Hair Brushes
Wooden hair brushes require more careful handling. Wood can warp or crack if submerged in water for too long. First, remove all hair from the bristles. Then, use a cloth dampened with a mild soap solution to wipe the bristles. You can use a toothbrush dipped in the solution to scrub the base gently. Avoid getting the wooden handle too wet. Rinse the bristles by wiping them with a damp cloth, then a dry one. Lay the brush flat on a clean towel with the bristles facing down. Let it air dry completely. Never expose wooden brushes to direct heat or sunlight. This prevents damage. For a comprehensive guide, see how to clean wooden hair brush. This careful approach keeps your wooden brush in good shape.
Cleaning Boar Bristle and Natural Fiber Brushes
Boar bristle brushes are excellent for distributing natural oils. They can hold onto product buildup and oil easily. Remove all hair first. Prepare a shallow basin of warm water with a small amount of gentle, sulfate-free shampoo. Dip only the bristles into the water. Avoid getting the base or handle wet, especially if it is wood. Gently agitate the bristles to create suds. Use your fingers or a soft brush to work the shampoo through the bristles. Rinse the bristles carefully under a slow stream of cool water. Make sure no soap remains. Gently press the bristles against a clean towel to remove excess water. Lay the brush bristles down on a dry towel to air dry completely. Air drying is important. It prevents mold and preserves the bristles. For more details on these specific brushes, check out how to clean boar bristle brush.
Cleaning Specialty Brushes (Paddle, Round, Denman, Wet Brush)
Many popular brushes have unique designs. Cleaning them needs specific attention. For example, a how to clean paddle brush usually has a large, flat surface. This can collect a lot of hair and dust. Remove the hair first, then follow the basic cleaning steps. If your paddle brush is plastic, you can submerge it. If it has a wooden handle, follow the wooden brush instructions.
Round brushes often have a metal or ceramic barrel. Hair and product can get trapped around the base of the bristles. Use a comb to pull out hair. For the barrel, wipe it down with a damp cloth. If it’s a how to clean blow dry brush with mixed bristles, be gentle.
Denman brushes have removable rubber pads. This design makes them easier to clean. After removing hair, you can often pop out the rubber pad. This allows for a deeper clean of both the pad and the brush base. Wash them separately with soap and water. Rinse thoroughly and allow to air dry completely before reassembling. For specific steps, refer to how to clean Denman brush.
Wet brushes are designed for use on wet hair. They typically have flexible plastic bristles. These brushes can also accumulate product and hair. Treat them like plastic brushes. You can submerge them for cleaning. Make sure to remove all hair. Scrub gently. Then rinse and air dry. Check out how to clean Wet brush for more details. Each specific brush type may have small nuances that are important for optimal cleaning and care.
Natural Cleaning Solutions for Hair Brushes
Sometimes, regular soap and water are not enough. You might want to sanitize your brush or tackle extra stubborn buildup. Natural solutions offer effective alternatives. These solutions use common household items. They are safe for most brush types.
Using Baking Soda
Baking soda is a mild abrasive and a natural deodorizer. It helps break down greasy buildup and neutralize odors. After removing hair, fill a basin with warm water. Add one tablespoon of baking soda to the water. Stir until it dissolves. Submerge your plastic hair brush or the bristles of a natural bristle brush into the solution. Let it soak for 15-20 minutes. Scrub the bristles gently with an old toothbrush. Rinse thoroughly under running water until all baking soda residue is gone. Air dry completely. For more information, read how to clean hair brushes baking soda. This method works well for general cleaning and deodorizing.
Using Vinegar
White vinegar is an excellent disinfectant and cuts through grease and product residue. It is especially useful for sanitizing your hair brush. Mix equal parts white vinegar and warm water in a basin. Remove all hair from your brush. Submerge plastic brushes or the bristles of other brush types into the mixture. Let it soak for 30 minutes to an hour. The vinegar smell might be strong at first. Do not worry; it will dissipate.
After soaking, scrub the bristles and base with a brush. Rinse the hair brush very well under cool running water. Ensure the vinegar smell is gone. Air dry the brush completely on a clean towel. Vinegar helps kill bacteria and mold. It also leaves your brush very clean. This method provides a deep clean. For general cleaning with vinegar, consider tips like how to clean shower with vinegar or how to clean glass with vinegar for similar principles.
Using Hydrogen Peroxide
Hydrogen peroxide is a powerful disinfectant. It helps kill germs and bacteria. It can also help lift stubborn stains. Mix one part 3% hydrogen peroxide with two parts warm water in a basin. Remove all hair from your brush. Submerge plastic brushes or the bristles of natural brushes into this solution. Let it soak for about 15 minutes. Do not leave it for too long, especially with colored bristles.
After soaking, gently scrub the bristles and the base. Rinse the hair brush thoroughly under cool running water. Make sure no peroxide residue remains. Place the brush bristles down on a clean towel to air dry completely. Hydrogen peroxide is great for sanitizing brushes that are used frequently or shared. For detailed instructions, refer to how to clean hair brushes with hydrogen peroxide. Always use proper ventilation when working with hydrogen peroxide.
Drying Your Hair Brush and Storage Tips
Proper drying is as important as proper washing. If you do not dry your hair brush completely, it can develop mold or mildew. This is especially true for brushes with cushions or wooden parts. Moisture can also cause wooden handles to crack. It can degrade the glue holding bristles in place. Taking the time to dry your brush correctly ensures its longevity and hygiene.
After cleaning, shake off as much excess water as you can. You can gently tap the brush against the sink. This removes large water droplets. Next, lay your hair brush on a clean, dry towel. Position it bristles down. This allows water to drain away from the base and handle. It also allows air to circulate around the bristles. If your brush has a padded base, like a paddle brush, try to prop it up. You can use a small object to elevate one end slightly. This helps air get underneath the cushion. It prevents water from pooling inside.
Air drying is the safest method. Avoid using heat from hair dryers or direct sunlight. High heat can melt plastic bristles or warp wooden handles. It can also damage the integrity of natural bristles. Let the brush air dry for several hours, or even overnight. Make sure it feels completely dry to the touch before putting it away or using it. You want zero dampness.
Store your clean, dry hair brush in a clean, dry place. Avoid storing it in humid environments like a closed bathroom cabinet immediately after use. This can encourage mold growth. A drawer or a vanity top is fine, as long as the brush is dry. Keeping it away from excessive dust also helps. Some people keep their brushes in a separate container. This keeps them even cleaner between uses. Proper storage protects your brush until its next use. It also keeps your hair healthier.
How Often Should You Clean Your Hair Brush?
The frequency of cleaning your hair brush depends on several factors. These factors include how often you use it, your hair type, and if you use many hair products. A general rule is to clean your hair brush regularly. This helps maintain good hygiene. It also keeps your hair looking its best.
Daily Maintenance: You should remove loose hair from your brush every single day. Do this after each use or at the end of the day. Hair gets trapped easily. It prevents the brush from working effectively. It also collects dust and product residue. Taking one minute to pull out the hair makes deeper cleaning easier later. It keeps your brush performing well. I always do this before putting my brush away.
Weekly Quick Clean: A quick wash is advisable once a week for most people. This involves washing the brush with warm water and a small amount of shampoo or soap. This removes surface oils and light product buildup. It keeps the brush fresh. It prevents a large accumulation of grime. This is a simple step that takes only a few minutes. It is a good habit to incorporate into your routine.
Monthly Deep Clean: A thorough deep clean is recommended once a month. This is where you use soaking methods with baking soda, vinegar, or hydrogen peroxide. This deep clean tackles stubborn product residue, natural oils, and bacteria. It sanitizes the brush completely. If you use a lot of styling products, have oily hair, or suffer from dandruff, you might need to deep clean more often. Maybe every two to three weeks. Similarly, if multiple people use the same brush, increase deep cleaning frequency. This ensures good hygiene for everyone.
Considerations for Specific Hair Types/Products:
- Oily Hair/Scalp: If your hair gets oily quickly, your brush will accumulate oil faster. Clean it weekly or even more frequently.
- Product Heavy Use: Using hairsprays, gels, mousses, or dry shampoo causes significant product buildup. Deep clean your brush every two weeks. This prevents sticky residue.
- Dandruff/Scalp Issues: If you have dandruff or other scalp conditions, sanitize your brush more often. This prevents re-introducing flakes or bacteria to your scalp.
- Shared Brushes: If you share a brush with family members, regular deep cleaning is crucial. This limits germ transfer.
Consistent cleaning prevents accumulation. It supports healthier hair. It also extends the life of your hair brush.
Common Mistakes to Avoid When Cleaning Hair Brushes
Cleaning your hair brush might seem simple. However, some common mistakes can damage your brush or make the cleaning less effective. Knowing these pitfalls helps you avoid them. This ensures your brush stays in good condition and performs its best.
1. Not Removing Hair First: Many people try to wash their brush without removing all the tangled hair first. This is a big mistake. Hair prevents water and soap from reaching the bristles and base. The hair itself can become matted and harder to remove once wet. Always take the time to remove every strand of hair before washing. This step makes the cleaning process much easier and more effective. You can use scissors or a comb.
2. Submerging Wooden Brushes: Wood absorbs water. Submerging a wooden brush, especially the handle, will cause it to swell, crack, or warp. This can ruin the brush. Only clean the bristles of wooden brushes with a damp cloth or by gently dipping just the bristles. Do not let the handle get soaked. Always air dry wooden brushes thoroughly.
3. Using Harsh Chemicals: Avoid strong cleaning agents like bleach, abrasive cleaners, or harsh detergents. These can damage bristles, strip coatings, or weaken the brush’s structure. They can also leave irritating residues. Stick to gentle shampoos, dish soap, white vinegar, or hydrogen peroxide diluted properly. Natural solutions are often safer and just as effective. For example, using how to clean hair combs with gentle soap applies here too.
4. Not Rinsing Thoroughly: Leaving soap or cleaning solution residue on your brush is problematic. This residue can transfer to your hair. It can make your hair look dull, greasy, or irritated. Rinse your brush very thoroughly under running water. Keep rinsing until all suds are gone and the water runs clear. I usually rinse my brushes longer than I think necessary.
5. Not Drying Completely: Putting away a damp brush promotes mold and mildew growth. This is especially true for brushes with cushions or those stored in closed environments. Mold can damage the brush and be harmful to your hair and scalp. Always air dry your brush completely before storing it. Lay it bristles down on a towel. Ensure good air circulation. Patience here prevents future issues.
6. Using Too Much Heat to Dry: Never use a hair dryer or direct heat to speed up the drying process. High heat can melt plastic bristles. It can warp plastic or wooden parts. It can also damage the natural structure of boar bristles. Air drying is the safest and most effective method. This protects your investment in your hair tools.
7. Infrequent Cleaning: The biggest mistake is simply not cleaning your brush often enough. A brush full of hair, dust, and product buildup cannot clean your hair effectively. It just redistributes grime. Establish a cleaning routine: daily hair removal, weekly quick wash, and monthly deep clean. Regular cleaning keeps your brush effective. It keeps your hair healthy.
Beyond the Basics: Advanced Brush Care and Troubleshooting
Maintaining your hair brushes involves more than just regular washing. Sometimes, you encounter specific issues or want to extend the life of your favorite tools. Understanding advanced care techniques and troubleshooting common problems helps. This section covers those deeper insights.
Removing Stubborn Buildup and Residue
Sometimes, product buildup becomes really sticky and hard to remove. This often happens with hairsprays, mousses, or dry shampoo. After the initial hair removal and soaking, you might need extra steps. For very sticky residue, try using a slightly stronger soap solution. You can also mix in a small amount of baking soda to create a paste. Apply this paste directly to the affected areas. Let it sit for a few minutes. Then, use an old toothbrush or a small, stiff brush to scrub vigorously. The mild abrasive action of baking soda helps lift the grime. Rinse thoroughly afterward. For severe cases, a quick dip in a diluted rubbing alcohol solution (for plastic brushes only) can help dissolve sticky residues, but always rinse immediately. Specific articles like how to clean buildup on hair straightener show the importance of tackling buildup on hair tools.
Dealing with Mold or Mildew
If you find black spots or a musty smell on your brush, it indicates mold or mildew. This usually happens if the brush was not dried completely or was stored in a damp place. For plastic brushes, a solution of white vinegar and water (50/50) or hydrogen peroxide (1 part peroxide to 2 parts water) is effective. Submerge the brush in the solution for 30 minutes. Scrub well, especially around the base of the bristles. Rinse thoroughly and dry completely. For wooden brushes with mold, unfortunately, it can be harder to remove permanently without damaging the wood. A very diluted vinegar solution wiped on with a cloth, followed by immediate drying, might help. However, severe mold might mean replacing the brush for hygiene reasons. Protecting your hair from issues like scalp mold means starting with clean tools.
Caring for Special Features or Materials
Some brushes have unique features that need special attention. For example, brushes with gel handles or those designed for wet hair (like the Wet Brush) are usually fully submersible. However, brushes with fabric elements or delicate adornments require spot cleaning only. Always check the manufacturer’s care instructions if you are unsure. High-quality brushes, such as Mason Pearson or Denman, often have specific cleaning tools or recommendations. For instance, a how to clean Mason Pearson brush involves specific techniques to preserve its natural bristles and cushion. This ensures their longevity and performance. Similarly, the how to clean Tangle Teezer brush benefits from its unique design allowing easy removal of hair and simple rinsing.
When to Replace Your Hair Brush
Even with the best care, hair brushes do not last forever. Knowing when to replace your brush is important for hair health.
- Bristles are Bent or Missing: If the bristles are heavily bent, broken, or missing, the brush cannot detangle or style effectively. It might even cause damage to your hair.
- Cushion is Cracked or Damaged: For brushes with a rubber cushion, if it cracks, tears, or deflates, it compromises the brush’s flexibility and comfort.
- Unpleasant Odor: If your brush consistently smells musty or unpleasant even after cleaning, it might have deep-seated mold or bacteria. It’s time to replace it.
- Brush Head is Loose or Broken: A wobbly or broken brush head makes the tool unsafe and ineffective to use.
- Every 6-12 Months: As a general guideline, consider replacing your hair brush every 6 to 12 months, especially if you use it daily. This ensures you are always using a tool that is effective and hygienic.
By paying attention to these advanced care tips and knowing when to replace your brush, you ensure your hair tools always support healthy, beautiful hair.
FAQ Section
Q1: How often should I remove hair from my brush?
You should remove loose hair from your hair brush after every single use or at least once a day. This simple action prevents a significant buildup of hair, dust, and product residue. It makes deeper cleaning much easier and keeps your brush effective for detangling and styling. It takes only a few seconds.
Q2: Can I put my hair brush in the dishwasher?
No, you should not put most hair brushes in the dishwasher. The high heat and harsh detergents used in dishwashers can melt plastic, warp wooden handles, and damage bristles. This will ruin your hair brush. Hand washing with gentle soap and warm water is always the safest and most effective method.
Q3: What type of soap is best for cleaning hair brushes?
A gentle shampoo, mild dish soap, or even a bar of hand soap works best for cleaning hair brushes. These mild cleaners effectively break down oils and product buildup without damaging the brush materials. Avoid harsh detergents or abrasive cleaners, as they can be too strong.
Q4: How long does a hair brush take to dry completely?
A hair brush typically takes several hours to air dry completely, often overnight. The exact time depends on the brush type, humidity levels, and air circulation. Always ensure it is bone dry before storing or using it again. This prevents the growth of mold and mildew.
Q5: Is it okay to share hair brushes?
It is not ideal to share hair brushes. Sharing brushes can transfer oils, dead skin cells, bacteria, and even head lice between individuals. For best hygiene, each person should have their own hair brush. If sharing is unavoidable, deep clean and sanitize the brush very thoroughly after each use.
Q6: Can a dirty hair brush cause hair problems?
Yes, a dirty hair brush can cause several hair problems. It can transfer oil and product buildup back onto clean hair, making it look greasy or dull. It can also re-introduce dirt, dead skin, and bacteria to the scalp, potentially leading to scalp irritation, itching, or even mild infections. Regular cleaning prevents these issues.
Conclusion
Cleaning your hair brush is an essential part of maintaining healthy hair and good hygiene. We have explored the simple yet impactful steps to keep your hair tools spotless. From regularly removing tangled hair to understanding deep cleaning methods for various brush types, each step helps. We covered specific care for plastic, wooden, and natural bristle brushes. We also discussed using natural solutions like baking soda, vinegar, and hydrogen peroxide. Proper drying and storage are also key to prevent mold and prolong brush life.
Remember, a clean hair brush prevents product buildup and oil from transferring back to your hair. This leads to shinier, healthier-looking hair. Make cleaning your hair brush a regular habit. Daily hair removal, weekly quick washes, and monthly deep cleans will keep your brush effective. It will also ensure your hair stays its best. Don’t let a dirty brush undo your hair care efforts. Take action today. Give your hair the clean tools it deserves. Your hair will thank you for it!
- hair brush cleaning
- brush maintenance
- clean hair tools

Todd Martin
Senior Writer
With over 15 years of experience in home renovation and design, I started HEG to share what I’ve learned with homeowners who want to create spaces that are both beautiful and functional. I’ve always believed in a hands-on approach, and over the years, I’ve picked up practical solutions that actually work. Through HEG, I aim to make home improvement more approachable, sharing real tips that help you create a home you truly love.