· Todd Martin · Home Improvement · 20 min read
How To Add Wheels To A Table
How To Add Wheels To A Table: A Complete Guide
Have you ever wished your heavy workbench could glide across the garage floor? Or perhaps your dining table could easily move aside for a party? Adding wheels to a table transforms it into a versatile piece of furniture. This simple modification greatly enhances convenience and adaptability in any living space. It allows you to reconfigure rooms with minimal effort.
This guide will walk you through the process of adding wheels to a table. We will cover selecting the right casters, preparing your table, and the step-by-step installation. You will learn about different caster types and how to attach them securely. By the end, your table will gain newfound mobility, ready to serve your dynamic needs.
Takeaway
- Assess Table Needs: Determine table weight and use to select correct casters.
- Choose Caster Type: Select between plate, stem, or specialized casters.
- Gather Tools: Collect drill, screws, measuring tape, and safety gear.
- Prepare Table: Clean the table and mark precise attachment points.
- Install Correctly: Follow steps for secure attachment, ensuring stability.
Adding wheels to a table involves selecting the correct casters based on weight and use, then securely attaching them to the table’s legs or base using appropriate tools and fasteners. This process enhances a table’s mobility, making it easy to move for cleaning, rearranging, or changing its function.
Why Add Wheels to Your Table? Unlock Greater Mobility
Adding wheels to a table brings significant advantages. It dramatically increases the furniture’s functionality and adaptability. Imagine effortlessly moving your kitchen island for extra floor space. Or perhaps you need to reposition your craft table for better lighting.
Tables on wheels offer incredible convenience. They allow you to reconfigure rooms quickly for different activities. This flexibility helps optimize your living space. Mobility can also improve ergonomics, as you avoid straining your back by lifting or dragging heavy furniture. Tables with wheels are also easier to clean around and under. This simple upgrade makes daily life smoother and more efficient.
Enhanced Functionality and Adaptability
A table that moves offers many benefits. You can transform a static piece of furniture into a dynamic asset. This is especially useful in smaller homes where furniture often serves multiple purposes. For instance, a dining table might become a temporary workspace, then a serving station.
Wheeled tables provide a practical solution for flexible living. They support various activities without the need for heavy lifting. This boosts your home’s efficiency. Think about a rolling cart for your laundry room. Or consider a movable desk that follows the sun.
Space Optimization and Ergonomics
Wheeled tables help maximize your available space. You can push a table against a wall when not in use. Then, pull it out to the center of the room when needed. This fluid movement makes small rooms feel larger. It also helps manage traffic flow.
Beyond space, mobility protects your body. You no longer need to strain your muscles to shift furniture. This reduces the risk of injury. It also makes cleaning under and around the table much simpler. A movable table means less bending and lifting.
Choosing the Right Casters: Types and Considerations
Selecting the proper casters is crucial for success. Not all casters are equal. Different tables require different types and sizes of wheels. Your choice depends on the table’s weight, its intended use, and your floor type.
Understanding caster types helps you make an informed decision. Plate casters offer strong, broad support. Stem casters integrate directly into the table legs. Twin-wheel casters distribute weight well. Heavy-duty casters handle substantial loads. Light-duty casters suit smaller, lighter tables. Each type has specific applications and benefits.
Understanding Caster Types
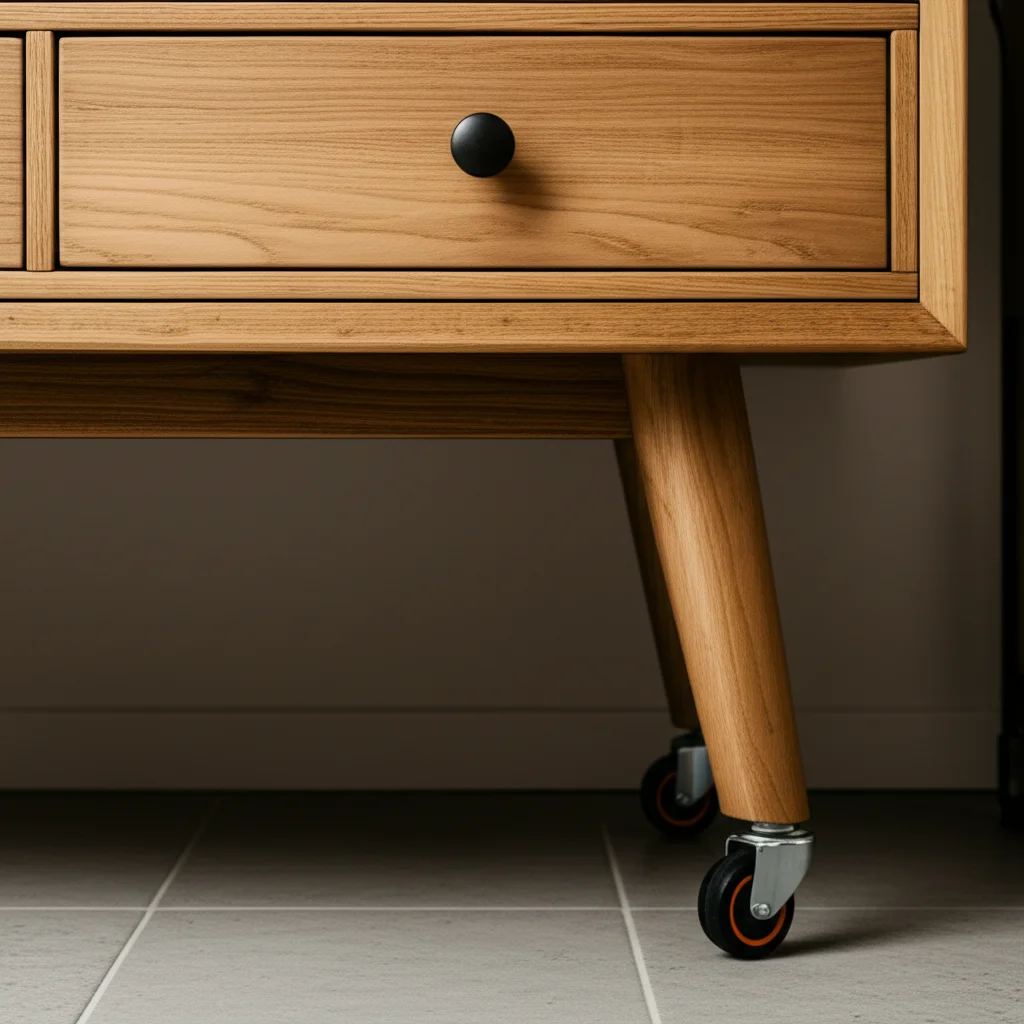
Casters come in several main types. Plate casters feature a flat top plate with pre-drilled holes. You screw this plate directly onto the bottom of your table or leg. They offer a very stable and secure connection. These are common for workbenches and dining tables.
Stem casters have a rod or stem that inserts into a socket. The socket usually goes inside the table leg. There are different stem types, like threaded stems or grip ring stems. These casters often have a cleaner look. They are popular for office chairs and lighter tables. Some casters are designed specifically to be put on a table.
Key Considerations: Weight, Material, and Floor Type
Before buying casters, consider three main factors. First, evaluate the weight capacity required. This is the most critical factor. Calculate the table’s weight plus the maximum weight you expect to put on it. Choose casters with a combined capacity that exceeds this total. For instance, if a table weighs 100 pounds and you plan to put 50 pounds on it, you need casters that can support at least 150 pounds. Always ensure the total weight rating of all casters combined exceeds your table’s maximum load.
Second, think about the caster material. Wheel materials impact performance and floor protection.
- Hard materials (e.g., nylon, metal) are durable for carpets or industrial settings. They can scratch hard floors.
- Softer materials (e.g., rubber, polyurethane) are better for hardwood, tile, or laminate floors. They offer more grip and prevent marks.
Finally, consider your floor type. This dictates the best wheel material. Soft rubber wheels work well on delicate wood floors. Harder plastic wheels are fine for concrete or carpet. Selecting the correct material protects your floors and ensures smooth movement.
Gathering Your Tools and Materials for the Job
Before you begin, assemble all necessary tools and materials. Having everything ready saves time and ensures a smooth installation. Preparation is key to a successful project. You do not want to stop mid-way because of a missing screw.
Make a checklist and gather each item. This includes your chosen casters, appropriate fasteners, and essential hand tools. Safety gear should also be on your list. A well-prepared workspace enhances efficiency and safety. This careful planning avoids frustration during the process.
Essential Tools for Caster Installation
You will need a few basic tools for this project.
- Drill: A cordless drill is ideal for pre-drilling pilot holes and driving screws.
- Drill Bits: Select bits appropriate for your screws and the table material.
- Measuring Tape: Essential for accurate placement of casters.
- Pencil or Marker: For marking drill points.
- Screwdriver (manual or drill attachment): To secure fasteners.
- Wrench (for stem casters): If your stem casters require a nut for tightening.
- Level: To ensure the table sits evenly after installation.
- Safety Glasses: Always protect your eyes when drilling or working with tools.
- Gloves: To protect your hands.
- Work Gloves: To protect your hands from splinters or sharp edges.
Required Materials and Fasteners
Beyond tools, specific materials ensure a secure installation.
- Casters: The primary item, chosen based on your table’s needs. Ensure you have four casters for a standard four-legged table.
- Screws/Bolts: For plate casters, choose screws appropriate for the table’s material (wood, metal). The length should be sufficient to penetrate the table leg without going through it. For stem casters, ensure you have the correct sockets or expansion sleeves.
- Washers: Can provide a more secure fit for screws and prevent them from countersinking too deeply.
- Wood Glue (optional): If drilling into wood, a small amount of wood glue in pilot holes can add extra hold for screws.
- Sandpaper (fine-grit, optional): To smooth any rough edges after drilling.
Preparing Your Table for Wheel Installation
Proper preparation sets the stage for a successful caster installation. You cannot just flip the table over and start drilling. The table needs to be stable, clean, and accurately marked. This ensures the casters align correctly and provide even support.
Take your time with this step. Rushing can lead to crooked wheels or an unstable table. A well-prepared surface ensures the casters attach securely and function as intended. This foundational work guarantees a professional result.
Cleaning and Securing the Table
First, clean the table thoroughly. Remove any dust, grime, or debris from the underside, especially where the casters will attach. A clean surface helps ensure proper adhesion of any markings and prevents foreign objects from interfering with the installation. You can use appropriate cleaners for different table materials. For example, use a gentle wood cleaner for a wood table. If you need to clean a wood table, use a damp cloth and mild soap.
Next, flip the table upside down. Place it on a stable, flat surface. Use moving blankets or towels to protect the table’s top surface from scratches. Ensure the table is completely stable and cannot wobble or tip during the installation process. If it is a very large or heavy table, ask for help to flip it safely. Support the table so that the legs or base are easily accessible.
Measuring and Marking Attachment Points
Accuracy in measuring is critical. This ensures your casters are evenly spaced and the table remains level.
- Determine Placement: Decide exactly where each caster will attach. For table legs, this is usually centered on the bottom of each leg. For a table with a solid base, you might distribute them evenly around the perimeter.
- Measure and Mark: Use your tape measure and pencil to mark the exact spot for each caster.
- For plate casters: Position the caster plate on the leg or base. Use a pencil to mark the center of each screw hole on the plate. Double-check alignment with other legs.
- For stem casters: Mark the center point where the stem will be inserted. This often requires a larger hole. Ensure this mark is truly centered on the leg.
- Check for Obstructions: Before drilling, look for any existing screws, hardware, or structural elements inside the table legs that might interfere. Adjust your marks slightly if needed.
- Verify Evenness: After marking all points, step back and visually inspect. Are they symmetrical? Will the table sit level? Use your level to check the potential heights.
Step-by-Step Guide to Attaching Plate Casters
Plate casters are popular for their strength and ease of installation. They are ideal for heavier tables like workbenches, dining tables, and kitchen islands. The process involves precise measurement, pre-drilling, and secure fastening. Following these steps ensures your table remains stable and moves smoothly.
This method provides a robust connection. It makes your table ready for daily use and frequent movement. Properly installed plate casters can support significant weight. They also offer excellent long-term durability.
Drilling Pilot Holes and Securing Plates
Once your table is clean and marked, you can begin the attachment process. This is where precision pays off.
- Select the Right Drill Bit: Choose a drill bit slightly smaller than the diameter of your screw. This allows the screw threads to bite into the wood without splitting it. If working with metal, use a drill bit designed for metal and consider self-tapping screws or pre-drilling with a specific metal bit.
- Drill Pilot Holes: Carefully drill a pilot hole at each marked point. Drill straight down, to the correct depth. The depth should be slightly less than the screw’s length. This prevents the screw from poking through the other side of the leg.
- Position the Caster Plate: Align the caster plate with the pre-drilled holes. Ensure it is perfectly straight and centered on the leg.
- Insert and Tighten Screws: Start by inserting one screw partially into each hole. This helps hold the plate in place. Then, use your drill or screwdriver to drive each screw firmly into the pilot holes. Tighten them until the plate is flush and secure against the table leg. Do not overtighten, especially with wood, as this can strip the wood or crack it.
- Repeat for All Casters: Follow these steps for each remaining caster. Ensure consistency in placement and tightness.
Ensuring Stability and Alignment
After attaching all plate casters, perform a quick check.
- Visual Inspection: Look at each caster. Are they all facing the same direction? Are their plates flush against the table?
- Wobble Test: Gently rock the table to check for any wobbling. If it wobbles, check if any screws are loose. Ensure all casters touch the ground evenly. You may need to loosen and adjust a slightly misaligned plate.
- Move Test: Carefully flip the table upright. Push it around to test its movement. Do the wheels roll smoothly? Do they swivel freely (if swivel casters)?
Properly installed plate casters provide excellent stability. They transform a stationary table into a mobile asset. This careful process ensures your table functions perfectly.
Step-by-Step Guide to Attaching Stem Casters
Stem casters offer a streamlined look, often found on office chairs or lighter furniture. They integrate directly into the leg, making them less visible. Installing them requires specific attention to the size of the stem and the corresponding socket. This method can be quicker than plate casters once you have the right components.
Understanding the different stem types is crucial for a successful installation. Some stems are threaded, while others have a grip ring. Each requires a specific method of insertion. This guide focuses on common types and ensures a secure fit.
Installing Threaded Stem Casters
Threaded stem casters have a screw-like shaft at the top. They screw directly into a pre-drilled hole or a threaded insert.
- Drill Pilot Hole: Select a drill bit the same diameter as the threaded stem (or slightly smaller if going into soft wood). Drill a pilot hole directly into the center of the table leg. The depth should match the length of the stem.
- Install Threaded Insert (Optional but Recommended): For a stronger connection, especially in softer woods, install a threaded insert into the pilot hole. Use an Allen key or screwdriver to twist the insert into the wood until flush.
- Screw in Caster: Align the threaded stem of the caster with the pilot hole or the threaded insert. Twist the caster clockwise, screwing it firmly into place. Hand-tighten or use a wrench if the caster has a nut at its base. Do not overtighten, which can strip the threads.
- Repeat: Follow these steps for all remaining casters.
Attaching Grip Ring Stem Casters
Grip ring stem casters have a smooth stem with a compression ring. They fit into a socket or sleeve that you install in the table leg.
- Insert Socket/Sleeve: Drill a pilot hole slightly smaller than the outer diameter of the socket. Tap the socket into the center of the table leg using a mallet or hammer, until it is flush with the bottom of the leg. Ensure it is straight.
- Insert Caster Stem: Align the stem of the caster with the installed socket. Push the stem firmly into the socket until the grip ring clicks into place. You might need to apply significant pressure or gently tap with a mallet.
- Test Fit: Once inserted, try to pull the caster out. It should feel secure and not easily detach.
- Repeat: Install all remaining grip ring casters.
Final Checks for Stem Caster Installation
After all stem casters are attached:
- Verify Security: Pull on each caster to ensure it is firmly seated in its socket or securely screwed in.
- Level Check: Flip the table upright. Check if it sits level and does not wobble. If uneven, check if one caster isn’t fully inserted.
- Mobility Test: Roll the table around. The casters should spin freely and pivot without resistance. For office chairs, you might already know how to get hair out of desk chair wheels. This ensures smooth operation for your newly mobile table.
Stem casters, when properly installed, provide reliable mobility. They often give a cleaner, more integrated look. Enjoy the new versatility of your table.
Maintaining Your Wheeled Table: Longevity and Safety
Adding wheels to your table enhances its utility. However, like any moving part, casters require occasional maintenance. Regular checks ensure smooth operation and extend the life of your wheeled table. Neglecting maintenance can lead to sticky wheels, damaged floors, or even safety hazards.
Proper care also encompasses important safety practices. A movable table can be a convenient tool, but also a potential risk if not used carefully. Understanding how to maintain and safely operate your wheeled table ensures it remains a valuable asset for years to come.
Regular Maintenance for Casters
Keeping your casters in top condition is simple.
- Clean Wheels Regularly: Dust, dirt, hair, and debris can accumulate around the caster wheels. This build-up prevents smooth movement and can scratch floors. Periodically turn your table over or tilt it. Clean the wheels and their housing. You can use a damp cloth or a small brush. For more stubborn debris, a pair of pliers or scissors can help remove tangled hair. If you have chair wheels to clean this process will be familiar.
- Check for Loose Fasteners: Over time, screws or bolts can loosen due to movement and vibration. Routinely check all fasteners securing the caster plates or sockets. Tighten them as needed with a screwdriver or wrench. This prevents wobbling and ensures the casters remain firmly attached.
- Lubricate Moving Parts: Some casters, especially those with metal axles or swiveling mechanisms, benefit from lubrication. Apply a small amount of silicone spray or light machine oil to the axle and swivel points. This reduces friction and ensures quiet, smooth operation. Wipe away any excess lubricant.
- Inspect for Wear and Tear: Look for signs of damage. Check for cracked wheels, bent axles, or excessive play in the swivel mechanism. Damaged casters should be replaced promptly. Continuing to use broken casters can damage your floors or make the table unstable.
Essential Safety Tips for Wheeled Tables
Safety is paramount when using a table with wheels.
- Use Locking Casters: If your table will be used in a fixed position most of the time, or if it will hold heavy or delicate items, locking casters are essential. Engage the locks when the table is stationary. This prevents accidental movement. It adds stability for tasks like cutting or writing. Always ensure all locks are engaged before use.
- Avoid Overloading: Do not exceed the weight capacity of your casters. Overloading can damage the casters, make the table unstable, or cause it to tip. Distribute weight evenly across the table surface.
- Roll on Level Surfaces: For best stability and to prevent tipping, roll your table on level ground. Uneven surfaces can cause one or more casters to lift, making the table unstable. Take extra care when moving it over thresholds or uneven flooring.
- Push, Don’t Pull (if possible): When moving the table, push it from behind rather than pulling it. This gives you better control and reduces the risk of the table rolling over your feet.
- Be Mindful of Surroundings: Always be aware of people, pets, and obstacles when moving the table. Clear the path before you start rolling. Avoid sudden, jerky movements.
- Regular Stability Checks: Periodically, check the overall stability of the table. Ensure the legs are secure and the casters are functioning properly. A well-maintained wheeled table offers great convenience. It also contributes to a safer home environment.
Advanced Tips and Customizations for Your Wheeled Table
Once you master the basic installation of wheels, you might consider advanced options. These customizations can further enhance your table’s functionality. They also allow for specific design needs. Thinking beyond standard installations opens up new possibilities. You can make your wheeled table truly unique and perfectly suited to your space.
These tips address specific challenges or desires. They allow you to tailor your table’s mobility to your exact requirements. From hidden wheels to specialized leg attachments, customization offers greater control over your furniture.
Integrating Wheels into Table Design
Sometimes, you want the mobility without the casters being visible.
- Recessed Casters: For a cleaner look, you can recess the casters into the table legs or base. This involves routing out a pocket for the plate caster or a deeper hole for a stem caster socket. The wheels themselves will be the only visible part below the table. This technique gives the table a “floating” appearance while maintaining mobility.
- Caster Blocks/Bases: For tables with thin legs or an irregular base, you can build a separate block or base. Attach this block to the bottom of the table. Then, attach the casters to this new, more substantial base. This provides a stable mounting surface. It also distributes the weight more effectively. This is particularly useful for delicate or antique tables.
- Integrated Leg Extensions: If your table legs are too short or not suitable for direct caster attachment, consider adding leg extensions. These extensions can be designed with internal channels for stem casters or flat surfaces for plate casters. This allows you to achieve the desired height and mobility.
Addressing Specific Table Types and Materials
Different tables and materials require unique approaches.
- Metal Tables: For metal tables, you might need to use metal-specific drill bits and self-tapping screws. Alternatively, consider casters designed with a threaded stem that can bolt through pre-drilled holes in the metal frame. Welding caster plates directly to a metal frame is also an option for robust, permanent attachment.
- Hollow Legs: Some furniture has hollow legs. For these, plate casters that attach to the outer surface of the leg are usually the best choice. If you must use stem casters, look for those with expansion sleeves. These sleeves expand inside the hollow leg to create a secure fit.
- Antique or Delicate Furniture: For valuable or fragile pieces, minimize direct modification. Instead of drilling into the original legs, create a separate wooden dolly or platform. Attach the casters to this dolly. Then, place the antique table on top of the dolly. This preserves the original furniture while still providing mobility.
- Outdoor Tables: If you’re adding wheels to an outdoor table, choose casters made from rust-resistant materials like stainless steel or zinc-plated steel. The wheels themselves should be durable and resistant to UV rays and moisture. Consider larger, wider wheels for easier movement over uneven outdoor surfaces.
These advanced tips help you customize your table’s mobility. They ensure the best outcome for any specific table or design goal.
Common Questions About Adding Wheels to a Table
Can I add wheels to any table?
Generally, yes, you can add wheels to most tables. The main considerations are the table’s weight, its leg or base structure, and its material. Heavy tables need heavy-duty casters with high weight capacity. Tables with solid wood or metal legs are easiest to work with. Always ensure the attachment method is strong enough for the table’s load.
What kind of wheels should I use for a heavy table?
For heavy tables, use heavy-duty casters. Look for models with high weight ratings, robust construction (often metal or industrial-grade polyurethane wheels), and plate mounts. Larger wheel diameters also make it easier to roll heavy loads. Locking mechanisms are essential for safety to prevent accidental movement of heavy furniture.
How do I prevent the wheels from scratching my floor?
To prevent floor scratches, choose casters with soft wheel materials. Polyurethane or rubber wheels are best for hardwood, laminate, or tile floors. Avoid hard plastic or metal wheels on delicate surfaces. Also, regularly clean debris from the wheels, as small particles can get embedded and cause scratches.
Do I need to drill holes for all types of casters?
Most caster types require drilling. Plate casters need pilot holes for screws. Stem casters require a hole for the stem or a socket to be inserted. Self-adhesive or clamp-on casters exist but are generally for very light items and offer less stability. For strong, reliable attachment, drilling is almost always necessary.
How do I know the correct screw length for plate casters?
The correct screw length for plate casters should allow the screw to penetrate deeply enough into the table leg for a secure hold without going all the way through. A good rule of thumb is to choose screws that are at least 75% of the leg’s thickness, ensuring they are slightly shorter than the leg’s depth to avoid protrusion on the other side.
- table mobility
- furniture casters
- DIY furniture
- home organization
- caster installation

Todd Martin
Senior Writer
With over 15 years of experience in home renovation and design, I started HEG to share what I’ve learned with homeowners who want to create spaces that are both beautiful and functional. I’ve always believed in a hands-on approach, and over the years, I’ve picked up practical solutions that actually work. Through HEG, I aim to make home improvement more approachable, sharing real tips that help you create a home you truly love.