· Todd Martin · DIY Projects · 13 min read
How To Build An Armoire Closet
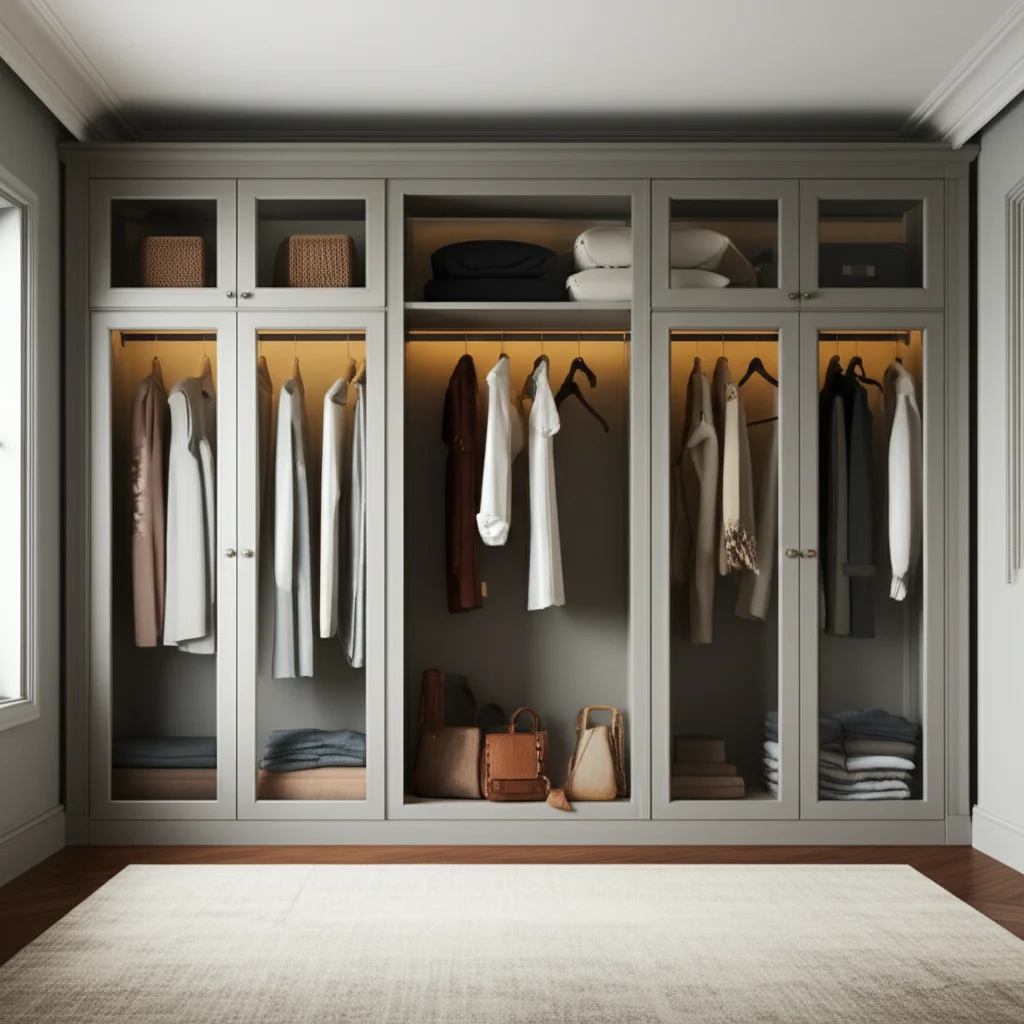
Build Your Own Armoire Closet: A DIY Guide
Imagine having a beautiful, functional storage piece that fits perfectly in your space. Building an armoire closet yourself makes this vision real. It offers custom storage where you need it most. You get to choose the style, size, and internal layout. A DIY armoire closet provides ample space for clothes, linens, or other household items. It adds a touch of custom furniture to any room.
This article guides you through the entire process. You will learn about planning your design. We cover gathering the right tools and materials. You will discover how to construct the main frame. Adding shelves, drawers, and doors is also part of this guide. Finally, we discuss how to give your new armoire a professional finish. By the end, you will feel ready to start your own armoire closet project.
Takeaway:
- Design your armoire closet to fit your space and needs.
- Gather all essential tools and materials before starting.
- Construct the main frame carefully for a sturdy build.
- Customize interior storage with shelves, drawers, and hanging rods.
- Apply a quality finish for a durable and attractive armoire.
Building an armoire closet involves measuring, cutting, and assembling wood panels to create a freestanding storage unit. You then add interior features like shelves and hanging rods, and attach doors and hardware, concluding with a chosen finish to match your home’s style.
Designing Your Custom Armoire Closet
Starting your armoire closet project begins with a good plan. Think about where your armoire will sit. Measure the height, width, and depth of that space. Consider what items you plan to store inside. Will it hold clothes, bedding, or office supplies? These decisions help you decide the armoire’s dimensions and internal layout.
You can sketch your design on paper or use a simple digital tool. Include details like the number of shelves, drawers, and hanging space. Decide if you want full-length doors or smaller top and bottom sections. This planning phase prevents mistakes later. It makes sure your finished armoire meets your needs. Creating a truly custom closet means thinking about every detail. You may even consider building a corner closet if your space requires it.
Choose the type of wood you want to use. Plywood is strong and stable. MDF (medium-density fiberboard) is smooth for painting. Solid wood offers beauty and durability but costs more. Each material has its own look and feel. Think about the overall style you want your armoire to have. Will it be modern, rustic, or traditional? Your choice of wood affects the final appearance.
Consider the armoire’s style to match your home décor. You can add decorative trim or unique hardware. Think about the color or finish. These choices make your armoire truly unique. A well-designed armoire closet adds value and function to any room. Take your time during this design phase. It sets the stage for a successful build.
Essential Tools and Materials for Building Your Armoire
Before you begin building your armoire closet, gather all necessary tools and materials. Having everything ready saves time and frustration. You will need basic woodworking tools. A circular saw or table saw is important for accurate cuts. A miter saw helps with crosscuts. A drill is essential for pre-drilling and fastening screws. Other hand tools like a tape measure, speed square, and level are also important. Safety gear, such as safety glasses and ear protection, is a must.
For materials, you will need lumber or sheet goods. Plywood, MDF, or solid wood boards are common choices. The thickness of the wood is important for stability. Generally, 3/4-inch thick material works well for the main frame. You also need various hardware components. Hinges for the doors, drawer slides if you include drawers, and handles or pulls are all part of the plan. Magnetic catches keep the doors shut.
Fasteners like wood screws or pocket hole screws will hold your armoire together. Wood glue provides strong, lasting bonds. Sandpaper in different grits prepares the surface for finishing. You might need wood filler for small gaps or imperfections. For the finish, choose paint, stain, or clear coat. Primer is useful if you plan to paint.
Planning your materials list carefully helps avoid multiple trips to the hardware store. It also ensures you have enough of everything. Remember to buy a little extra material for mistakes. You are creating your own closet cabinets from the ground up. This preparation step makes the building process much smoother. Having the right tools and materials ready ensures a safe and efficient project.
Constructing the Armoire Carcass
Building the armoire closet’s main frame, or carcass, is the first major step. This structure provides the strength and shape of your unit. Begin by cutting the large panels. You will need two side panels, a top panel, a bottom panel, and a back panel. Measure each piece precisely. Accuracy here prevents problems later on. Use a straight edge and clamps to guide your saw for clean cuts.
Once cut, prepare the pieces for assembly. You can use pocket hole joinery for a strong, hidden connection. Drill pocket holes along the edges where panels will meet. Another option is dado joints, which involve cutting grooves into one piece to accept another. This creates a very strong joint but requires a router or table saw with a dado blade. Regardless of the method, ensure your joints fit snugly. For cabinet construction, understanding how to build face frames for cabinets can also be helpful for front stability and appearance.
Assemble the bottom, top, and side panels first. Apply wood glue to the joints before securing them with screws. Use clamps to hold the pieces tightly together while the glue dries. Check for squareness often. A square frame prevents doors from hanging crooked later. An out-of-square frame is hard to fix once glue sets.
Next, attach the back panel. A thin sheet of plywood or hardboard works well for the back. This panel adds rigidity and helps keep the armoire square. Nail or screw the back panel directly to the edges of the side, top, and bottom pieces. Ensure it is flush with the back edges. This completes the basic carcass. You now have a solid box ready for interior components and doors.
Adding Interior Storage: Shelves, Drawers, and Hanging Rods
Now that the armoire closet carcass is complete, it is time to add the internal components. These features make your armoire functional for storage. You can add fixed shelves, adjustable shelves, drawers, or hanging rods. Think back to your design plan and what items you want to store.
For fixed shelves, cut pieces of wood to the correct size. Install shelf supports along the inside of the side panels. You can use wood cleats, metal brackets, or dado cuts. Place the shelves securely on these supports. For adjustable shelves, drill shelf pin holes along the inside walls before assembly. This lets you move shelves up or down as needed. Make sure the holes are evenly spaced and level. Building wood shelves in a closet is a simple process.
If you plan to include drawers, build the drawer boxes first. Use plywood for the sides, front, back, and bottom of each drawer. Assemble them using pocket screws or dado joints for strength. Then, install drawer slides on the armoire sides and the drawer boxes. Follow the manufacturer’s instructions for the slides. Proper installation ensures smooth operation. You might find ideas from building a pantry cabinet with doors useful for internal setup.
For hanging clothes, install a closet rod. Measure and cut the rod to fit the width of your armoire. Secure rod holders to the inside of the side panels at the desired height. Make sure the rod is sturdy enough to hold the weight of clothes. You can use a single rod or multiple rods at different heights. This interior customization makes your armoire truly your own.
Installing Doors and Hardware on Your Armoire
Adding doors transforms your open armoire closet carcass into a complete storage unit. The type of door you choose impacts the final look. Common options include overlay doors, which cover the entire front opening, or inset doors, which sit flush within the frame. Measure your door openings carefully. Cut your door panels from the same material as your armoire for a consistent look.
Hinges are essential for hanging the doors. European-style cabinet hinges are popular for their adjustability and hidden appearance. They require drilling specific holes in the door and frame. Traditional butt hinges are also an option. These attach to the edge of the door and the face frame. Follow the hinge manufacturer’s instructions for proper installation. Ensure the doors are level and have even gaps around them. This takes patience and small adjustments.
Once the doors are hung, attach handles or pulls. Place them at a comfortable height for opening. Drill pilot holes before screwing them in to prevent splitting the wood. For drawers, attach pulls to the drawer fronts. Magnetic catches can be installed inside the armoire to keep the doors securely closed. These small pieces of hardware make a big difference in how the armoire functions.
Proper door and hardware installation is crucial for your armoire’s usability. Take your time to get the alignment right. Well-hung doors add to the professional look of your DIY project. This step truly brings your armoire closet to life.
Finishing Your DIY Armoire Closet
Finishing your armoire closet adds protection and beauty. This step makes all your hard work shine. Start by sanding every surface. Begin with a medium-grit sandpaper, like 120-grit. This removes any rough spots and milling marks. Then, move to a finer grit, like 180 or 220-grit, for a smooth finish. Sand in the direction of the wood grain. Remove all dust with a tack cloth or vacuum before applying any finish.
If there are any small gaps or screw holes, fill them with wood filler. Let the filler dry completely. Then, sand these areas smooth. This creates a seamless appearance. If you plan to paint, apply a coat of primer. Primer helps the paint adhere better and provides a uniform base. Let the primer dry according to instructions.
Now, apply your chosen finish. If you are painting, apply thin, even coats. Sand lightly between coats for a super smooth finish. If you are staining, apply the stain evenly and wipe off excess according to the product’s directions. Staining brings out the natural beauty of the wood grain. After staining, apply a clear protective topcoat. Polyurethane, lacquer, or shellac are common choices. These coats protect the wood from moisture and wear.
Allow each coat to dry fully before applying the next. Follow the product’s recommended drying times. Once the final coat is dry, you can install any remaining hardware, like drawer pulls or decorative trim. Your armoire closet is now ready for use. You have built a functional and beautiful piece of furniture.
Expert Tips for a Successful Armoire Build
Building an armoire closet is a rewarding project. Here are some expert tips to help ensure your success. First, measure everything twice, and cut once. This old saying holds true in woodworking. Small errors in measurement can lead to big problems later. Always double-check your numbers before making a cut.
Patience is a great virtue in any DIY project. Do not rush through any step. Take breaks when you feel frustrated. It is better to take more time and do it right than to hurry and make mistakes. Dry-fitting your pieces before applying glue or fasteners is also important. This lets you check how parts fit together. You can make adjustments before permanent assembly.
Always prioritize safety. Wear safety glasses to protect your eyes from flying debris. Use hearing protection when operating loud tools. If you are using power tools, understand how they work. Keep your work area clean and clear of clutter. A tidy space reduces the risk of accidents.
Do not be afraid to ask for help or seek advice. Watch online tutorials if you get stuck on a step. Visit your local hardware store. Their staff often offer helpful tips. Remember, every project is a learning experience. Embrace the process. Your DIY armoire closet will be a source of pride for years to come.
FAQ Section
What is the best wood for building an armoire closet?
The best wood depends on your budget and desired look. Plywood is a common choice. It is stable, strong, and less expensive than solid wood. MDF is good for painting because it has a smooth surface. Solid hardwoods like oak or maple offer beauty and durability. They are more costly. Softwoods like pine are affordable but can dent more easily.
How long does it take to build an armoire closet?
The time to build an armoire closet varies. It depends on your skill level and the armoire’s complexity. A simple design might take a weekend or two. A more elaborate armoire with drawers and intricate details could take several weeks. Planning and finishing steps also add to the total time. Dedicate consistent time for faster progress.
Can I build an armoire without advanced woodworking tools?
Yes, you can build an armoire with basic tools. A circular saw, drill, tape measure, and square are usually enough. These tools let you cut and assemble the main pieces. Advanced tools like a table saw or router make some steps easier or more precise. However, they are not strictly necessary for a successful build.
How do I make my armoire fit into a specific space?
To make an armoire fit a specific space, you must measure accurately. Measure the width, depth, and height of the area. Subtract a small amount (like 1/4 inch) from each measurement. This ensures a snug but not too tight fit. Build your armoire to these exact adjusted dimensions. Consider if the armoire needs to pass through doorways.
What are common mistakes to avoid when building an armoire?
Common mistakes include inaccurate measurements and rushing the process. Not checking for squareness during assembly can lead to crooked doors. Skipping sanding or proper finishing steps results in a less professional look. Using the wrong fasteners or inadequate glue can compromise stability. Always double-check your work and follow instructions carefully.
Conclusion
Building your own armoire closet is a truly rewarding DIY project. You gain custom storage that perfectly suits your home. We have covered every step, from initial design to the final finishing touches. You now know how to plan your layout, select materials, and construct the sturdy frame. You also understand how to add functional shelves and drawers. The process of installing doors and applying a beautiful finish is now clear.
This project allows you to create something unique and functional. It enhances your living space. Remember the importance of careful measurements and patience. Embrace the learning experience that comes with any DIY endeavor. By following these steps, you can create an armoire closet you will be proud of. Why wait? Start planning your custom armoire today and enjoy the satisfaction of building it yourself!
- armoire closet
- DIY closet
- custom storage
- woodworking
- home organization

Todd Martin
Senior Writer
With over 15 years of experience in home renovation and design, I started HEG to share what I’ve learned with homeowners who want to create spaces that are both beautiful and functional. I’ve always believed in a hands-on approach, and over the years, I’ve picked up practical solutions that actually work. Through HEG, I aim to make home improvement more approachable, sharing real tips that help you create a home you truly love.