· Todd Martin · HVAC Maintenance · 19 min read
How To Clean Evaporator Coil
Clean Your Evaporator Coil: A Complete DIY Guide
Imagine your home staying perfectly cool without sky-high energy bills. This dream is achievable. The key often lies in a small, yet mighty, component of your air conditioning system: the evaporator coil. I understand many homeowners might overlook this part, but keeping it clean is vital for comfort and savings. A dirty coil reduces your AC’s ability to cool, costing you more money.
In this guide, I will show you how to clean evaporator coil thoroughly and safely. We will explore why these coils get dirty and the problems a dirty coil causes. You will learn the exact tools needed and a step-by-step cleaning process. I will also cover how to handle mold and common mistakes to avoid. By the end, you will feel confident performing this important maintenance task yourself. Get ready to enjoy a more efficient and comfortable home.
Takeaway
- Turn off power to your AC unit before any cleaning begins.
- Remove debris from the coil surface using a soft brush or vacuum.
- Apply a specialized, no-rinse coil cleaner for best results.
- Allow the cleaner to work and drain away naturally.
- Clean the condensate drain line to prevent clogs and water damage.
- Regular maintenance improves efficiency and air quality.
Clear and Concise Answer
To clean an evaporator coil, first turn off the AC power at the thermostat and breaker. Access the coil inside your indoor unit. Use a soft brush or compressed air to remove loose dirt and debris. Then, spray a specialized, no-rinse coil cleaner evenly over the fins. Allow the cleaner to drip into the drain pan. Finally, clean the drain pan and line before restoring power.
Understanding Your Evaporator Coil and Its Role
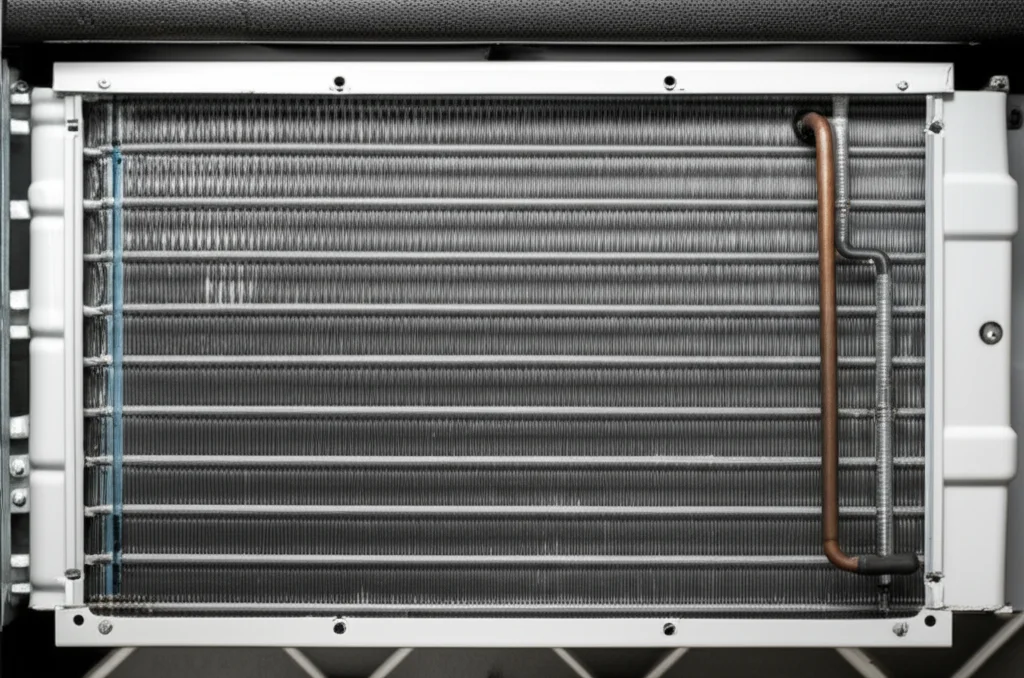
Your air conditioning system works hard to keep your home cool. The evaporator coil is a crucial part of this system. It is located inside your home’s indoor AC unit or furnace. This coil looks like a series of metal fins, often made of copper or aluminum. Refrigerant flows through these fins.
The evaporator coil absorbs heat and humidity from your indoor air. Warm air passes over the coil. The cold refrigerant inside the coil takes the heat from the air. This process also causes moisture to condense on the coil surface. This moisture then drips into a drain pan.
Over time, dust, dirt, and pet dander accumulate on the coil. This buildup happens because air constantly flows over it. Dirt acts as an insulator. This insulation prevents the coil from properly absorbing heat. A dirty evaporator coil cannot cool your home effectively. This makes your AC unit work harder. It uses more energy and increases your electricity bills. Cleaning the coil is essential for efficient operation.
Why a Dirty Evaporator Coil is a Problem
A clean evaporator coil is vital for a healthy home and efficient AC. When the coil becomes dirty, several problems arise. These issues affect your comfort, your wallet, and your health. Understanding these problems helps you appreciate the need for regular cleaning.
First, efficiency drops significantly. Dirt acts as a barrier on the coil’s surface. This barrier prevents proper heat exchange. Your AC unit must run longer to reach the desired temperature. This extended operation consumes more electricity. You will notice higher utility bills each month. The unit also experiences more wear and tear.
Second, indoor air quality suffers. Dust, mold, and other allergens collect on dirty coils. As air passes over these coils, it picks up these particles. This means your AC unit is circulating contaminated air throughout your home. This can trigger allergies or respiratory issues. Mold growth on the coils is especially concerning. Mold spores spread through the air.
Third, system performance decreases. Your home might not feel as cool as it used to. The airflow from your vents may weaken. This is because debris clogs the fins. The system struggles to maintain consistent temperatures. In severe cases, the coil can even freeze over. This happens when airflow is too restricted. A frozen coil prevents any cooling from occurring. This can lead to system breakdown. Recognizing these signs means it is time to inspect and clean your evaporator coil.
Gathering Your Tools and Safety First
Before you start cleaning your evaporator coil, gather all necessary tools. Having everything ready makes the job easier and faster. Safety is also my top priority. Never begin work without taking proper precautions.
Here is a list of tools you will need:
- Screwdrivers: For removing access panels (Phillips and flathead).
- Work Gloves: To protect your hands from dirt and cleaners.
- Safety Glasses: To shield your eyes from debris and sprays.
- Shop Vacuum with Hose Attachment: For removing loose dirt and dust.
- Soft Bristle Brush: A gentle brush to clean coil fins without bending them.
- Fin Comb: A specialized tool to straighten bent fins (optional, but helpful).
- No-Rinse Evaporator Coil Cleaner: Choose a non-toxic, biodegradable option. These cleaners typically foam up and then drip into the drain pan.
- Bleach (Optional): For cleaning the condensate drain pan and line.
- Wet/Dry Rags or Towels: For wiping surfaces and absorbing spills.
- Bucket or Tray: To catch water if the drain pan overflows during cleaning.
- Flashlight or Headlamp: To illuminate dark spaces inside the unit.
Now, for safety. Always follow these critical steps:
- Turn Off Power: This is the most crucial step. Go to your thermostat and switch your AC system to “Off.” Then, go to your home’s main electrical breaker box. Locate the breaker that controls your indoor AC unit or furnace. Flip it to the “Off” position. Some units also have a disconnect switch near the unit itself. Turn that off too. This prevents accidental startup during cleaning.
- Wear Protective Gear: Put on your work gloves and safety glasses. These protect your skin and eyes from dirt, dust, and cleaning chemicals.
- Work in a Well-Ventilated Area: If possible, open windows and doors. This helps dissipate any fumes from cleaning solutions.
- Be Gentle: Evaporator coil fins are delicate. Avoid harsh scrubbing or bending them. Bent fins restrict airflow.
By following these safety measures, you ensure a safe and effective cleaning process.
Step-by-Step Guide: How to Clean Your Evaporator Coil
Cleaning your evaporator coil might seem daunting, but it is a manageable DIY task. I will walk you through each step. Take your time and follow these instructions carefully. You will have a cleaner, more efficient AC unit in no time.
Step 1: Accessing the Evaporator Coil
The evaporator coil is inside your indoor air handler or furnace. Its location can vary slightly by model.
- Locate the Indoor Unit: This unit is usually in a utility closet, basement, attic, or garage.
- Turn Off Power (Again!): I cannot stress this enough. Double-check that the power is off at both the thermostat and the circuit breaker. Safety is paramount.
- Remove Access Panels: Most units have service panels secured with screws or latches. Use your screwdrivers to remove them. You might need to remove an upper and lower panel. Be careful with any wires or tubing inside. You might also want to how to clean under a refrigerator for tips on accessing appliance components.
- Locate the Coil: The evaporator coil is often a large, rectangular component. It will have refrigerant lines connecting to it. It might be covered in a layer of insulation or a housing.
Step 2: Initial Cleaning and Debris Removal
Once you have access, you can start removing the loose dirt.
- Vacuum Loose Debris: Use your shop vacuum with a brush attachment. Gently vacuum the surface of the coil. Remove any large clumps of dust, pet hair, or lint. Work slowly to avoid bending the delicate fins.
- Brush Away Stuck-On Dirt: For more stubborn dirt, use a soft bristle brush. Brush downwards along the direction of the fins. Do not brush against the fins, as this can bend them. This step prepares the coil for the chemical cleaner.
- Straighten Bent Fins (Optional): If you notice bent fins, use a fin comb. Carefully slide the fin comb into the bent areas. Gently work it back and forth to straighten the fins. Straight fins allow for better airflow and heat exchange.
Step 3: Applying the Coil Cleaner
This is where the specialized cleaner comes into play.
- Read Cleaner Instructions: Always follow the specific instructions on your chosen no-rinse evaporator coil cleaner. Products can vary slightly.
- Spray Evenly: Hold the cleaner can a few inches from the coil. Spray a generous, even coat over the entire surface of the fins. The cleaner will typically foam up. This foam penetrates the dirt and grime. Ensure you cover all visible areas of the coil.
- Allow Time to Work: Most no-rinse cleaners are designed to liquefy dirt and drain away. Let the cleaner sit for the recommended time, usually 10-20 minutes. The foam will dissolve the grime. It will then drip into the condensate drain pan below. You will see dirty liquid accumulating in the pan.
Step 4: Cleaning the Condensate Drain Pan and Line
The drain pan collects all the moisture and cleaner runoff. It is vital to clean it to prevent clogs and mold.
- Clean the Drain Pan: While the cleaner works on the coil, clean the drain pan. Remove any standing water and visible debris. You can use a wet rag to wipe it clean. If there is mold or mildew, you can use a diluted bleach solution (1 part bleach to 10 parts water) to scrub it. For general mold cleaning, you might find tips in how to clean mold in shower or how to clean mold with vinegar.
- Clear the Drain Line: The drain line is a PVC pipe connected to the drain pan. It carries water away from the unit. These lines can get clogged with algae or sludge. Locate the access port on the drain line, usually a T-shaped vent. Remove the cap.
- Flush the Drain Line: Pour a cup of distilled vinegar or a bleach/water solution into the drain line. This helps clear any clogs. Let it sit for 15-30 minutes. Then, flush with warm water. You might want to consider flushing your how to clean water filter for a similar cleaning concept. If the line is severely clogged, you might need a wet/dry vacuum to suction out the blockage from the outdoor end of the drain line.
Step 5: Reassembly and Power Restoration
Once cleaning is complete, it is time to put everything back together.
- Replace Panels: Carefully reattach all access panels. Make sure they are securely fastened with screws or latches.
- Restore Power: Go back to your circuit breaker box. Flip the breaker for your AC unit back to “On.” Then, go to your thermostat. Switch your system back to “Cool” mode.
- Test the System: Turn your AC on and set the temperature lower than your current room temperature. Listen for any unusual noises. Feel the air coming from your vents. It should feel cooler and stronger. You will likely notice an immediate improvement in cooling performance.
By following these steps, you successfully clean your evaporator coil. This simple maintenance task greatly benefits your AC system.
Dealing with Specific Evaporator Coil Issues: Mold and Odors
Sometimes, cleaning your evaporator coil involves more than just dust removal. Mold growth and persistent odors are common issues. These problems require specific attention to ensure your AC system is truly clean and healthy.
Identifying and Removing Mold
Mold on evaporator coils is a serious concern. It thrives in damp, dark environments. The coil, with its constant condensation, is an ideal breeding ground.
- Visual Inspection: Look for fuzzy, black, green, or white patches on the coil fins and in the drain pan. You might also smell a musty odor.
- Specialized Mold Cleaners: If you find mold, standard coil cleaners might not be enough. Look for an evaporator coil cleaner specifically labeled as an “anti-microbial” or “mold killer.” These products contain agents designed to kill mold spores.
- Application: Apply the mold-specific cleaner liberally to all affected areas of the coil. Follow the product’s dwell time. This allows the cleaner to penetrate and kill the mold.
- Drainage: The cleaner, along with dead mold spores, will drain into the condensate pan. Ensure the drain pan and line are thoroughly cleaned afterward. As an example of tackling mold in other areas, consider how you might how to clean mold from grout in your bathroom.
- Personal Protection: When dealing with mold, wear an N95 respirator mask in addition to gloves and safety glasses. This prevents inhaling mold spores.
Eliminating Odors
Unpleasant odors from your AC unit often originate from the evaporator coil or drain pan.
- Musty Odor: This is the most common odor. It indicates mold or mildew growth. Cleaning the coil and thoroughly flushing the condensate drain line usually resolves this. The source is often stagnant water or mold in the drain pan.
- Chemical Smell: If you notice a lingering chemical smell after cleaning, ensure good ventilation. This smell should dissipate quickly. If it persists, ensure your cleaner is completely drained and no residue remains.
- Dead Animal Smell: Rarely, a small animal might crawl into the air handler and die. This causes a very strong, unpleasant odor. You will need to locate and remove the source. Then, thoroughly clean and sanitize the area.
- Ongoing Odor Control: After cleaning, consider adding condensate pan tablets. These small tablets slowly dissolve and release algaecides. They prevent future mold and algae growth in the drain pan. This keeps your drain line clear and prevents odors.
Addressing mold and odors directly improves both air quality and system health. Regular checks during your routine how to clean dishwasher with vinegar or other appliance cleaning tasks can extend to your HVAC system.
Maintaining Your Evaporator Coil: Prevention is Key
Cleaning your evaporator coil is a significant step. However, regular maintenance prevents future problems. Consistent care extends the life of your AC unit. It also ensures ongoing energy efficiency. I find that prevention is always easier than a deep clean.
Regular Air Filter Replacement
This is the simplest and most effective preventative measure. The air filter catches dust, dirt, and allergens before they reach the evaporator coil.
- Check Monthly: I recommend checking your air filter once a month. Hold it up to a light. If you cannot see light through it, it is time to change it.
- Replace Every 1-3 Months: Depending on your home’s conditions (pets, allergies, construction), replace your filter every one to three months. A dirty filter restricts airflow. This forces your AC to work harder and allows more debris to bypass the filter.
- Use High-Quality Filters: Invest in good quality filters (MERV 8-11). These capture smaller particles. Make sure the filter size matches your unit exactly.
Clear the Area Around the Indoor Unit
Ensure good airflow around your air handler.
- Keep Clearances: Do not store items directly against or on top of your indoor AC unit. Allow sufficient space for proper ventilation.
- Maintain Cleanliness: Keep the area around the unit free from dust and debris. This reduces the amount of particulate matter that gets drawn into the return air vents.
Schedule Professional HVAC Tune-Ups
While DIY cleaning is helpful, professional maintenance offers deeper benefits.
- Annual Check-Ups: I suggest scheduling a professional HVAC tune-up once a year. This is ideally done in the spring before the cooling season begins.
- Comprehensive Inspection: Technicians perform thorough inspections. They check refrigerant levels, electrical connections, and fan motors. They also use specialized tools to clean coils more deeply. They can also address issues you might miss.
- Early Problem Detection: Professionals can spot small problems before they become major breakdowns. This proactive approach saves you money in the long run.
Consider a UV Light System
For homes with persistent mold or air quality issues, a UV light system can be beneficial.
- Mold Prevention: UV lights are installed inside the air handler near the evaporator coil. They kill mold spores and other microorganisms as air passes over them. This prevents growth on the coil and in the drain pan.
- Improved Air Quality: UV light systems reduce airborne pathogens. This leads to healthier indoor air.
By combining DIY cleaning with these preventative measures, you keep your evaporator coil in top condition. This ensures your AC runs efficiently and provides clean, cool air for years to come. Remember, proper care of your AC system is similar to routine how to clean stainless steel appliances; consistent effort yields lasting benefits.
Common Mistakes to Avoid When Cleaning Evaporator Coils
Cleaning your evaporator coil is a valuable DIY project. However, certain mistakes can cause more harm than good. I want you to be successful and safe. Pay close attention to these common pitfalls. Avoiding them will protect your AC unit and ensure a better cleaning outcome.
1. Forgetting to Turn Off Power
This is the most critical mistake. It leads to serious injury or damage to your system.
- Always Disconnect: Before touching anything inside the unit, always turn off the power at the thermostat AND the circuit breaker. Some units also have an external disconnect switch. Turn all of them off.
- Verify Power Off: Do not rely on just the thermostat. A tripped breaker or accidental switch can send power to the unit. Check the breaker box.
2. Using the Wrong Cleaner
Not all cleaners are suitable for evaporator coils.
- Use “No-Rinse” Coil Cleaner: I highly recommend using a specialized “no-rinse” evaporator coil cleaner. These are designed to be safe for the coil materials. They also do not require you to flush them with water, which can be messy and hard to do inside the unit.
- Avoid Harsh Chemicals: Do not use household cleaners like oven cleaner, strong degreasers, or abrasive chemicals. These can corrode the delicate coil fins or damage other components. Always read the cleaner’s label carefully.
3. Bending or Damaging the Fins
The fins are very thin and easily bent.
- Gentle Brushing/Vacuuming: When cleaning, use a soft brush or gentle vacuum attachment. Always brush or vacuum in the direction of the fins. Never brush across them.
- Use a Fin Comb: If you notice bent fins, use a specialized fin comb. This tool helps straighten them without causing further damage. Bent fins restrict airflow. This reduces efficiency.
4. Not Cleaning the Condensate Drain Line
A clean coil is useless if the water has nowhere to go.
- Clear the Drain: The condensate drain line can clog with algae and sludge. This causes water to back up and overflow from the drain pan. This can lead to water damage and mold growth.
- Flush Regularly: Always flush the drain line with a bleach/water solution or vinegar after cleaning the coil. This prevents clogs. Think of it like cleaning the filter in your dishwasher; it’s a small task with big benefits. For more ideas on using vinegar for cleaning, check out how you can how to clean bathroom with vinegar.
5. Rushing the Process
Cleaning an evaporator coil requires patience.
- Take Your Time: Do not rush through the steps. Hasty work increases the risk of mistakes, damage, or an incomplete clean.
- Allow Cleaner to Work: Give the coil cleaner enough time to fully penetrate and dissolve the dirt. Rinsing too early (if your cleaner requires it, though most are no-rinse) will not be effective.
6. Ignoring the Evaporator Coil Too Long
Infrequent cleaning leads to severe buildup.
- Regular Schedule: I suggest cleaning your evaporator coil at least once a year. If you have pets, allergies, or live in a dusty area, clean it twice a year.
- Signs of a Dirty Coil: Pay attention to signs like reduced cooling, increased energy bills, or a musty odor. These indicate your coil needs attention sooner.
By being mindful of these common mistakes, you can perform an effective and safe evaporator coil cleaning. This ensures your AC unit operates at its best.
FAQ Section
How often should I clean my evaporator coil?
I generally recommend cleaning your evaporator coil at least once a year. This is ideal before the cooling season begins. If your home has pets, or if you or family members have allergies, cleaning it twice a year might be more beneficial. Regular cleaning prevents significant dirt buildup.
Can I use water to clean evaporator coils?
Most modern evaporator coil cleaners are “no-rinse,” meaning they do not require water flushing. Using water can be messy and potentially damage electrical components if not done carefully. If your cleaner requires rinsing, ensure all power is off and protect nearby electronics.
What happens if I don’t clean my evaporator coil?
If you neglect to clean your evaporator coil, several issues will arise. Your AC system will lose efficiency, leading to higher energy bills. Airflow will decrease, and your home will not cool effectively. Additionally, mold and mildew can grow, causing poor indoor air quality and potential health issues.
Is it safe to clean the evaporator coil myself?
Yes, cleaning the evaporator coil yourself is safe, provided you follow proper safety precautions. The most critical step is to turn off all power to the unit before you start. Wear protective gear like gloves and safety glasses. If you are unsure or uncomfortable, call a professional.
How can I tell if my evaporator coil is dirty?
There are several signs indicating a dirty evaporator coil. You might notice your AC unit is not cooling as effectively as before. Your energy bills may be unusually high. A musty smell coming from your vents can also indicate mold growth on the coil. Visual inspection will show a layer of dust or grime on the fins.
What type of cleaner is best for evaporator coils?
The best cleaner for evaporator coils is a specialized, “no-rinse” foam or spray cleaner. These products are designed to penetrate and dissolve dirt and grime without needing a water rinse. Look for biodegradable, non-toxic options that are safe for your coil materials.
Conclusion
I hope this guide empowers you to tackle the essential task of cleaning your evaporator coil. You have learned that this small part plays a huge role in your home’s comfort and energy efficiency. We covered why a dirty coil creates problems, what tools you need, and a clear, step-by-step process to get it sparkling clean. We also addressed specific challenges like mold and discussed vital preventative measures.
Regular maintenance of your evaporator coil leads to many benefits. You will enjoy lower energy bills and consistent, powerful cooling. Your home’s indoor air quality will improve significantly, creating a healthier living environment. Furthermore, consistent care extends the life of your entire AC system, saving you from costly repairs down the line. Take control of your home’s cooling system today. By dedicating a little time to clean evaporator coil, you invest in your comfort and your home’s longevity. Make this a part of your annual home maintenance routine. Your AC system, and your wallet, will thank you.
- clean evaporator coil
- AC coil cleaning
- HVAC maintenance
- home cooling efficiency
- DIY cleaning

Todd Martin
Senior Writer
With over 15 years of experience in home renovation and design, I started HEG to share what I’ve learned with homeowners who want to create spaces that are both beautiful and functional. I’ve always believed in a hands-on approach, and over the years, I’ve picked up practical solutions that actually work. Through HEG, I aim to make home improvement more approachable, sharing real tips that help you create a home you truly love.