
· Todd Martin · Smart Home Maintenance · 22 min read
How To Clean Roborock Sensor
Optimize Roborock Performance: Clean Your Sensors
Owning a Roborock robot vacuum brings ease to home cleaning. These smart devices use sensors to move around your home, avoid obstacles, and clean well. Over time, dust, dirt, and pet hair can cover these sensors. This stops your vacuum from working correctly. It might miss spots, get stuck, or show error messages.
Learning how to clean Roborock sensor parts is important. Regular sensor care helps your vacuum run smoothly. It ensures your device continues to map your home accurately and clean effectively. This article will walk you through finding and cleaning each type of sensor. I will also share tips to keep your Roborock in top shape, making sure it delivers a clean home for a long time.
Takeaway
- Regularly clean all Roborock sensors to keep performance high.
- Use dry, soft cloths or cotton swabs for most sensor types.
- Avoid liquid cleaners directly on sensors.
- Address specific sensor types like LDS, cliff, and bumper sensors.
- Preventative care extends your vacuum’s life and efficiency.
To clean Roborock sensors, gently wipe them with a dry, soft cloth or cotton swab. Focus on the LDS, cliff, bumper, and wall sensors. Remove any dust, dirt, or debris that blocks their view. Do this regularly to ensure your robot vacuum navigates and cleans correctly, preventing errors and improving efficiency.
The Role of Roborock Sensors: Essential for Smart Cleaning
Roborock robot vacuums rely on many sensors to do their job. These sensors are like the vacuum’s eyes and ears. They help it understand its surroundings and clean your home efficiently. Without working sensors, your Roborock cannot navigate properly. It might bump into furniture or fall down stairs.
Different sensors do different jobs. The main LDS sensor creates a map of your home. Cliff sensors stop the vacuum from falling. Bumper sensors detect obstacles it hits. Dirty sensors cause problems. My own Roborock once kept getting stuck until I realized its wall sensor was covered in dust. A quick wipe solved everything.
Keeping these sensors clean means your Roborock can keep doing its best work. It ensures the device moves smoothly and cleans every part of your floor. This section looks at the specific types of sensors on your Roborock. It explains what each one does. Understanding this helps you know which sensors need attention.
Types of Roborock Sensors
Your Roborock has many sensors, each with a key function. Knowing where they are helps you clean them properly.
- LDS (Laser Distance Sensor): This sensor is on top of your Roborock. It spins quickly and sends out laser beams. The laser measures distance to objects. This creates a detailed map of your home. A dirty LDS sensor can lead to mapping errors or poor navigation. My vacuum once drew lines through walls on the app map because its LDS sensor was unclear.
- Cliff Sensors: These are small sensors found on the bottom of the vacuum. They detect drops, like stairs. This stops the robot from falling. If these sensors get dirty, your Roborock might stop at edges, or worse, try to clean over a drop-off.
- Bumper Sensors: These sensors are behind the front bumper. When the vacuum gently bumps into an object, these sensors feel the contact. They tell the robot to change direction. Dirt or debris stuck under the bumper can make these sensors always active, making the robot think it is stuck.
- Wall Sensors: Found on the side of the vacuum. These sensors help the robot follow walls closely without bumping them hard. They ensure a thorough clean along edges. A dirty wall sensor can make the robot move away from walls or bump them too often.
- Dust Bin Detection Sensor: This sensor checks if the dust bin is present and properly seated. If it gets dirty, your vacuum might not start cleaning, thinking the bin is missing.
- Charging Contact Sensors: Located on the bottom of the robot and on the charging dock. These sensors ensure the robot aligns correctly for charging. Dirt here can prevent your Roborock from charging.
- Wheel Speed Sensors: These sensors monitor the speed of the wheels. They help the robot track its movement distance. While less prone to visible dirt, a buildup could affect their function.
Each sensor type plays a key role. Keeping them all clean maintains your Roborock’s ability to clean well. It ensures it continues to be a helpful part of your home.
Essential Tools for Roborock Sensor Cleaning
Before you start to clean Roborock sensor parts, gather the right tools. Using the correct tools makes the job easier and safer. It also prevents damage to the delicate sensor components. You do not need many special items. Most of what you need you likely already have at home.
I always keep a small kit ready for my robot vacuum maintenance. This kit includes the basic items listed below. Having them on hand means I can clean sensors as soon as I notice a performance issue. This saves time and keeps my vacuum running smoothly. Choose soft, non-abrasive materials to protect the sensor surfaces.
Recommended Cleaning Supplies
- Dry, Soft Microfiber Cloths: These cloths are very effective. They pick up dust and dirt without scratching surfaces. They are gentle enough for delicate sensor lenses.
- Cotton Swabs (Q-tips): Cotton swabs are perfect for reaching small areas. They can clean in between sensor parts and in tight spots.
- Soft Brush (e.g., old toothbrush or paintbrush): A soft brush helps remove loose dust and debris. It works well on the LDS sensor tower and around crevices. Make sure the bristles are truly soft to avoid scratches.
- Canned Air (optional, use with caution): Canned air can blow away dust from hard-to-reach areas. If you use it, hold the can upright to avoid spraying liquid propellant. Keep a safe distance from sensors. My friend once sprayed too close and left a residue mark on his.
- Rubbing Alcohol (Isopropyl Alcohol, 70% or higher) and Water Solution (optional): For stubborn grime, a very small amount of rubbing alcohol on a cotton swab or microfiber cloth is useful. Do not spray it directly onto the sensors. Alcohol dries quickly and leaves no residue. This is the only liquid I would suggest.
Important Safety Tips
Safety comes first when cleaning any electronic device. Your Roborock is no different. Follow these tips to prevent harm to yourself or your vacuum.
- Power Off and Unplug: Always turn off your Roborock before cleaning. Remove it from its charging dock. This prevents the robot from starting unexpectedly. It also protects you from electric shock. I always press the power button until it shuts down fully.
- No Direct Water or Harsh Chemicals: Never spray water or cleaning solutions directly onto the sensors. Liquids can damage the electronics inside. Harsh chemicals can corrode plastic parts or leave residues. Stick to dry cleaning methods as much as possible. If you must use liquid, apply a tiny bit to a cloth first.
- Gentle Touch: Sensors are delicate. Use only light pressure when wiping them. Pressing too hard can scratch lenses or push debris further into cracks. My rule is: if it feels like it takes force, I am doing it wrong.
- Check User Manual: Your specific Roborock model might have unique cleaning instructions. Always check the user manual for model-specific advice. It can give you tips on cleaning specific parts.
- Avoid Abrasive Materials: Do not use paper towels, rough cloths, or abrasive sponges. These can scratch the sensor surfaces. Scratches can reduce the sensor’s accuracy.
By gathering the right tools and following these safety guidelines, you can clean your Roborock sensors effectively. This ensures your vacuum operates at its peak performance. It also helps extend its lifespan. For more general advice on cleaning delicate sensors, you might find tips on how to clean a sensor on DSLR cameras useful, as they also involve precision cleaning for optical components.
General Steps to Clean All Roborock Sensors
Cleaning your Roborock sensors is a straightforward task. It follows a general pattern, no matter the specific sensor type. By doing these steps first, you address common dust and dirt buildup. This can often resolve minor navigation issues. I find it helpful to make this part of my regular vacuum maintenance routine. It saves me from bigger problems later on.
My routine starts with a quick visual check. Then, I move to the wiping phase. These initial steps are often enough to bring back full sensor function. It is surprising how much difference a simple wipe can make to the vacuum’s performance. Remember to be gentle.
Power Off Your Roborock
The first and most important step is to turn off your Roborock. Locate the power button. Press and hold it until the vacuum completely shuts down. If it is on the charging dock, remove it. This prevents the robot from starting accidentally during cleaning. It protects both you and the device.
Initial Dust Removal
Once powered off, do a general sweep for loose dust.
- Soft Brush: Use a soft brush (like a clean paintbrush or soft toothbrush). Gently brush away dust from all accessible sensor areas. This includes the LDS tower, around the bumper, and any visible sensor windows. This step removes larger particles that a cloth might just push around.
- Canned Air (Optional and Careful): If you have canned air, use it carefully. Hold the can upright. Spray short bursts from a distance. This helps dislodge dust from tiny crevices. Avoid spraying directly into openings or at a close range. Pressure can damage components.
Gentle Wiping Technique
After removing loose dust, it is time for the main cleaning step.
- Microfiber Cloth: Take a clean, dry microfiber cloth. Gently wipe all visible sensor surfaces. Pay attention to the clear plastic windows of the sensors. These are common spots for dust to settle.
- Cotton Swabs for Tight Spots: For smaller, harder-to-reach areas, use a cotton swab. Dip it slightly in water or a small amount of isopropyl alcohol if there is stubborn grime. Wring out any excess liquid. The swab should be damp, not wet. Carefully wipe the sensor. Immediately follow with a dry swab to remove any moisture.
Post-Cleaning Check
Once you finish cleaning, do a quick check. Look at all the sensors. Make sure they are clear of dust, streaks, or residue. Then, power on your Roborock. Observe its behavior during its next cleaning cycle. See if the issues you had are gone. Many times, these general steps are all you need. If you encounter issues with other smart devices, like problems cleaning an Apple Watch sensor, similar gentle wiping techniques often apply.
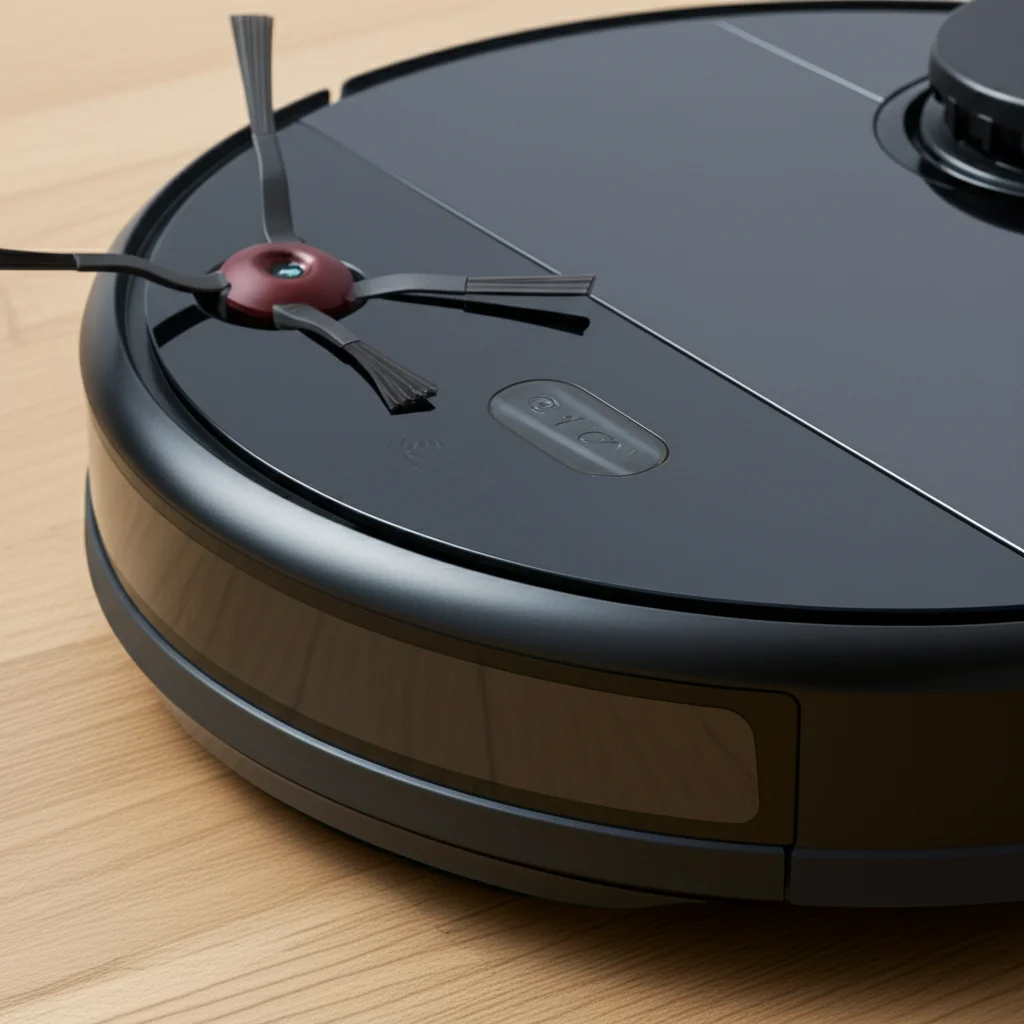
Cleaning the LDS (Laser Distance Sensor)
The LDS sensor is vital for your Roborock’s ability to map and navigate. It sits on top of the vacuum, usually in a raised turret. This sensor spins rapidly, emitting laser beams to measure distances. When this sensor is dirty, your Roborock can get lost. It might bump into things often or fail to create an accurate map of your home. I once found my Roborock drawing strange lines on the app’s map, which was a clear sign its LDS needed attention.
Cleaning the LDS sensor is simple but requires a gentle touch. This part spins, so be careful not to obstruct its movement or apply too much pressure. Regular cleaning of this sensor will keep your Roborock mapping correctly. It ensures your vacuum covers every area of your home effectively.
Locating the LDS Sensor
The LDS sensor is the most prominent sensor. It is the round, raised part on the top of your Roborock. This turret often has a clear or slightly tinted window. This window is where the laser light passes through. It can collect dust and fingerprints.
Steps to Clean the LDS Sensor
- Power Off Your Roborock: Always turn off the vacuum before cleaning. Hold the power button until the device shuts down. This stops the LDS turret from spinning and prevents accidental starts.
- Inspect the Turret: Look at the LDS turret. Check for any hair, dust, or debris wrapped around its base. Also, look for blockages on the clear window. My pet’s hair often gets caught around the base of mine.
- Clean the Turret Base: Use a soft brush or a dry microfiber cloth to gently remove any hair or large debris from around the spinning base of the LDS turret. Make sure nothing restricts its movement.
- Wipe the Sensor Window: Take a clean, dry microfiber cloth. Gently wipe the clear plastic window on the LDS turret. Use light, circular motions. The goal is to remove any smudges, dust, or fingerprints. Avoid pressing hard.
- Check for Obstructions: Rotate the LDS turret by hand if your model allows. Listen for any grinding sounds. Ensure it spins freely. Sometimes, debris can get under the turret, causing friction. If you find something stuck, try to gently dislodge it with tweezers if accessible, but do not force anything.
- Avoid Liquids: Do not spray any liquid directly on the LDS sensor window or into the turret. Liquids can seep inside and damage the sensitive electronics. A dry cloth is best for this sensor.
- Power On and Test: After cleaning, power on your Roborock. Place it in a clear area. Start a quick cleaning cycle. Observe its navigation. It should move smoothly and create an accurate map.
Proper care for your LDS sensor will ensure your Roborock remains a top-tier cleaning helper. It keeps the vacuum’s mapping precise and its navigation flawless. This means a cleaner home with fewer interruptions.
Cleaning Cliff and Bumper Sensors
Cliff and bumper sensors are crucial for your Roborock’s safety and obstacle avoidance. Cliff sensors, located on the underside of your vacuum, prevent it from falling down stairs or off ledges. Bumper sensors, found behind the front bumper, detect obstacles the vacuum touches. Dirty cliff sensors can cause your robot to stop suddenly or even attempt to drive off a drop. Blocked bumper sensors can make your Roborock constantly think it’s stuck or unable to move forward.
I have found these two types of sensors are often the first to show issues because they are so exposed to dirt and impacts. Regular checks and cleaning of these areas are simple. They are key to ensuring your Roborock navigates safely and without issues. Keeping them clear will save your vacuum from damage and keep it cleaning effectively.
Cleaning Cliff Sensors
Cliff sensors are small, usually black or clear windows on the bottom edge of your Roborock. There are typically several of them spread across the front and sides.
- Flip Your Roborock Over: Carefully turn your vacuum upside down. Place it on a soft surface to avoid scratching the top.
- Locate the Sensors: Identify the small, clear or black windows along the front and side edges of the bottom plate. These are your cliff sensors.
- Remove Dust and Debris: Use a dry microfiber cloth or a cotton swab. Gently wipe each cliff sensor window. Dust, pet hair, and even small bits of debris can cover these. Make sure the surface is perfectly clear.
- Check for Hair Wraps: Sometimes hair can wrap around the sensor housing or block the sensor window. Use tweezers or a small soft brush to gently remove any tangled hair.
- No Liquids: Like the LDS sensor, avoid spraying liquids directly onto cliff sensors. Any moisture can get inside and damage the components. A dry wipe is generally enough. If you have stubborn grime, a slightly damp (with water or isopropyl alcohol) cotton swab, followed by a dry one, is the maximum.
Cleaning Bumper Sensors
The bumper sensors are not directly visible. They are behind the movable front bumper of your Roborock. They work by detecting physical contact.
- Inspect the Bumper: Gently press on the front bumper of your Roborock. It should move in and out freely with a slight spring action.
- Remove Trapped Debris: If the bumper feels stiff or stuck, debris might be trapped. Turn the vacuum off. Use a soft brush, a dry cloth, or even canned air (carefully) to clear dust, dirt, or small objects from the gap between the bumper and the main body of the vacuum. This gap can accumulate a surprising amount of dust and pet hair.
- Check for Damage: While cleaning, look for any physical damage to the bumper or the springs. A bent bumper might need professional attention.
- Test Bumper Movement: Once cleaned, push the bumper several times to ensure it moves smoothly. Make sure it springs back to its original position without sticking.
By keeping your cliff and bumper sensors clean, your Roborock will navigate safely. It avoids falls and handles obstacles with ease. This extends the life of your vacuum and keeps your home tidy without worry. If you are cleaning other automotive sensors, like those in a car’s safety system, similar principles of clearing debris and checking for free movement apply, as seen with how to clean an FCW sensor.
Maintaining Wall and Dust Bin Sensors
Beyond the main navigation and safety sensors, your Roborock has other key components that require cleaning. These include the wall sensors and the dust bin detection sensor. While less dramatic than a faulty LDS or cliff sensor, issues with these can still impact your vacuum’s overall performance. A dirty wall sensor might cause your robot to miss spots along edges. A dirty dust bin sensor could prevent it from starting its cleaning job altogether.
I’ve learned that overlooking these smaller, less obvious sensors can lead to frustrating minor glitches. A quick wipe during regular maintenance prevents these headaches. They are just as important for a complete and hassle-free cleaning experience.
Cleaning Wall Sensors
Wall sensors are typically located on the side of your Roborock, near the front. They help the robot maintain a consistent distance from walls, allowing it to clean edges effectively without constant bumping.
- Locate Wall Sensors: Look at the sides of your Roborock. You will usually find one or two small, clear, or dark windows on each side. These are the wall sensors.
- Wipe Gently: Use a dry, soft microfiber cloth or a cotton swab. Gently wipe the surface of each wall sensor. These sensors are prone to collecting dust and streaks from contact with walls.
- Remove Streaks: If there are stubborn marks, slightly dampen your cloth or swab with a tiny amount of water or isopropyl alcohol. Wipe the sensor, then immediately dry it with a clean, dry part of the cloth. Do not allow any liquid to drip into the sensor housing.
- Check for Obstructions: Ensure no hair or debris is caught around the sensor opening. This can block its view.
Cleaning Dust Bin Detection Sensor
The dust bin detection sensor ensures the dustbin is correctly inserted before the vacuum starts cleaning. If this sensor is dirty or blocked, your Roborock might display an error saying the dustbin is missing, even when it is in place.
- Remove the Dust Bin: Pull out the dust bin from your Roborock. This will expose the area where the sensor is located.
- Locate the Sensor: The dust bin sensor can vary in location by model. It is usually a small optical sensor (a tiny light emitter and receiver) inside the vacuum’s body where the dust bin slides in. It might look like a small black or clear plastic piece. Sometimes, it is inside the bin’s slot itself. Refer to your Roborock manual if you cannot find it.
- Clean the Sensor Area: Use a dry cotton swab or a small, soft brush to clean the sensor. Remove any dust, lint, or debris that has accumulated. Pay attention to both the sensor on the vacuum and any corresponding area on the dust bin itself. Sometimes debris builds up on the bin’s edge, preventing proper contact.
- Clean Dust Bin Contacts (if applicable): Some models might have metal contacts that engage with the dust bin. Wipe these with a dry cloth too.
- Reinsert Dust Bin: Once clean, reinsert the dust bin firmly. Make sure it clicks into place. Power on your Roborock and test if the error message is gone.
By regularly maintaining these less-obvious sensors, you help your Roborock run without annoying interruptions. This ensures your vacuum always cleans efficiently and without false errors. Just like you would clean a moisture sensor on a common appliance to ensure it works, like learning how to clean a Bosch dryer moisture sensor, keeping these detection sensors clear is key to proper operation.
Troubleshooting Common Sensor Issues and Error Codes
Even with regular cleaning, your Roborock might sometimes act strangely. It might show an error code or exhibit odd behavior. This often points to a sensor problem. Knowing common sensor issues and how to interpret error codes helps you fix the problem faster. It also helps you decide if a simple cleaning is enough or if you need more help.
I have faced many Roborock issues myself. Most times, a thorough sensor cleaning solves it. But some problems need a bit more digging. This section covers what to look for. It also explains what common error codes mean for your sensors.
Common Sensor-Related Behaviors
- Getting Stuck Frequently: If your Roborock gets stuck in open spaces or bumps into furniture often, the LDS or bumper sensors might be dirty. It cannot see its surroundings clearly.
- Missing Spots or Poor Coverage: The robot might skip rooms or leave uncleaned areas. This often points to a dirty LDS sensor. It impacts the vacuum’s ability to map accurately.
- Falling Down Stairs or Over Ledges: This is a clear sign of dirty or faulty cliff sensors. Address this immediately to prevent damage to your robot.
- Not Charging: If your Roborock does not connect to the charging dock properly, the charging contact sensors could be dirty. Clean both the robot’s contacts and the dock’s contacts.
- Error Messages (e.g., “Error 1: Laser distance sensor is obstructed”): These messages directly point to a specific sensor issue.
Roborock Error Codes Related to Sensors
Roborock uses specific error codes to tell you what is wrong. These codes appear in the app or as voice prompts.
- Error 1 (Laser Distance Sensor blocked): This is very common. It means the LDS sensor is obstructed. Action: Clean the LDS turret window and ensure nothing is blocking its spin. Clear any hair or dust from around the base.
- Error 4 (Cliff sensor malfunction): Your cliff sensors are either dirty or faulty. The robot might think it is at an edge even on a flat surface. Action: Turn the robot over and thoroughly clean all cliff sensor windows on the bottom. If the error continues, there might be a deeper issue.
- Error 5 (Main brush stuck): While not a sensor issue directly, a stuck brush can sometimes lead to navigational problems if the robot struggles to move. It is worth checking.
- Error 6 (Side brush stuck): Similar to the main brush.
- Error 7 (Wheel stuck): Dirty wheel speed sensors, or general wheel blockages can lead to this. Clean around the wheels and test.
- Error 9 (Dustbin not installed): This means the dust bin detection sensor is likely dirty or blocked. Action: Remove the dust bin, clean the sensor inside the vacuum, and clean the dust bin itself. Reinstall it firmly.
- Error 10 (Main filter clogged): Again, not a sensor, but a common maintenance item that affects performance.
- Error 13 (Charging error): This could indicate dirty charging contacts on both the robot and the dock. Action: Clean the metal charging strips on both the robot’s bottom and the dock.
- Error 18 (Bumper stuck): This means the front bumper is not moving freely. Action: Clear any debris caught in the bumper gap. Gently push the bumper to ensure it springs back.
- Error 21 (Obstacle detected): The robot often senses an obstacle but cannot move past it. This often comes down to dirty bumper or wall sensors.
When Cleaning Doesn’t Help
If you have cleaned all relevant sensors and the error persists, consider these steps:
- Restart the Roborock: Turn it off completely, wait a minute, and turn it back on. This can sometimes clear temporary glitches.
- Factory Reset: As a last resort, you can perform a factory reset. Be aware this will erase your maps and settings. Check your manual for specific instructions.
- Contact Support: If all troubleshooting fails, the sensor might be faulty. Contact Roborock customer support. They can offer further diagnostics or arrange for repair.
By understanding these common issues and error codes, you can diagnose and fix many Roborock sensor problems yourself. This keeps your smart vacuum working well for longer.
Preventative Roborock Sensor Maintenance
Preventative maintenance is key to keeping your Roborock running perfectly. It is always better to prevent problems than to fix them. Regular, quick checks and cleaning of your sensors can save you a lot of time and frustration later. This approach also extends the life of your robot vacuum. I have found that a small amount of effort each week or two makes a big difference. It ensures my Roborock always performs at its best.
This goes beyond just cleaning when there is an error. It means making sensor care a part of your regular vacuum upkeep. By doing so, you can avoid most sensor-related performance issues. It also helps you identify potential problems before they become serious.
Establish a Cleaning Schedule
Consistency is vital for preventative care. Create a routine that fits your usage.
- Weekly Check-up:
- Quickly wipe the LDS sensor window with a dry microfiber cloth.
- Wipe down the cliff sensors on the bottom.
- Check the bumper for any trapped debris and ensure it moves freely.
- Empty and rinse the dustbin, and check the dust bin sensor area for dust.
- Monthly Deep Clean:
- Perform all weekly checks.
- Use cotton swabs to get into smaller crevices around all sensors.
- Check and clean charging contacts on both the robot and the dock.
- Inspect wheels and brushes for tangled hair, as this can indirectly affect sensor performance if the robot struggles to move.
Adjust this schedule based on how often you use your Roborock and if you have pets. Homes with pets or high foot traffic may need more frequent checks. My own home with two cats means I check sensors every few days!
- Roborock cleaning
- robot vacuum maintenance
- sensor care

Todd Martin
Senior Writer
With over 15 years of experience in home renovation and design, I started HEG to share what I’ve learned with homeowners who want to create spaces that are both beautiful and functional. I’ve always believed in a hands-on approach, and over the years, I’ve picked up practical solutions that actually work. Through HEG, I aim to make home improvement more approachable, sharing real tips that help you create a home you truly love.


