
· Todd Martin · Automotive Maintenance · 16 min read
How To Clean Serpentine Belt
Keep Your Car Running Smooth: How To Clean Serpentine Belt
Have you ever heard a high-pitched squeal coming from under your car’s hood? It often points to a worn or dirty serpentine belt. Learning how to clean serpentine belt components is a simple yet vital task. This action can prevent more serious issues. It also keeps your car running quietly and efficiently.
A well-maintained serpentine belt ensures power delivery to essential engine accessories. These include the alternator, power steering pump, and air conditioning compressor. Dirt, grease, and grime build up over time. This buildup makes the belt slip, causing noise and reducing its effectiveness. Neglecting this maintenance can lead to belt failure. This leaves you stranded. In this article, I will guide you through the process. We will cover identifying issues, gathering tools, and safely cleaning your serpentine belt. You will learn valuable steps to extend your belt’s life and improve your car’s performance.
Takeaway
- Diagnose Squealing: Understand belt noises indicate dirt or wear.
- Safety First: Disconnect the battery and let the engine cool.
- Choose Cleaner: Use specialized belt dressing or mild degreaser.
- Apply Correctly: Spray cleaner sparingly onto the belt while the engine is off.
- Inspect Thoroughly: Check for cracks, fraying, or missing ribs.
- Prevent Future Issues: Maintain cleanliness and check tension regularly.
Clear Answer to the Main Query
To effectively clean a serpentine belt, first ensure the engine is off and cool. Use a specialized serpentine belt cleaner or a mild degreaser, applying it sparingly to the belt’s ribbed side. Use a soft brush to scrub away dirt and grime. Then wipe the belt clean with a rag, allowing it to dry fully before restarting the engine.
Understanding Your Serpentine Belt
Your car’s serpentine belt is a crucial component. It wraps around multiple pulleys on the engine. This single belt powers many important parts. These parts include the alternator, water pump, and air conditioning compressor. Without it, these systems cannot function.
The belt’s surface can accumulate various contaminants. Road grime, oil, and coolant leaks are common culprits. These substances reduce the belt’s friction. This causes it to slip and squeal. Understanding the belt’s function helps you see why cleaning is important. A clean belt maintains proper tension and grip. This prevents those annoying noises and ensures all accessories work correctly. Regular checks are a smart part of vehicle care.
What is a Serpentine Belt?
A serpentine belt is a long, winding belt. It transfers power from the engine’s crankshaft. It drives multiple peripheral components. These components are essential for your car’s operation. Its design allows it to power several accessories at once. This replaces the need for multiple individual belts.
The belt has a ribbed side that grips the pulleys. The smooth side may contact flat idler pulleys. Each rib must sit correctly in its groove. If dirt fills these grooves, the belt cannot grip. This leads to slippage. Regular inspection helps find early signs of trouble. This prevents bigger problems later.
Common Issues Caused by a Dirty Belt
A dirty serpentine belt causes several noticeable problems. The most common sign is a loud squealing noise. This sound often occurs during cold starts or when turning the steering wheel. This noise indicates the belt is slipping. It loses traction against the pulleys.
Beyond noise, a dirty belt reduces efficiency. It cannot transfer power effectively. This may affect your power steering or air conditioning performance. Over time, excessive slipping causes the belt to wear out faster. It can also damage the pulleys themselves. Identifying these issues early saves you money and hassle. It helps you keep your vehicle running smoothly.
When and Why You Should Clean Your Serpentine Belt
Knowing when to clean your serpentine belt is just as important as knowing how. Regular maintenance prevents many common issues. I check my serpentine belt during routine oil changes. This simple habit keeps me ahead of potential problems. Pay attention to any unusual sounds from under the hood.
A squealing noise is the most common indicator. This sound often means the belt is slipping. It might be dirty or losing its grip. Other times, you might notice visible grime or oil buildup on the belt’s surface. These are clear signs it needs attention. Cleaning your serpentine belt saves you money. It extends the belt’s lifespan. It also ensures your car’s accessories work correctly.
Identifying a Dirty Serpentine Belt
Identifying a dirty serpentine belt is quite straightforward. The clearest sign is usually noise. A high-pitched squeal is very common. This noise often happens when you start the car. It can also occur when you accelerate or use accessories like the air conditioning. If you hear this, check the belt.
Visual inspection also helps. Look at the belt’s surface. Do you see grease, oil, or dirt buildup? Are the grooves filled with debris? If the belt appears grimy or slick, it is dirty. A clean belt looks relatively uniform in color. Its ribs should be clear and distinct.
Benefits of Cleaning Your Belt Regularly
Cleaning your serpentine belt offers several significant benefits. First, it eliminates the annoying squealing noise. This improves your driving experience. Second, it restores proper friction between the belt and pulleys. This ensures all engine accessories receive consistent power. My car feels more reliable after cleaning.
Regular cleaning also extends the belt’s lifespan. Dirt and grime can act as abrasives, accelerating wear. By removing these contaminants, you reduce friction damage. This delays the need for a costly replacement. It also helps you spot other issues early. These issues could be cracks or fraying.
Tools and Materials for Cleaning Your Serpentine Belt
Before you start, gather all necessary tools and materials. Having everything ready makes the process smoother. I always lay out my items first. This prevents interruptions during the cleaning task. You do not need many specialized tools.
Most items are common garage supplies. Safety gear is paramount. You will also need a specific cleaning agent for the belt itself. Do not use just any cleaner. The right materials protect your belt and your vehicle. They also ensure your own safety.
Essential Tools
You will need a few basic tools for this job.
- Gloves: Protect your hands from grime and chemicals. I always wear tough work gloves.
- Safety Glasses: Safeguard your eyes from splashes or debris.
- Flashlight: Provides better visibility in dark engine bays.
- Wrench or Ratchet Set: Potentially needed to release belt tension, depending on your vehicle model.
- Soft Brush or Old Toothbrush: For scrubbing away stubborn dirt.
- Clean Rags: For wiping the belt dry and clean.
- Car Jack and Jack Stands (Optional): If you need to access the belt from below, ensure proper support.
Recommended Cleaning Products
Choosing the right cleaning product is crucial for your serpentine belt.
- Serpentine Belt Dressing/Cleaner: This is the best option. These products are formulated specifically for rubber belts. They clean and condition the belt. They also help restore its grip.
- Mild Degreaser: If belt dressing is unavailable, a mild, non-petroleum-based degreaser can work. Choose one safe for rubber and plastics. Avoid harsh chemicals like brake cleaner. These can dry out and damage the belt material.
- Water (for rinsing): A small amount for rinsing after cleaning.
- Soap and Water Solution: For light dirt, a simple solution of mild dish soap and water can suffice. This is a gentle approach. When cleaning any greasy component, understanding how to tackle tough grease stains is valuable, as similar principles of breaking down oil apply. For especially stubborn grime, think about how you might approach cleaning oil from concrete; the goal is similar: to lift the contaminant without damaging the surface. If you ever have a situation where oil has splattered, knowing how to clean oil out of an oven can offer insights into effective degreasing methods applicable elsewhere.
Step-by-Step Guide to Cleaning Your Serpentine Belt
Cleaning your serpentine belt is a straightforward process. Take your time and follow each step carefully. Safety is my top priority when working on any vehicle. Remember, a cool engine is a safe engine.
This guide will walk you through preparation, cleaning, and final inspection. You will achieve a quiet, efficient belt. This improves your car’s overall performance. Always consult your car’s owner’s manual for specific instructions. Every car model is slightly different.
Step 1: Safety First and Engine Preparation
Before touching anything under the hood, prioritize safety.
- Park on a Level Surface: Ensure your car is on flat, stable ground. Engage the parking brake firmly.
- Turn Off the Engine and Let It Cool: Never work on a hot engine. Hot parts can cause severe burns. Wait at least 30 minutes to an hour for the engine to cool down completely.
- Disconnect the Battery: For an added layer of safety, disconnect the negative terminal of your car’s battery. This prevents accidental starting. It also avoids electrical shorts while you are working.
- Put on Safety Gear: Wear your safety glasses and gloves. This protects your eyes from any sprays and your hands from grease or chemicals.
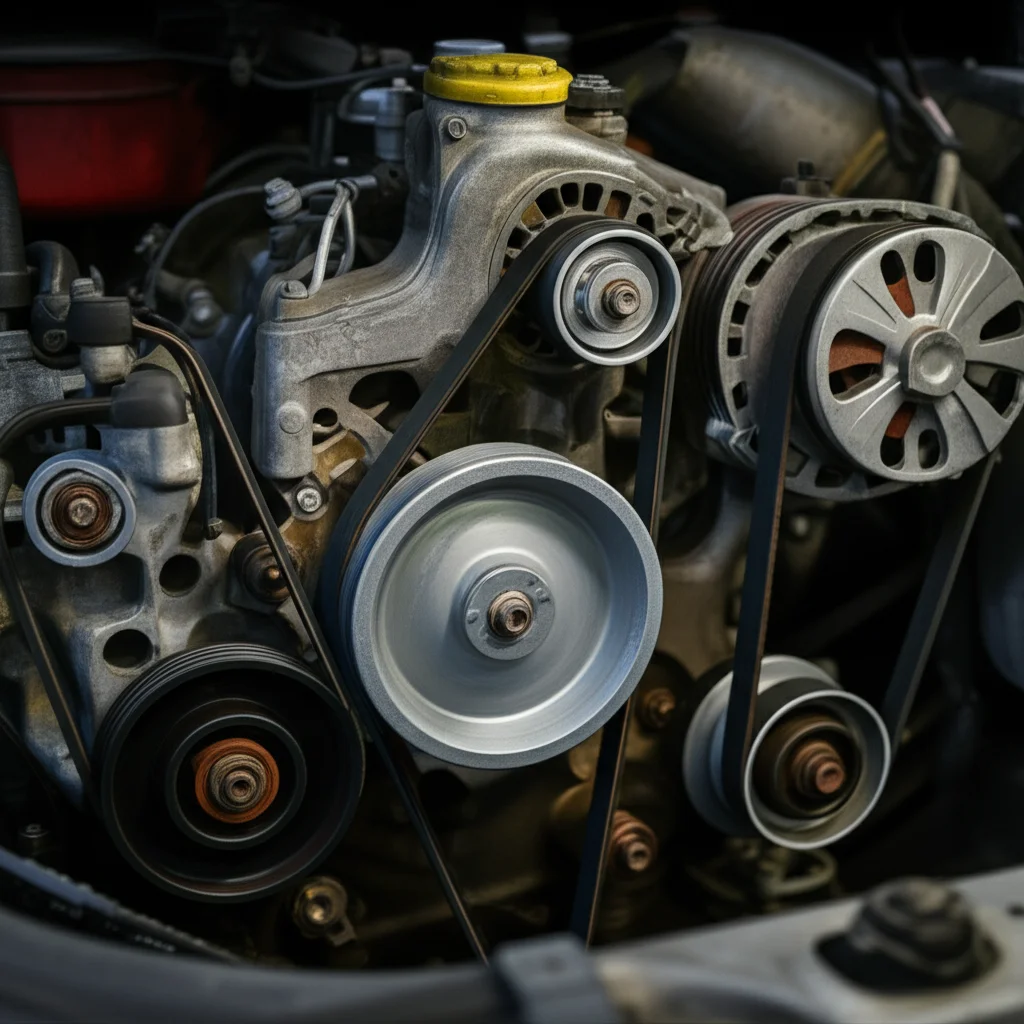
Step 2: Locating and Inspecting the Belt
Now, locate the serpentine belt and check its condition.
- Open the Hood: Prop it open securely.
- Locate the Serpentine Belt: It will be a prominent, long, ribbed belt winding around several pulleys at the front of the engine. Use your flashlight for better visibility.
- Inspect the Belt for Damage: Look for cracks, fraying, missing ribs, or signs of dry rot. While cleaning helps, a damaged belt needs replacement, not just cleaning. If you see deep cracks or missing chunks, replace the belt. A visual check should confirm whether it is dirty or damaged.
Step 3: Applying the Cleaner
With safety measures in place, it’s time to apply the cleaner.
- Choose Your Cleaner: Use a specialized serpentine belt cleaner. If unavailable, a mild degreaser or a simple soap and water solution works for light grime. Avoid harsh petroleum-based solvents.
- Apply Sparingly: Spray the cleaner directly onto the ribbed surface of the belt. Do not saturate it. A light, even coat is sufficient. You do not want excess liquid dripping onto other engine components.
- Allow to Sit (if recommended): Some cleaners suggest a short dwell time. Read the product instructions. This allows the cleaner to penetrate and loosen the dirt.
Step 4: Scrubbing and Wiping
This step removes the loosened grime.
- Use a Soft Brush: Take your soft brush or old toothbrush. Gently scrub along the length of the belt. Pay extra attention to the ribbed grooves where dirt accumulates.
- Work in Sections: It can be easier to clean one section at a time. Rotate the belt by hand if possible to access all areas. Do not force rotation if the belt is tightly tensioned.
- Wipe Clean: Use a clean rag to wipe off the cleaner and loosened dirt. Continue wiping until the belt appears clean. If using soap and water, wipe with a damp cloth, then a dry one. Removing grease from concrete often requires patience and repeated application, much like cleaning a heavily soiled belt. Just as a mechanic might use a specific solvent for engine parts, understanding how to clean various stains, like those found on industrial surfaces, can inform your approach to even minor automotive spills.
Step 5: Drying and Reassembly
The final steps ensure everything is ready for operation.
- Allow to Dry: Ensure the belt is completely dry before starting the engine. Air drying is usually sufficient. This prevents slippage from residual moisture.
- Reconnect Battery: Once the belt is dry, reconnect the negative battery terminal.
- Start the Engine: Start your car. Listen for any squealing noises. Observe if the belt runs smoothly. The squeal should be gone.
- Monitor Performance: Drive your car briefly. Pay attention to how the accessories perform. Ensure the power steering and AC work as expected. If the squealing returns, the belt might be worn out. It might also have tension issues, requiring further diagnosis or replacement.
Advanced Tips and Maintenance
Cleaning your serpentine belt is just one part of its overall care. There are additional steps you can take. These steps ensure your belt lasts as long as possible. I always combine cleaning with other checks. This proactive approach saves time and money.
Understanding the causes of belt problems helps you prevent them. Consider issues beyond simple dirt. Proper tension and alignment are also critical. Learn to identify when cleaning is not enough. Sometimes, replacement is the only solution.
Addressing Stubborn Stains and Residue
Sometimes, ordinary cleaning does not remove all stains. Heavy oil or grease can stubbornly cling to the belt. For these situations, you might need a more targeted approach. Be careful not to use anything too abrasive. This could damage the belt’s surface.
- Spot Treatment: Apply a small amount of concentrated degreaser directly to the tough spot. Let it sit for a moment. Then, scrub with your soft brush.
- Repeated Cleaning: You might need to repeat the cleaning process. Multiple light applications are better than one heavy one.
- Gentle Scrapers: For very thick, caked-on residue, you might gently scrape it off. Use a plastic scraper, not metal. Be extremely careful not to damage the belt material itself.
When Cleaning Isn’t Enough: Signs of a Worn Belt
Cleaning works for dirt and grime. It cannot fix a worn-out belt. Look for these signs that indicate a replacement is needed:
- Cracks: Any visible cracks on the belt’s ribbed or smooth side.
- Fraying: Loose threads or material on the belt’s edges.
- Glazing: A shiny, hardened appearance on the belt’s surface. This means the rubber has lost its elasticity and grip.
- Missing Ribs/Chunks: Parts of the belt’s ribs are torn off or missing.
- Excessive Squealing After Cleaning: If the squeal persists despite thorough cleaning, the belt is likely worn or has lost tension. In such cases, cleaning might not suffice, and exploring how to effectively clean oil from concrete or clean grease from an oven provides a comparative understanding of addressing deeply embedded substances that simply scrubbing won’t fix.
Checking Belt Tension
Proper belt tension is vital for its function. Both too loose and too tight are bad.
- Too Loose: Causes slippage, leading to squealing and poor accessory performance.
- Too Tight: Puts undue stress on pulleys and bearings, leading to premature component failure.
Your car’s manual specifies the correct tension. You can often check it using a belt tension gauge. If you lack this tool, a general rule is a slight deflection. With moderate thumb pressure, the belt should deflect about half an inch. If it feels too loose or too taut, adjust the tensioner. This is often done by a spring-loaded mechanism or a bolt. If you are unsure, have a professional check it.
Preventing Future Serpentine Belt Issues
Proactive steps can prevent future serpentine belt problems. You can extend its life and save on repairs. I find that prevention is always better than a cure. A little regular attention goes a long way. This ensures your car stays reliable.
Good maintenance habits are key. These habits protect your belt from premature wear. They also keep your engine bay cleaner. Preventing issues involves more than just cleaning. It includes checking other related components.
Regular Inspection Schedule
Regular inspections are your first line of defense. I make it a habit to check my serpentine belt every few months. This also applies during every oil change.
- Visual Check: Look for cracks, fraying, glazing, or any signs of wear.
- Listen for Noise: Pay attention to any squealing, chirping, or grinding sounds.
- Check for Leaks: Inspect the area around the belt for oil, coolant, or power steering fluid leaks. Leaks are a common cause of belt contamination. Address any leaks immediately. This prevents the belt from getting dirty again.
Maintaining a Clean Engine Bay
A clean engine bay helps keep your serpentine belt clean.
- Wipe Down Spills: If you spill oil or coolant during maintenance, clean it up promptly.
- Address Leaks Quickly: Fix any fluid leaks as soon as you discover them. Even small leaks can contaminate the belt over time. Understanding how to manage spills, such as how to effectively clean paint off a floor or any other surface, reinforces the principle of immediate cleanup to prevent long-term damage or stubborn stains on various materials, including your belt.
- Occasional Engine Bay Cleaning: Periodically clean your entire engine bay. Use appropriate engine cleaners and follow safety guidelines. A clean environment reduces the chances of dirt and grime accumulating on your belt.
Understanding Tensioner and Pulley Health
The serpentine belt works with tensioners and pulleys. Their condition directly impacts the belt’s performance.
- Tensioner: This component applies constant pressure to the belt. It keeps the belt taut. Listen for squeaking or rattling noises from the tensioner. This indicates a failing bearing.
- Pulleys: Each accessory (alternator, AC compressor) has a pulley. Spin each pulley by hand (with the engine off and belt removed if possible). Check for excessive play or rough rotation. A wobbly or noisy pulley needs replacement. These issues can cause belt misalignment or premature wear. Addressing them ensures your new or cleaned belt performs optimally.
FAQ Section
Q1: Can I use WD-40 to clean my serpentine belt?
No, do not use WD-40 on your serpentine belt. WD-40 is a penetrating oil and lubricant. It can make the belt slippery, causing it to lose grip and squeal more. It can also degrade the rubber material over time. Always use a dedicated serpentine belt cleaner or a mild degreaser.
Q2: How often should I clean my serpentine belt?
Clean your serpentine belt when you notice squealing noises or visible grime. As a proactive measure, inspect it during every oil change. A thorough cleaning might be needed every 30,000 to 50,000 miles. This depends on your driving conditions and environment.
Q3: What causes a serpentine belt to squeal after cleaning?
If a serpentine belt squeals after cleaning, it likely indicates deeper issues. The belt might be worn out, glazed, or cracked. It could also be a problem with the belt’s tensioner. A failing tensioner cannot maintain proper belt tension. Alternatively, a pulley bearing might be seizing.
Q4: Is cleaning a serpentine belt better than replacing it?
Cleaning is effective for addressing dirt and minor slippage. It can extend the belt’s life. However, cleaning cannot fix a physically damaged or severely worn belt. If the belt shows cracks, fraying, or glazing, replacement is the only safe and effective solution.
Q5: Can a dirty serpentine belt affect car performance?
Yes, a dirty serpentine belt can affect car performance. It causes slippage, which reduces power transfer to essential accessories. This can lead to weaker air conditioning, reduced power steering assistance, or even charging system issues if the alternator is affected. It also creates annoying squealing noises.
Conclusion
Learning how to clean serpentine belt components is a skill every car owner should consider. It is a simple maintenance task. Yet, it offers significant benefits. You will enjoy a quieter ride. Your engine accessories will work more efficiently. Most importantly, you will extend the life of your critical serpentine belt. Regular cleaning prevents frustrating breakdowns. It saves you money on premature replacements.
Remember to always prioritize safety when working on your vehicle. Gather your tools, prepare your engine, and follow the cleaning steps carefully. Inspect your belt regularly for signs of wear. Address any persistent squealing or damage promptly. Taking good care of your serpentine belt ensures a smooth and reliable driving experience. It also gives you peace of mind. Drive safely and keep your belt in top shape!
- serpentine belt cleaning
- car maintenance tips
- belt squeal repair
- engine belt care
- DIY car repair

Todd Martin
Senior Writer
With over 15 years of experience in home renovation and design, I started HEG to share what I’ve learned with homeowners who want to create spaces that are both beautiful and functional. I’ve always believed in a hands-on approach, and over the years, I’ve picked up practical solutions that actually work. Through HEG, I aim to make home improvement more approachable, sharing real tips that help you create a home you truly love.
