· Todd Martin · Home Improvement · 19 min read
How To Cover Range Hood Duct

How To Cover Range Hood Duct: Aesthetic & Functional Solutions
An exposed range hood duct can be an eyesore in any kitchen. I know how much effort goes into creating a beautiful kitchen space. When a big metal pipe is visible, it can really detract from the overall design. Many homeowners look for ways to hide this necessary but unsightly component.
Covering your range hood duct improves your kitchen’s appearance. It allows for a more polished and integrated look. You can make your kitchen feel complete. This article explores various methods to cover a range hood duct. We will discuss building custom structures, using existing cabinetry, and applying decorative finishes. By the end, you will have clear ideas to transform your kitchen.
Takeaway
- Improve Aesthetics: Transform an exposed duct into a seamless kitchen feature.
- Boost Home Value: A finished kitchen looks more appealing to potential buyers.
- Choose Your Method: Select from custom cabinetry, drywall enclosures, or decorative wraps.
- Ensure Safety: Maintain proper ventilation and adhere to local building codes.
- Plan for Maintenance: Create accessible points for cleaning and inspections.
To cover a range hood duct, homeowners can build a custom wooden enclosure, extend existing cabinetry around the duct, or construct a drywall box. Decorative materials like metal or plaster can also be used to create a stylish cover that blends with the kitchen’s design, ensuring both function and aesthetics are met.
Understanding Your Range Hood Ducting
Before you start any covering project, understanding your range hood duct is important. Range hoods pull smoke, grease, and odors from your cooking area. They send these unwanted elements outside through a duct system. This duct is often metal and runs from the hood through the ceiling or wall.
Ducts come in different shapes and sizes. You might have a round duct or a rectangular one. The size depends on your range hood’s power and design. Knowing the duct’s path and dimensions helps with planning. This knowledge ensures your cover fits properly and allows good airflow. Remember, proper ventilation is key for a healthy kitchen.
Duct Materials and Types
Most range hood ducts are made from galvanized steel or aluminum. These materials are durable and fire-resistant. They handle the hot, greasy air effectively. You might have rigid ducts or semi-rigid flexible ones. Rigid ducts are best for airflow efficiency. Flexible ducts are easier to install around obstacles.
Always aim for rigid ducts where possible. They create less air resistance. This means your range hood works better. Check local building codes for duct material requirements. Some areas have specific rules to ensure fire safety.
Why Cover the Duct?
The primary reason to cover your range hood duct is aesthetics. An exposed metal duct can look unfinished. It might not match your kitchen’s style. Covering the duct integrates it into your kitchen design. It creates a cleaner, more streamlined appearance.
Covering the duct also protects it. It shields the duct from accidental bumps. It also makes cleaning easier by hiding greasy surfaces. A covered duct can also help reduce noise slightly. It dampens some of the sound from air movement.
Building Custom Cabinetry for Seamless Integration
One of the most popular ways to cover a range hood duct is with custom cabinetry. This method offers a seamless look. It makes the range hood appear as a natural part of your kitchen’s upper cabinets. I love how integrated this looks. It gives a kitchen a high-end feel.
This approach involves extending existing cabinets or building new ones around the duct. The goal is to hide the duct completely. The cabinet housing often matches your kitchen’s existing cabinetry. This creates a cohesive and beautiful space.
Planning Your Cabinet Enclosure
Careful planning is essential for a cabinet enclosure. First, measure the duct’s exact dimensions. You need to know its height, width, and depth. Also, consider the space above your range hood. Your new cabinet must accommodate the duct path without obstructing it.
Think about how the cabinet will attach to the wall. It needs strong support. You might use wooden cleats or direct screwing into studs. Consider the style of your existing cabinets. You want the new cover to match perfectly.
Materials and Construction
You can build a custom cabinet enclosure from various materials. Plywood or MDF are common choices. They are easy to work with and paint. Match the finish to your current kitchen cabinets. You can paint it, stain it, or apply a veneer.
Start by building a frame around the duct. Then, attach panels to the frame. You can create a simple box shape. Or, you can design a more elaborate hood structure. Many homeowners opt for a shaker-style range hood for a classic look. This adds architectural interest to the kitchen.
Access for Maintenance
When designing your cabinet, plan for maintenance access. Range hoods and ducts need cleaning. Grease can build up inside the duct over time. Consider a removable panel or a hinged door. This allows you to reach the duct for inspections or cleaning.
You might also need to access the hood’s wiring. A well-designed access point makes future work simple. Without it, you might need to dismantle the entire cover for basic maintenance. Remember, you might need to clean the range hood filter regularly.
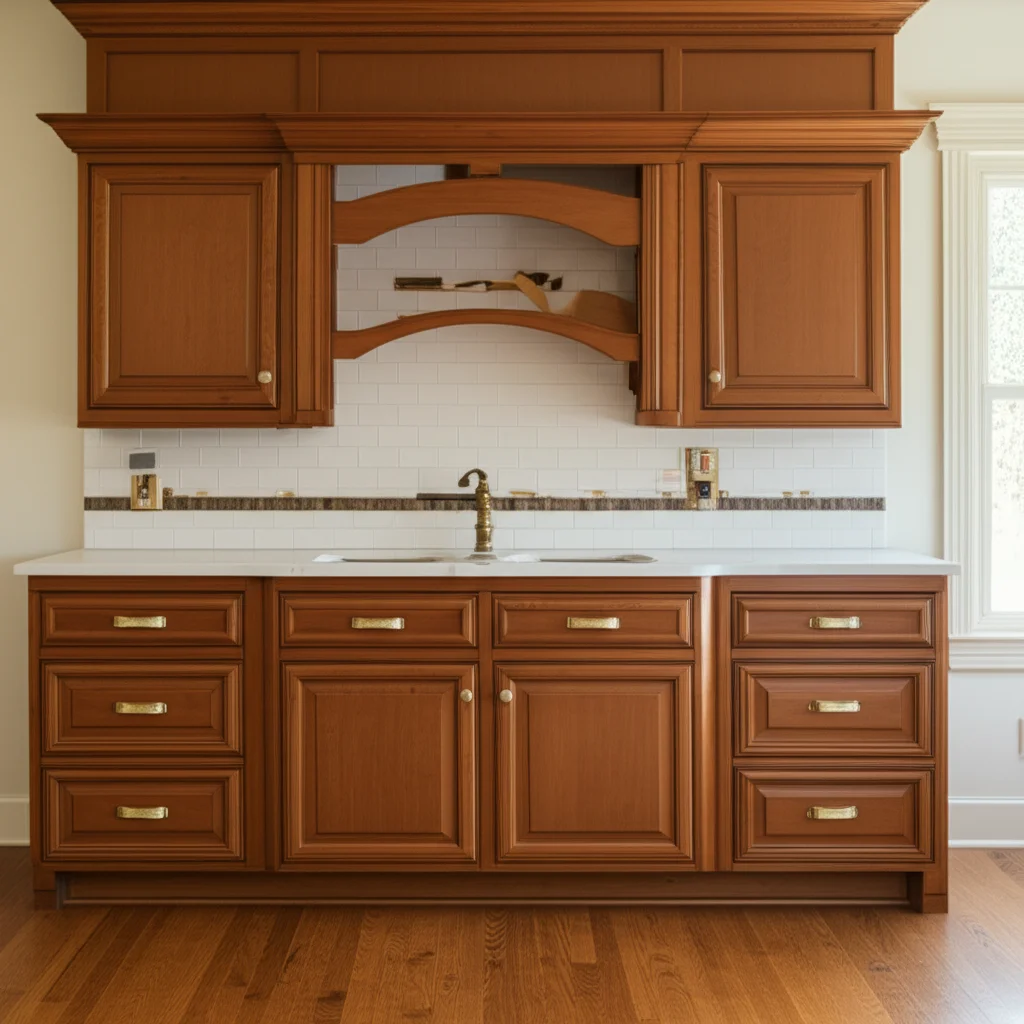
Crafting a Bespoke Range Hood Cover
A bespoke or custom range hood cover goes beyond simple cabinetry. It involves designing a unique structure that completely encases the duct. This method offers great flexibility in design. You can create a focal point in your kitchen. I find this option exciting because it allows for true personalization.
This type of cover often extends down to just above the cooking surface. It can incorporate decorative elements. You can choose from various materials to match your kitchen’s theme. The design possibilities are vast.
Design Considerations
Think about your kitchen’s overall style. Do you have a rustic, modern, or traditional kitchen? Your custom cover should complement this style. For example, a rustic kitchen might feature a distressed wood cover. A modern kitchen might use sleek metal or painted plaster. Consider the proportions carefully. The cover should not feel too big or too small for your space.
You can add trim, corbels, or molding for extra detail. Some designs incorporate a small shelf or display area. This adds both function and beauty. Remember, the cover needs to safely house the duct. It must also allow the range hood to function properly.
Material Choices for Custom Covers
Wood is a popular choice for custom covers. It is versatile and relatively easy to work with. You can paint, stain, or finish wood to match any decor. Metal, such as stainless steel or copper, offers a contemporary look. These materials can be fabricated into sleek, modern forms.
Plaster or stucco can create a smooth, sculptural finish. This works well for a minimalist or Mediterranean style. Some homeowners even use faux stone or brick veneers. This creates a rustic or industrial feel. The material choice impacts the final look significantly.
Construction Process for Custom Covers
Building a custom cover typically involves framing. You create a skeleton structure from wood or metal studs. This frame goes around the range hood and duct. Ensure the frame is sturdy and securely anchored to the wall. This is a critical step for safety.
Once the frame is in place, you attach your chosen facing material. This could be plywood panels, metal sheets, or plasterboard. Carefully cut and fit each piece. Then, finish the surface. This involves sanding, priming, and painting or applying your chosen decorative finish. For those interested in a full DIY build, understanding how to build a vent hood from scratch can provide valuable insights.
Enclosing the Duct with Drywall: A Clean Finish
Drywall offers a straightforward and budget-friendly way to cover a range hood duct. This method creates a clean, integrated look. It makes the duct virtually disappear into the wall or ceiling structure. I often recommend drywall for a seamless, minimalist aesthetic. It’s a classic way to achieve a finished look.
A drywall enclosure creates a box around the duct. This box then gets taped, mudded, and painted. It blends with the surrounding wall. This method is common in new constructions or major kitchen remodels. It’s an effective way to hide all unsightly elements.
Framing the Enclosure
The first step is to build a wooden or metal stud frame. This frame acts as the skeleton for your drywall. It needs to be precise. Measure the duct’s dimensions carefully. Add an inch or two around the duct for clearance. This gives you room to work and ensures proper airflow.
Securely attach the frame to ceiling joists and wall studs. Use screws for a strong connection. The frame must be perfectly plumb and level. Any imperfections will show in the finished drywall. A sturdy frame prevents cracks later on.
Installing and Finishing Drywall
Once the frame is ready, cut drywall sheets to fit. Screw the drywall panels onto the frame. Use drywall screws at appropriate intervals. Make sure the panels are snug against each other. Then, apply drywall tape to the seams. This reinforces the joints.
Next, apply joint compound, or “mud,” over the tape and screw heads. You will need several thin coats. Sand each coat smooth after it dries. This creates a perfectly flat surface. Finally, prime and paint the drywall. Match it to your kitchen walls or ceiling for a truly integrated look.
Benefits and Considerations
Drywall enclosures offer a smooth, continuous surface. They are easy to clean once painted. They are also fire-resistant, which is a safety bonus. The material cost for drywall is relatively low. However, the labor involved in framing, mudding, and sanding can be time-consuming.
Consider future access. Drywall enclosures are permanent. If you need to access the duct for major repairs, you might have to cut into the drywall. For routine cleaning, you should still be able to clean the kitchen hood from below. Plan for an access panel if future extensive maintenance is likely.
Decorative Wraps & Faux Finishes: Budget-Friendly Style
Sometimes, a full custom build or drywall enclosure is not feasible. Perhaps you are on a budget, or you live in a rented home. Decorative wraps and faux finishes offer creative and less invasive solutions. These methods focus on camouflaging the duct rather than completely enclosing it. I appreciate these options for their versatility and cost-effectiveness. They allow for a quick style upgrade.
These techniques can transform an ugly duct into a unique design element. They are often reversible, which is a big plus for renters. You can add personality without major construction. This keeps the project simple and affordable.
Applying Decorative Wraps
Decorative wraps involve covering the duct with a chosen material. This could be thin wood panels, laminate, or even specialized adhesive films. Measure the duct’s circumference and length precisely. Cut your material to size, allowing for overlap. Clean the duct thoroughly before applying any wrap. This ensures good adhesion.
- Wood Veneer or Thin Panels: These can be glued or screwed onto the duct. They offer a natural, warm look. You can stain or paint them to match your decor. This creates a rustic or traditional feel.
- Adhesive Films/Wallpaper: Available in various patterns and textures. These are easy to apply and remove. They are perfect for a temporary change or a pop of color. Look for heat-resistant options.
- Metal Sheeting (Thin Gauge): For an industrial or modern look, you can wrap the duct in thin metal. This might require special tools for cutting and bending. Ensure edges are smooth and safe.
Faux Finishing Techniques
Faux finishes involve painting or texturing the duct to mimic another material. This is a very creative way to integrate the duct. It requires some artistic skill but can yield impressive results.
- Metallic Paint: Transform a standard metal duct into a brushed stainless steel or copper look. Use specialized metallic paints for realism.
- Distressed Look: Apply layers of paint and then sand them back. This creates a weathered or antique appearance. This works well for farmhouse or vintage-style kitchens.
- Textured Paint: Use paints with built-in texture or add sand to regular paint. This can mimic concrete or plaster. It adds depth and dimension to the duct.
Benefits and Considerations
These methods are generally faster and less expensive than building a full enclosure. They are also less disruptive to your kitchen. You don’t need extensive carpentry or drywall skills. However, these methods might not completely hide the duct’s shape. They are about blending it in, not making it disappear entirely.
Ensure any materials used are heat-resistant. The area around a range hood can get warm. Check product specifications for temperature ratings. Also, consider how easy the chosen finish is to clean. Grease buildup is a constant concern in kitchens. It is important to know how to clean a greasy stove hood and other components.
Ventilation and Accessibility Considerations
When covering your range hood duct, proper ventilation is not just a suggestion; it is a safety requirement. It ensures your hood functions efficiently. It also keeps your kitchen safe from fire hazards. I cannot stress enough the importance of maintaining good airflow. A well-designed cover considers both looks and function.
Accessibility for future maintenance is also a crucial aspect. Ductwork needs occasional cleaning. The range hood itself needs regular service. Designing your cover with these needs in mind saves trouble later.
Ensuring Proper Airflow
Never obstruct the airflow of your range hood duct. The duct needs a clear path to the outside. Any blockages reduce the hood’s effectiveness. This can lead to lingering cooking odors and grease buildup in your kitchen. It also increases the risk of fire.
Ensure the new cover does not restrict the duct. Maintain the duct’s original diameter. Avoid sharp bends or kinks in the duct itself. Use smooth transitions if you are connecting new duct sections. Proper design allows air to move freely and efficiently.
Building Code Compliance
Local building codes often dictate range hood duct installation. These codes ensure safety. They cover duct materials, sizing, and fire safety clearances. Before starting your project, check with your local building department. You might need a permit.
Codes often specify minimum distances from combustible materials. They also dictate how ducts pass through walls or ceilings. Adhering to these codes protects your home and ensures your project is legal. Ignoring codes can lead to dangerous situations and problems if you ever sell your home.
Designing for Maintenance Access
Think about how you will access the duct and hood components. Grease can accumulate inside the duct. Filters need regular cleaning or replacement. For example, knowing how to clean a hood vent filter is essential. A removable panel or a hinged section in your cover is ideal. This allows easy access without damaging the enclosure.
- Removable Panels: Design sections that can be unscrewed or lifted off. This is a simple solution for accessing the duct.
- Hinged Doors: For a more integrated look, incorporate a small door. This could blend into the overall cabinet design.
- Magnetic Catches: Use magnetic catches to hold panels in place. This makes removal quick and tool-free.
Plan these access points strategically. They should be large enough for inspection and cleaning. They should also be discrete. This ensures they don’t detract from your finished aesthetic.
DIY vs. Professional Installation: Weighing Your Options
Deciding whether to DIY or hire a professional is a big part of any home project. Covering a range hood duct can be a simple task or a complex build. Your choice depends on your skills, budget, and the desired outcome. I’ve seen both successful DIY projects and those that needed professional rescue. It’s about honesty regarding your abilities.
Each approach has its benefits and drawbacks. Understanding them helps you make the right decision for your home. Consider the complexity of the job. Also, think about the tools and time required.
When to DIY Your Duct Cover
DIY is a great option if you have basic carpentry skills. If you are comfortable with measuring, cutting, and fastening materials, you can do this. Simple covering methods, like decorative wraps or basic wooden boxes, are often suitable for DIY. You save money on labor costs. You also gain the satisfaction of completing a project yourself.
- Skills Required: Measuring, cutting (wood, drywall), basic framing, finishing (sanding, painting).
- Tools Needed: Saw, drill, level, measuring tape, safety gear, possibly drywall tools.
- Time Commitment: Depends on complexity; a simple wrap could be a day, a custom cabinet a weekend or more.
- Budget: Lower overall cost as you only pay for materials.
DIY projects require patience and attention to detail. Watch online tutorials and read guides thoroughly. Plan every step. This minimizes mistakes and ensures a professional-looking result.
When to Hire a Professional
For more complex projects, hiring a professional is a wise investment. If you are building an elaborate custom hood, or if the duct needs re-routing, a pro is ideal. Professionals have specialized tools and experience. They ensure the job is done correctly and to code. This saves you potential headaches and costly mistakes.
- Complex Designs: If you want a bespoke, intricate range hood cover.
- Duct Rerouting: If the current duct path is inefficient or unsafe.
- Structural Changes: If the project involves modifying wall studs or ceiling joists.
- Guaranteed Quality: Professionals offer warranties on their work.
- Time Savings: They complete the job faster and more efficiently.
While hiring a pro costs more upfront, it can prevent issues down the line. It ensures safety and longevity. Get multiple quotes from licensed contractors. Check their references and portfolios. Discuss your vision clearly with them.
Maintenance and Accessibility for Covered Ducts
Covering your range hood duct enhances your kitchen’s appearance significantly. However, it’s vital to remember that range hoods and their ducts require regular maintenance. Grease and debris can build up. This affects performance and can even become a fire hazard. I always advise planning for future access when designing any cover. Neglecting maintenance can lead to bigger problems later.
A well-designed cover allows easy access for cleaning and inspection. This ensures your range hood continues to operate safely and efficiently. It also protects your investment.
Routine Cleaning of Your Range Hood and Filters
Even with a cover, the range hood itself needs regular cleaning. The filters are especially important. They trap grease and dust. If filters become clogged, airflow decreases. This makes your hood less effective. You might notice more cooking odors lingering in your kitchen.
- Filter Cleaning: Most range hoods have metal mesh filters. These are usually dishwasher-safe or can be cleaned with hot, soapy water. Clean them monthly or more often if you cook frequently. You can refer to guides like how to clean sticky range hood for detailed tips.
- Exterior Cleaning: Wipe down the exterior of your range hood cover. Use a mild degreaser for stubborn grease. This keeps the visible parts looking fresh.
- Fan Blades: If accessible, clean the fan blades periodically. Grease buildup on blades reduces their efficiency.
Internal Duct Cleaning and Inspection
The duct itself collects grease over time. This buildup is less common with efficient hoods but can still occur. A covered duct needs internal inspection every few years. Professional duct cleaning services can handle this. They have specialized tools to reach inside the duct.
- Signs of Buildup: If you notice reduced suction, a greasy smell, or dripping from the hood, your duct might need cleaning.
- Access Panels: If you built your cover with access panels, open them up. Shine a flashlight inside to inspect the duct walls. Look for thick grease layers.
- Professional Help: For deep cleaning or stubborn clogs, consider hiring a professional duct cleaner. They ensure thorough cleaning without damaging the ductwork.
Ensuring Longevity of Your Cover
Proper maintenance also extends the life of your duct cover. Keep the surface clean. Address any minor damage promptly. For wooden covers, reapply paint or stain as needed. For drywall, patch cracks or chips.
Regularly check the fasteners and supports. Ensure the cover remains securely attached to the wall or ceiling. This prevents sagging or instability. A well-maintained cover will look good and function safely for many years. It makes your kitchen look polished and well cared for.
FAQs About Covering Range Hood Ducts
Q1: Why should I bother covering my range hood duct?
Covering your range hood duct significantly improves your kitchen’s aesthetics. An exposed metal duct can look unfinished or industrial. A well-designed cover integrates the hood into your kitchen’s overall design. It creates a cleaner, more cohesive appearance. This also adds value and appeal to your home.
Q2: Can I use drywall to cover my range hood duct?
Yes, drywall is a common and effective material for covering a range hood duct. You first build a sturdy frame around the duct, usually from wood or metal studs. Then, you attach drywall panels to this frame. After taping, mudding, sanding, and painting, the enclosure blends seamlessly with your wall.
Q3: What materials are best for a custom range hood cover?
Popular materials for custom range hood covers include wood (plywood, MDF, solid wood), metal (stainless steel, copper), and plaster. Wood is versatile and can be painted or stained. Metal offers a modern, sleek look. Plaster creates a smooth, sculptural finish. The best material matches your kitchen’s style.
Q4: Do I need professional help to cover my duct?
It depends on your skill level and the project’s complexity. Simple covers, like basic wooden boxes or decorative wraps, can be DIY projects. For intricate custom designs, rerouting ducts, or ensuring structural changes meet codes, hiring a professional contractor or carpenter is highly recommended. They ensure safety and quality.
Q5: How do I access the duct for maintenance after covering it?
Designing for maintenance access is crucial. You can incorporate a removable panel secured with screws or magnetic catches into your cover. Another option is a hinged door that blends with the design. These access points allow you to inspect, clean, and maintain the ductwork and range hood components without damaging the cover.
Q6: Are there fire safety concerns when covering a range hood duct?
Yes, fire safety is a major concern. Ensure that the materials used for your cover are fire-resistant or have appropriate clearances from the duct. Never obstruct the duct’s airflow. Adhere to local building codes regarding duct installation and clearances. Proper ventilation prevents grease buildup and reduces fire risk.
Conclusion
Covering your range hood duct is an impactful way to elevate your kitchen’s design. It transforms an essential but often unsightly component into a sleek, integrated feature. From building a custom cabinet enclosure to constructing a clean drywall box, many effective solutions exist. You can also explore decorative wraps or faux finishes for budget-friendly transformations.
I hope this guide has given you clear steps and fresh ideas. Remember to prioritize proper ventilation and plan for future maintenance access. Whether you choose a DIY approach or hire a professional, taking the time to cover your range hood duct will undoubtedly enhance your home. Begin your project today and enjoy a kitchen that looks as good as it functions!
- kitchen renovation
- range hood installation
- duct covering ideas
- DIY kitchen projects
- home aesthetics

Todd Martin
Senior Writer
With over 15 years of experience in home renovation and design, I started HEG to share what I’ve learned with homeowners who want to create spaces that are both beautiful and functional. I’ve always believed in a hands-on approach, and over the years, I’ve picked up practical solutions that actually work. Through HEG, I aim to make home improvement more approachable, sharing real tips that help you create a home you truly love.