· Todd Martin · Furniture Care · 15 min read
How To Darken Wood Furniture With Wax
Darken Wood Furniture with Wax: A Simple Guide
Do you want to give your wood furniture a fresh, richer look? Perhaps you have a light wood piece that does not quite fit your room’s style. Darkening wood furniture with wax offers an excellent solution. This method allows you to change the color and add depth. It also provides a protective finish.
Using wax for darkening is simpler than traditional staining. It helps you achieve an aged or elegant appearance. This guide will walk you through the process step-by-step. You will learn how to prepare your furniture, apply the wax correctly, and finish it beautifully. Get ready to transform your favorite pieces.
Takeaway
- Prepare your wood furniture thoroughly before waxing.
- Select a high-quality dark furniture wax suitable for your project.
- Apply the wax in very thin, even layers for best results.
- Buff the waxed surface to achieve your desired level of sheen and depth.
Darkening wood furniture with wax offers a gentle way to enrich its tone. You apply specialized dark furniture wax in thin coats, allowing it to penetrate the wood grain. This process deepens the color while adding a protective, lustrous finish, creating a more aged or elegant appearance without traditional staining.
Why Choose Wax to Darken Wood Furniture?
Many people want to change the look of their wood furniture. Staining is one option, but it can be a big job. Wax offers a softer, more forgiving approach. It creates a beautiful finish that feels natural. This method is often preferred for antique pieces.
Wax penetrates the wood surface without hiding its natural grain. It builds color slowly. This allows you to control the depth of darkness. It also provides a layer of protection. This layer guards against moisture and minor scratches.
Gentle Alternative to Stains
Stains change wood color permanently. They soak deeply into the wood fibers. This makes it hard to reverse the process. Darkening with wax is less harsh.
Wax sits closer to the surface of the wood. It builds up color gradually. You have more control over the final shade. If you make a mistake, it is easier to correct.
Adding Depth and Patina
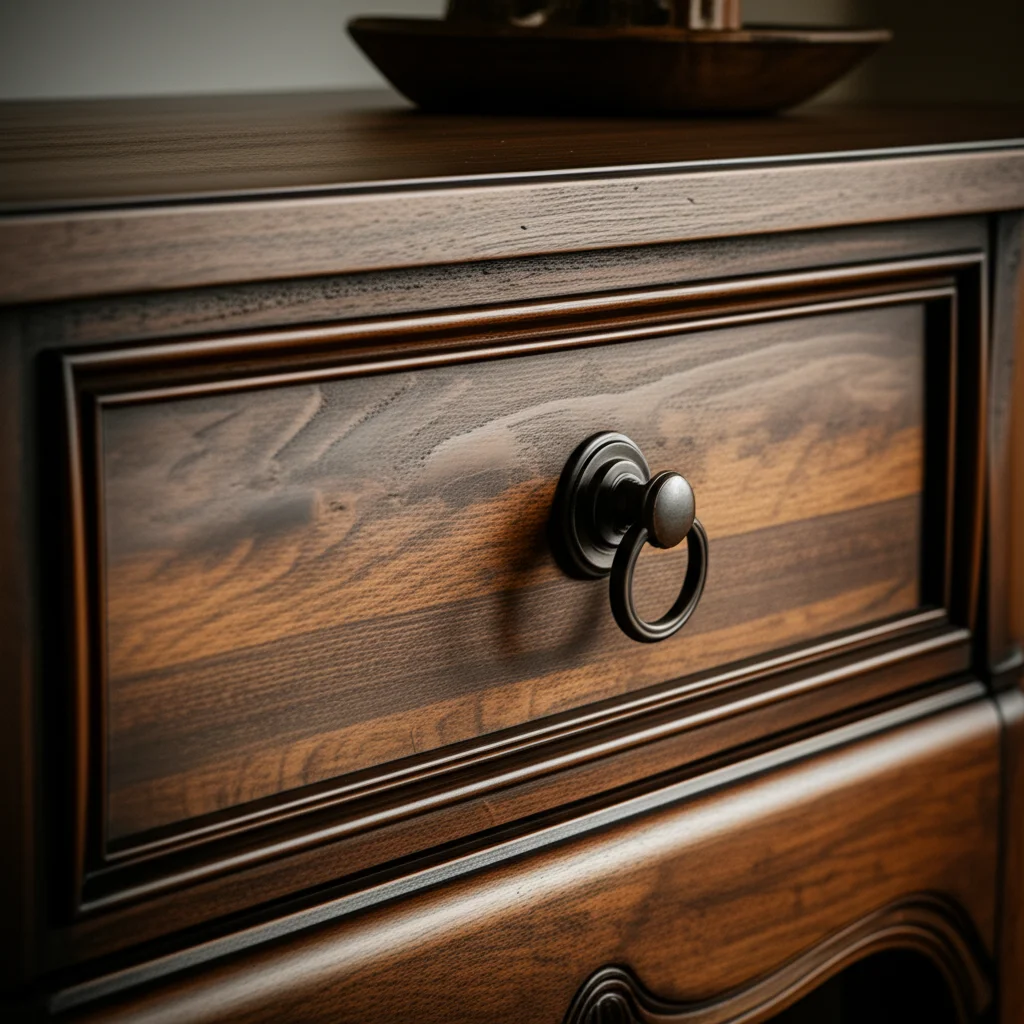
Dark wax adds character to furniture. It settles into the wood grain and any imperfections. This highlights the natural beauty of the wood. It gives the piece a lovely, aged look.
This method helps create a rich patina over time. The furniture gains a warm, inviting feel. It looks like it has a long history. This makes old pieces feel even more special.
Protection and Finish
Beyond changing color, wax protects wood. It forms a barrier against daily wear. This layer helps repel dust and fingerprints. It also adds a subtle sheen.
The finish feels smooth and pleasant to touch. It enhances the wood’s natural luster. Regular waxing can keep your furniture looking its best. It maintains its deep color and protective qualities. Learning how to clean wood furniture with vinegar can also help maintain your pieces before and after waxing.
Selecting the Right Darkening Wax for Your Project
Choosing the right wax is important for your project. Different waxes offer various shades and finishes. Consider the type of wood you have. Also, think about the final look you want to achieve. Testing the wax first is always a good idea.
Quality wax provides the best results. Look for waxes designed for furniture. These waxes contain ingredients that nourish and protect wood. They also offer good color consistency.
Types of Dark Wax
Many dark waxes are available. Beeswax is a common base for many furniture waxes. It offers natural protection and a soft sheen. Some waxes combine beeswax with other waxes like carnauba for added hardness.
Mineral oil blends can make waxes easier to apply. These blends often provide a deeper penetration. They help the dark pigments settle into the wood. Read product labels to understand the ingredients.
Color Variations and Effects
Dark waxes come in many shades. You can find options like antique brown, black, or even gray. Each color creates a different effect. Antique brown wax gives a warm, aged look. Black wax can create a more dramatic, modern feel.
Consider the original color of your wood. A dark wax on light wood will show a stronger change. On already dark wood, it will add depth. Always test a small area first. This helps you see the true color.
Testing Wax on an Inconspicuous Area
Before applying wax to the entire piece, always test it. Find a hidden spot on your furniture. The underside of a table or inside a drawer works well. Apply a small amount of wax there.
Let it dry and buff it. This test shows you the exact color change. It also helps you practice the application technique. If you need to remove excess wax or fix a mistake later, knowing how to remove wax from chalk painted furniture might offer some useful general principles, even if your furniture is not chalk-painted.
Preparing Your Wood Furniture for Darkening
Proper preparation makes a big difference. It ensures the wax adheres well. It also helps you achieve a smooth, even finish. Skipping steps can lead to poor results. Take your time with this part of the process.
Start by cleaning the furniture thoroughly. Remove any old dirt, grime, or existing finishes. This creates a clean surface for the new wax. Addressing any damage beforehand is also a good idea.
Thorough Cleaning is Key
Your furniture must be clean before you apply wax. Dust and dirt can get trapped in the wax. This creates an uneven look. Use a mild wood cleaner or a damp cloth. Make sure the wood is completely dry before moving on.
You can use a vacuum cleaner with a brush attachment for crevices. A general cleaner for wooden furniture will remove surface grime. For deep cleaning, you might want to look into how to clean wooden furniture with specialized products. This removes built-up oils and polishes.
Addressing Imperfections
Inspect your furniture for any cracks or holes. Fill these with wood filler if needed. Let the filler dry completely. Sand it smooth afterward. This ensures an even surface for waxing.
Small dents or scratches can sometimes disappear with wax. However, larger flaws benefit from repair. Wax will highlight rather than hide deep imperfections. For more serious damage, learning how to fix a crack in wood furniture can be a helpful step.
Light Sanding for Adhesion
Sanding might be necessary, depending on your furniture. If the old finish is shiny, a light sanding helps the wax stick better. Use fine-grit sandpaper, like 220-grit. Sand gently in the direction of the wood grain.
After sanding, wipe away all dust. Use a tack cloth or a slightly damp cloth. Ensure no sanding dust remains. The surface must be clean and smooth for the wax. Before any painting or finishing project, it is also useful to review general advice on how to clean furniture before painting.
Step-by-Step Application of Dark Wax
Applying dark wax is a straightforward process. The key is to work in thin layers. Rushing can lead to a patchy finish. Follow these steps for the best results.
Patience makes all the difference here. You will build up the color gradually. This gives you control over the final look. Get your tools ready and find a well-ventilated area.
Gather Your Tools and Supplies
You will need a few items for waxing. Gather your chosen dark wax. You also need a clean, lint-free cloth. A soft brush, like a natural bristle brush, can help apply wax in carvings.
For buffing, a clean, soft cloth is essential. Microfiber cloths work very well. Make sure you have enough clean cloths. You will use different ones for application and buffing.
Applying the First Thin Coat
Open your dark wax can. Use your cloth or brush to pick up a small amount of wax. A little goes a long way. Start applying the wax to a small section of your furniture. Work in the direction of the wood grain.
Apply in thin, even coats. Avoid applying too much wax at once. If you put too much, it can become sticky. Spread the wax evenly over the surface.
Building Up Color with Multiple Layers
Once the first coat is on, let it sit. The wax needs some time to cure. Check the product instructions for specific drying times. This usually takes 10-20 minutes. The surface should feel dry to the touch.
After drying, you can apply more layers. Each layer will deepen the color. Apply each new layer just like the first. Continue until you reach your desired shade. Remember, you can always add more, but taking it away is harder. If you find yourself dealing with excess wax, understanding how to clean hard wax might offer relevant techniques for removal.
Buffing for Desired Sheen
After your final wax coat dries, it is time to buff. Use a clean, soft, lint-free cloth. Rub the surface in circular motions. Then, switch to straight strokes along the grain. Buff until you achieve the desired sheen.
Buffing removes excess wax. It also brings out the luster of the wood. The more you buff, the shinier the surface becomes. This step is crucial for a smooth, even finish.
Achieving Different Looks: From Subtle to Dramatic
Darkening wood with wax offers versatility. You can create many different aesthetics. The amount of wax and your application technique influence the final look. Consider your existing decor. Think about the style you want to achieve.
From a slight tint to a bold transformation, wax helps. Experiment with layering and different buffing methods. This allows you to customize your furniture.
Subtle Darkening for Warmth
For a subtle change, apply just one thin layer of dark wax. Buff it well after a short drying time. This adds warmth without drastically altering the original color. It enhances the natural wood tones.
This approach works well if you simply want to enrich your furniture. It brings out the wood grain more. The piece will look slightly older and more refined. It keeps the furniture from looking too new or bright.
Creating an Aged, Antique Appearance
To achieve an antique look, use a slightly heavier hand. Apply two or more layers of dark wax. Allow each layer to dry before adding the next. Focus on working the wax into carved details or crevices. This makes these areas appear darker.
Buff the main surfaces lightly. Leave some of the darker wax in the recessed areas. This technique mimics natural aging. It gives your furniture the charm of an old heirloom. You can also consider how this might affect how to match wood furniture with wood floors for a cohesive design.
Dramatic Transformation for Modern Appeal
For a dramatic shift, apply several generous layers of dark wax. Ensure good coverage over the entire surface. Allow ample drying time between coats. You can even try using black wax for a bolder statement.
Buff the piece to a high shine or leave it with a more matte look. This depends on your preference. This method can completely change the character of a piece. It transforms light wood into a striking dark feature. You can achieve looks similar to how to paint white furniture to look like wood, but with a wax finish.
Combining Wax Colors
You can mix different wax colors for unique effects. Apply a clear wax first for added protection. Then, add a dark wax for specific areas. This can highlight details without darkening the entire piece too much.
Some people use a dark wax all over. Then, they apply a lighter wax to certain spots. This creates an even more varied and aged appearance. Experiment on a sample piece first to see what you like.
Maintaining Your Darkened Wood Furniture
Once you have darkened your wood furniture with wax, proper care is important. Maintenance helps preserve the beautiful finish. It also extends the life of your furniture. Regular attention keeps your pieces looking fresh and protected.
Wax finishes require different care than varnished or lacquered surfaces. Avoid harsh cleaners. These can strip the wax away. Gentle cleaning and occasional reapplication are key.
Regular Cleaning and Dusting
Dust your waxed furniture regularly. Use a soft, dry cloth. This prevents dust buildup. For fingerprints or light smudges, a slightly damp cloth can work. Always wipe dry immediately.
Avoid using silicone-based polishes. These can build up on the wax. They may also create a hazy film over time. Stick to cleaning methods that are safe for wax. You can learn more about general care for a wood table by reviewing how to clean a wood table.
Reapplying Wax for Longevity
Over time, wax can wear thin. Areas that get a lot of use will show this first. Reapply a fresh coat of wax every six months to a year. This depends on how much the furniture is used.
Before reapplying, give the furniture a light cleaning. Remove any surface dirt. Then, apply a thin layer of wax. Buff it well for continued protection and shine. This process refreshes the color and finish.
Protecting from Heat and Moisture
Wax provides some protection, but it is not waterproof. Use coasters under drinks. Place trivets under hot dishes. This prevents water rings and heat damage. Direct sunlight can also fade the finish over time.
Position your furniture away from direct heat sources. Also, keep it out of strong sunlight if possible. These steps help maintain the color and integrity of the wax finish. They ensure your furniture looks good for years.
Troubleshooting Common Issues When Darkening Wood with Wax
Even with careful application, you might run into issues. Do not worry; most problems have simple solutions. Knowing how to fix them saves time and effort. Common issues include uneven color or stickiness.
It is helpful to identify the problem quickly. This allows you to address it before the wax fully cures. Remember, wax is forgiving. You can often correct mistakes.
Uneven Color or Streaks
Sometimes, the wax can look uneven. This happens if you apply too much wax in one spot. It can also occur if you do not buff enough. The solution is often simple.
Apply a small amount of fresh wax to the streaky area. Use a clean cloth and work it into the wood. This helps reactivate the existing wax. Then, buff vigorously with a clean, dry cloth. This evens out the color and removes streaks.
Furniture Appears Too Dark
Did you apply too many layers? Or is the wax just too dark for your taste? You can lighten the color. Use clear wax on a clean cloth. Rub it over the darkened area. The clear wax acts as a solvent. It picks up some of the dark pigment.
Alternatively, a very fine steel wool (0000 grade) can remove some dark wax. Use it gently in the direction of the grain. Then, apply a fresh coat of clear wax. Buff to blend. This process is similar to how one might approach how to clean dry wax from other surfaces.
Tackiness or Wax Buildup
If your furniture feels sticky, it means you applied too much wax. Or you did not buff enough. The excess wax remains on the surface. It attracts dust and feels unpleasant.
To fix this, get a clean, lint-free cloth. Buff the sticky area very hard. This friction will melt and redistribute the wax. It also removes the excess. If it is still sticky, use a small amount of mineral spirits on a cloth. Wipe the area quickly. Then, immediately buff with a clean cloth. Mineral spirits will help dissolve the extra wax. Be aware of general wax removal techniques like those for how to clean wax off floor if you spill.
FAQ Section
Can I use regular furniture polish on top of dark wax?
Avoid using regular furniture polish on top of dark wax. Many polishes contain silicone or other chemicals. These can cause a cloudy film to build up over time. They can also strip away the wax finish. Stick to re-waxing when your furniture needs refreshing.
How long does it take for the wax to fully cure?
Wax typically dries to the touch within 10-20 minutes. However, it takes longer to fully cure or harden. Most waxes fully cure within 21-30 days. During this time, handle the furniture carefully. Avoid placing heavy items or liquids on it.
Will darkening wax work on all types of wood?
Darkening wax works best on unfinished or previously waxed wood. It also works well on painted surfaces. For wood with a hard, sealed finish like varnish or polyurethane, the wax will not penetrate. You might need to strip or sand the old finish first for the wax to be effective.
Can I reverse the darkening process if I don’t like it?
Reversing the darkening process is possible but requires effort. You can use mineral spirits on a clean cloth. Rub the area gently to dissolve and lift the wax. Then, clean the wood surface thoroughly. This method removes most of the dark pigment.
What’s the difference between dark wax and wood stain?
Dark wax sits on the surface of the wood. It tints the top layers and provides a protective finish. Wood stain penetrates deep into the wood fibers. It changes the wood’s color more dramatically and permanently. Wax offers a softer, more subtle color change and is easier to reverse.
How often should I reapply dark wax?
The frequency of reapplication depends on furniture use. For high-traffic pieces, reapply dark wax every 6-12 months. For decorative pieces, once every 1-2 years is often enough. Regular cleaning helps extend the life of the wax finish.
Conclusion
Darkening wood furniture with wax offers a simple, rewarding way to transform your home decor. This method provides a rich, deep finish. It also adds a layer of protection to your beloved pieces. You can achieve anything from a subtle tint to a dramatic, aged look. The process is forgiving and enjoyable.
Waxing allows you to control the color depth. It enhances the natural beauty of the wood grain. Plus, it creates a durable, beautiful surface that feels wonderful. We hope this guide helps you confidently begin your next furniture project. Give your furniture a fresh, new lease on life by choosing to darken wood furniture with wax. Share your beautiful transformations with us!
- dark wax
- wood furniture restoration
- furniture finishing
- DIY furniture
- wood care

Todd Martin
Senior Writer
With over 15 years of experience in home renovation and design, I started HEG to share what I’ve learned with homeowners who want to create spaces that are both beautiful and functional. I’ve always believed in a hands-on approach, and over the years, I’ve picked up practical solutions that actually work. Through HEG, I aim to make home improvement more approachable, sharing real tips that help you create a home you truly love.