· Todd Martin · Furniture Refinishing · 20 min read
How To Whitewash Dark Furniture
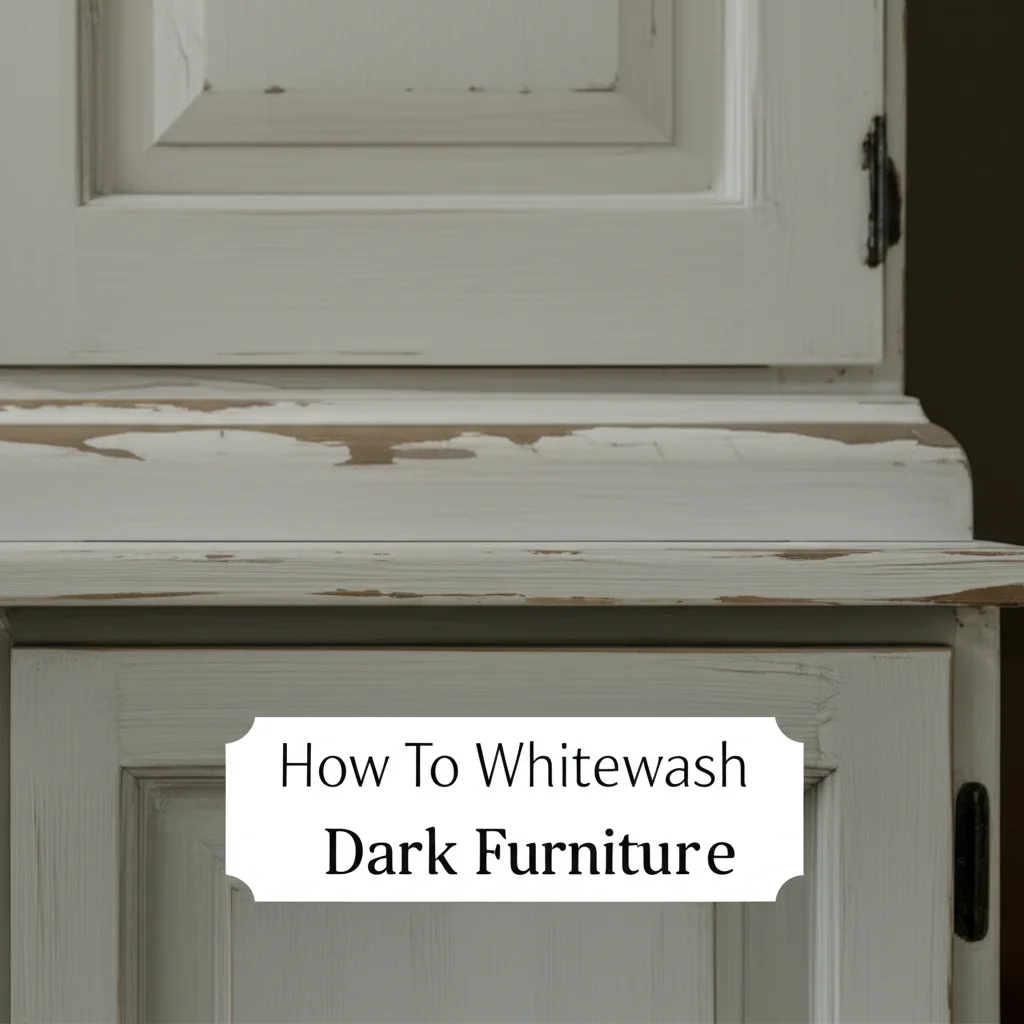
Revitalize Your Space: How to Whitewash Dark Furniture
Have you ever looked at a dark, heavy piece of furniture and wished it felt lighter, brighter, and more modern? Many people face this common design dilemma. Dark furniture can make a room feel smaller or outdated. I understand this desire for change.
Learning how to whitewash dark furniture offers a fantastic solution. This technique allows you to transform old pieces into fresh, airy additions. You can lighten your space and give forgotten items new life. This guide will walk you through every step. We will cover preparation, application, and finishing for beautiful results.
Takeaway
- Prepare your furniture thoroughly: Clean, sand, and prime dark surfaces to ensure proper paint adhesion and prevent bleed-through.
- Mix your whitewash correctly: Combine white paint with water for a translucent finish that allows wood grain to show.
- Apply thin, even coats: Use a brush or rag to apply the wash, wiping back excess for a natural look.
- Layer for desired opacity: Build up coats gradually until you achieve your preferred level of lightness.
- Seal your finish: Apply a protective topcoat to ensure durability and prevent future damage.
Whitewashing dark furniture involves diluting white paint and applying it thinly. This method creates a translucent, light finish that still shows the wood grain beneath. You can achieve a soft, airy look for any dark wooden item. This technique offers a subtle yet impactful transformation.
Why Whitewash Dark Furniture? Benefits and Style
Whitewashing dark furniture is more than just a painting project. It is a transformation that brings many benefits to your home. This technique allows you to update old, heavy pieces without losing their character. I find it creates a sense of lightness and openness in any room.
Dark wood furniture, while classic, can sometimes make a space feel closed off or heavy. Imagine a large, dark dresser in a small room. It might absorb light and make the area seem cramped. By learning how to whitewash dark furniture, you can reverse this effect. You can make rooms feel larger, brighter, and more inviting. This process is a simple way to refresh your home’s aesthetic.
Aesthetic Benefits of Whitewashing
Whitewashing instantly brightens a piece. The light finish reflects light, making a room feel more expansive. It offers a soft, worn, or coastal charm depending on the application. You can highlight intricate details on carved furniture that dark stains often obscure. The wood grain still peeks through, adding texture and warmth. This method provides a fresh, modern update while retaining the furniture’s original story.
Many interior design styles benefit from whitewashed pieces. Farmhouse, coastal, shabby chic, and even minimalist decors embrace this look. It introduces a calming, airy feel. This makes it perfect for bedrooms, living rooms, and even kitchens. The versatility means your transformed furniture will blend well with various decorative elements.
Practical Advantages of Lightening Furniture
Beyond aesthetics, whitewashing offers practical advantages. It is a cost-effective way to update furniture you already own. Instead of buying new pieces, you can repurpose existing ones. This saves money and reduces waste. The process itself is generally straightforward for DIY enthusiasts. You do not need highly specialized skills.
Whitewashing also offers protection for the wood underneath. The paint mixture acts as a barrier against minor scratches and spills. With a proper topcoat, your furniture becomes more durable. This extends the lifespan of your beloved pieces. It is a smart investment in both style and function for your home.
Gathering Your Whitewashing Essentials: Tools and Materials
Before you begin to whitewash dark furniture, gather all necessary tools and materials. Having everything ready saves time and ensures a smooth process. You do not want to stop mid-project because you are missing an item. Planning ahead is a key step for any successful DIY endeavor.
I always create a checklist of what I need. This helps me avoid multiple trips to the store. You will need items for cleaning, sanding, applying the whitewash, and sealing the finish. Proper tools make the job easier and improve the final outcome. Consider this stage your foundation for a beautiful furniture transformation.
Essential Cleaning Supplies
The first step for any furniture project is proper cleaning. You need to remove all dirt, grease, and grime. A good all-purpose cleaner works well for this. I often use a mild detergent mixed with water. You will also need clean rags or sponges for wiping.
For stubborn residue or built-up wax, mineral spirits can be effective. Always test a small, hidden area first to ensure it does not damage the finish. Old toothbrushes or small brushes are helpful for getting into intricate carvings. Remember, a clean surface is crucial for paint adhesion. You can learn more about cleaning your furniture effectively by visiting our guide on how to clean furniture before painting.
Painting and Finishing Materials
For the whitewash itself, you will need white paint. Latex paint is common and easy to use for this technique. You will also need water for thinning the paint. The ratio depends on how translucent you want the finish to be. Small mixing containers are useful for preparing your whitewash solution.
Applicators include brushes, foam brushes, or clean rags. Each offers a slightly different effect. I often use a brush for initial application and a rag for wiping back. Fine-grit sandpaper (220-grit) helps smooth surfaces between coats. A primer is essential, especially for dark wood, to prevent tannin bleed-through. Finally, a protective topcoat like polyurethane or clear wax is vital for durability.
Remember to also gather safety gear. Gloves protect your hands from paint. A mask is good for sanding or when working with fumes. Drop cloths protect your floors and surrounding areas from paint splatters. Having these items ready ensures a safe and clean working environment.
Preparing Dark Furniture for Whitewashing: The Foundation
Proper preparation is the most critical step when you whitewash dark furniture. Skipping steps here can lead to disappointing results. A well-prepared surface ensures the whitewash adheres correctly and looks professional. I always dedicate ample time to this stage, as it truly makes or breaks the project.
Think of it like building a house. A strong foundation is necessary for a sturdy structure. Similarly, a smooth, clean, and primed surface is essential for a beautiful whitewashed finish. This section covers cleaning, sanding, and priming your furniture. These steps ensure your dark piece is ready for its light transformation.
Thorough Cleaning and Degreasing
Begin by removing all hardware from your furniture. This includes knobs, pulls, and hinges. Place them aside in a secure container. Next, clean the entire piece thoroughly. Use a degreaser or a mild soap and water solution. Wipe down all surfaces to remove dirt, grime, and any oily residues.
For very dirty or waxy pieces, you might need a stronger cleaner. Mineral spirits or a dedicated furniture cleaner can cut through stubborn buildup. Ensure the surface is completely dry before moving on. Any lingering moisture can affect paint adhesion. This step is vital for a lasting finish. If you want more details on cleaning different types of wood, check out our guide on how to clean wooden furniture.
Sanding for Adhesion
Sanding is crucial for creating a surface the paint can grip onto. You do not need to sand down to raw wood. The goal is to scuff the existing finish. Use a medium-grit sandpaper (around 120-150 grit) first. Sand with the grain of the wood. This helps avoid noticeable scratches.
After the initial sanding, follow up with a finer grit (220-grit). This smooths out any rough areas. Always wipe away the sanding dust with a tack cloth or a damp cloth. Make sure no dust remains, as it can create bumps in your finish. Proper sanding ensures your whitewash adheres well.
Priming Dark Wood for Success
Dark wood, especially older pieces, can contain tannins. These are natural dyes in the wood that can bleed through light paint. This causes yellow or pink stains. To prevent this, apply a good quality primer. I always recommend a stain-blocking primer.
Apply one or two thin, even coats of primer. Allow each coat to dry completely according to the manufacturer’s instructions. Priming creates a uniform base for your whitewash. It also helps the white paint look brighter and more consistent. Do not skip this step, especially when you whitewash dark furniture. It is a small effort for a huge payoff.
The Whitewashing Technique: Applying Your Finish
Once your dark furniture is prepped and primed, you are ready for the exciting part: applying the whitewash. This technique involves mixing paint and water to create a translucent solution. The goal is to allow some of the original wood grain to show through. This gives the furniture character and depth. I find this stage incredibly satisfying as the transformation begins to appear.
The key to a successful whitewash is understanding consistency and application. You can control the opacity by adjusting the paint-to-water ratio. You can also build up layers. Take your time, and enjoy the process of bringing a lighter look to your pieces.
Mixing Your Whitewash Solution
Start with good quality white latex paint. Flat or eggshell finishes often work best for a soft look. Mix the paint with water. A common starting ratio is 1 part paint to 1 part water. For a more transparent wash, you might use 1 part paint to 2 or even 3 parts water. For a more opaque, but still slightly translucent, look, use less water.
Stir the mixture thoroughly until it is completely combined. The consistency should be thin, like milk or light cream. You can always add more water to make it thinner, but it is harder to make it thicker once diluted. Test your mixture on an inconspicuous area first. This helps you determine if the transparency is what you desire. You can compare this to general how to paint wood furniture white guides, but the dilution is key here.
Application and Wiping Techniques
There are several ways to apply whitewash, each giving a slightly different effect. I often use a brush for initial application. Dip your brush into the whitewash solution. Apply a thin, even coat to a small section of the furniture. Work in manageable areas, as the wash dries relatively quickly.
Immediately after applying, use a clean, lint-free rag to wipe off the excess. Wipe with the grain of the wood. This removes some of the paint, allowing the wood grain to show through. The amount you wipe back controls the transparency. For a more opaque finish, wipe less. For a more transparent look, wipe more vigorously.
You can also apply the wash directly with a rag for a very soft, subtle effect. Dip the rag into the solution and wipe it onto the surface. This method is great for achieving a very worn, natural appearance. Experiment with both methods on a test piece to see which you prefer. If you’re working on furniture that was previously painted, remember that the prep and application might differ slightly. You can find useful tips in our guide on how to paint over painted furniture.
Layering for Desired Opacity
One of the beauties of whitewashing is the ability to build layers. After your first coat dries, assess the look. If you want more coverage or a whiter appearance, apply a second thin coat. Repeat the application and wiping process. Allow each coat to dry completely before adding another.
Two or three thin coats often achieve the perfect balance of coverage and transparency. Too many thick coats can make it look like regular paint. The idea is a subtle, aged, or bleached effect. Patience is key here. Do not rush the drying time between layers. This ensures an even and beautiful finish that truly transforms your dark furniture.
Achieving Different Whitewash Looks: Beyond Basic White
Whitewashing is not a one-size-fits-all technique. You can adapt it to create a variety of stunning finishes. Beyond the standard translucent white, you can achieve distressed looks or introduce subtle color variations. This flexibility allows you to customize your dark furniture to perfectly match your decor. I love experimenting with these different approaches.
Understanding these variations empowers you to truly personalize your furniture. You can make it look like an antique, a coastal find, or a modern, minimalist piece. The base technique remains the same, but small adjustments create vastly different outcomes. Let’s explore how to achieve these unique styles.
Distressed Whitewash Effect
A distressed whitewash finish gives furniture an aged, time-worn appearance. This look is popular for farmhouse and shabby chic styles. After applying your whitewash, allow it to dry completely. Then, use fine-grit sandpaper (220-grit) or steel wool. Gently sand areas that would naturally show wear. This includes edges, corners, and raised details.
As you sand, some of the underlying dark finish will show through. This creates a beautiful contrast and an authentic distressed look. I recommend stepping back often to assess your progress. You want a natural appearance, not an overly uniform one. The goal is subtle erosion, not harsh scratches. For more detailed instructions on creating this effect, you can refer to our article on how to paint and distress furniture.
Subtle Tinted Washes
You are not limited to pure white. You can create tinted washes by adding a tiny amount of colored paint to your white paint before diluting it. A drop of light gray, beige, or even a pale blue can change the character of the wash. This allows you to complement existing color schemes in your room.
For instance, adding a touch of warm beige can create a “greige” wash. This is perfect for a rustic or traditional feel. A hint of blue can evoke a coastal vibe. Always add color slowly, a tiny bit at a time. Mix thoroughly and test on a scrap piece. This helps you achieve the perfect subtle hue. Remember, less is often more with tinted washes.
Limewash and White Wax Alternatives
Beyond paint-and-water mixes, other products can achieve a similar lightened effect. Limewash is a traditional finish that provides a unique matte, chalky look. It absorbs into porous surfaces and creates a very natural, almost plaster-like appearance. While the application is different, the result is a beautiful, breathable finish.
White wax is another excellent option, especially for achieving a very subtle, almost bleached look. It is applied over raw wood or a previously painted/stained surface. The wax settles into the wood grain, creating a soft, lightened effect. This is great if you want to enhance the wood texture rather than cover it. For tips on using white wax effectively, check out our guide on how to use white wax on furniture. Each of these alternatives offers a unique way to brighten dark furniture.
Sealing and Protecting Your Whitewashed Furniture
Once you have perfected the whitewash finish on your dark furniture, the final crucial step is to seal and protect it. This is not optional. A sealant safeguards your hard work from daily wear and tear. It also protects against moisture, stains, and scuffs. I always emphasize this stage, as it determines the longevity of your beautiful new piece.
Think of the sealer as a transparent shield. It locks in the whitewash and preserves its appearance. Without proper protection, your light finish could quickly become dirty or damaged. Choosing the right sealer depends on the furniture’s use and your desired final look.
Choosing the Right Sealer
Several types of sealers are suitable for whitewashed furniture.
- Water-based Polyurethane: This is a popular choice for durability. It dries clear and provides excellent protection against scratches and moisture. It comes in various sheens, from matte to high-gloss. I usually recommend a matte or satin finish to maintain the natural look of whitewash. Apply thin coats to avoid yellowing.
- Wax: Furniture wax, especially clear or white wax, offers a soft, natural finish. It deepens the color slightly and provides a protective layer. Wax is less durable than polyurethane. It is suitable for pieces that do not see heavy use, like decorative tables. It also requires reapplication every year or two.
- Polycrylic: This is a water-based protective finish. It is similar to polyurethane but often less prone to yellowing, making it ideal for white or light finishes. It offers good durability and is easy to clean up.
- Oil-based Polyurethane: While very durable, oil-based polyurethanes can yellow over time. This is usually not ideal for a bright whitewashed finish. I would avoid this type for most whitewashing projects.
Always read the manufacturer’s instructions for your chosen sealer. Different products have different application and drying times.
Application Tips for Durability
Ensure your whitewash is completely dry before applying any sealer. This might take 24-48 hours. Applying sealer too soon can cause issues like bubbling or a tacky finish. Lightly scuff the whitewashed surface with 400-grit sandpaper if needed. This provides extra grip for the sealer. Then wipe off any dust thoroughly.
Apply your chosen sealer in thin, even coats. For polyurethane or polycrylic, use a good quality brush or foam applicator. Work in the direction of the wood grain. Avoid overworking the product to prevent brush marks. Many products benefit from 2-3 thin coats for optimal protection. Allow each coat to dry fully before applying the next. Lightly sand between coats with 400-grit sandpaper for a smoother finish. Remember to wipe away dust between sanding and the next coat.
For wax, apply a thin layer with a clean cloth. Rub it into the surface in small sections. Then, buff it off with a clean, soft cloth until smooth and lustrous. This final step ensures your beautifully whitewashed furniture withstands the test of time and use.
Troubleshooting Common Whitewashing Challenges
Even with careful planning, sometimes things do not go exactly as expected when you whitewash dark furniture. Common issues can arise, from uneven coverage to pesky bleed-through. Do not worry; most problems have straightforward solutions. I have encountered these challenges myself, and I can assure you they are fixable.
Addressing these issues promptly ensures your furniture project ends successfully. Knowing how to troubleshoot helps maintain your confidence throughout the DIY process. This section covers the most common problems and their effective remedies.
Dealing with Tannin Bleed-Through
Tannin bleed-through is a common issue with dark wood, especially oak or mahogany. Tannins are natural wood dyes that can seep through white or light paint, causing yellow, pink, or brownish stains. This happens even after priming sometimes. It is frustrating, but preventable.
If you see bleed-through, stop painting immediately. Allow the area to dry completely. Then, apply a second coat of a high-quality stain-blocking primer. Shellac-based primers are particularly effective against stubborn tannins. Let this coat dry fully. If the bleed-through is severe, a third coat might be necessary. Once the primer is dry and no stains reappear, you can resume your whitewash application. The key is to create an impenetrable barrier.
Correcting Uneven Application
Uneven application can result in patchy or streaky whitewash. This usually happens if you apply too much or too little wash in one area. It can also occur if you do not wipe back consistently. The solution depends on whether the wash is wet or dry.
If the wash is still wet, quickly use a clean, damp rag to gently blend the uneven areas. You can also reapply a very thin, even layer over the entire section and immediately wipe back. If the wash is dry and appears streaky, you have a few options. For minor streaks, you might gently sand the area with fine-grit sandpaper and reapply a very thin wash. For more significant unevenness, you might need to apply another thin, even coat over the entire surface and wipe back consistently. Patience and thin layers are your best friends here. For general painting tips, you might find our guide on how to paint furniture without brush marks useful, as some principles apply.
Addressing Brush Marks and Imperfections
Visible brush marks can detract from a smooth whitewash finish. This often happens if the paint is too thick or if you apply it unevenly. Imperfections can also arise from dust or debris on the surface.
To prevent brush marks, ensure your whitewash solution is thin enough. Apply with a good quality brush and use long, even strokes. If you notice brush marks after the wash dries, gently sand the affected area with very fine-grit sandpaper (e.g., 400-grit). Lightly sand just enough to smooth the marks. Wipe away all dust. Then, apply another very thin coat of whitewash. For dust or debris, carefully pick it out while the wash is wet. If it dries, you will need to gently sand it down and reapply. A smooth finish makes a huge difference.
Frequently Asked Questions
Can you whitewash all types of dark furniture?
Yes, you can whitewash most types of dark furniture. This includes pieces made from solid wood, veneer, or even laminate with proper preparation. The key is thorough cleaning, light sanding, and applying a good stain-blocking primer. This creates an ideal surface for the whitewash to adhere and look its best.
How long does whitewashing dark furniture take?
The time it takes to whitewash furniture varies based on the size and complexity of the piece. A small side table might take a day or less. A large dresser could take two to three days, including drying times between coats. Preparation is usually the most time-consuming part.
Is whitewashing better than painting dark furniture solid white?
Neither is inherently “better”; they offer different aesthetics. Whitewashing creates a translucent finish, allowing the wood grain to show through. This gives a soft, aged, or coastal look. Painting solid white provides complete opaque coverage for a more modern or sleek appearance. Your choice depends on your desired style.
What type of paint is best for whitewashing?
Water-based latex or acrylic paint is generally best for whitewashing. Choose a flat or eggshell sheen for a soft, matte look. Mix it with water to achieve the desired translucent consistency. These paints are easy to work with and clean up quickly.
How do I clean whitewashed furniture?
Clean whitewashed furniture gently. Use a damp, soft cloth to wipe away dust and light grime. For tougher spots, a mild soap solution can be used. Avoid abrasive cleaners or harsh chemicals, as they can damage the finish or strip the protective topcoat. Regular dusting helps maintain its beauty.
Does whitewashing work on veneer?
Yes, whitewashing can work on veneer furniture. The process is similar to solid wood. Ensure the veneer is in good condition, without peeling or bubbling. Thorough cleaning, light sanding, and a good primer are crucial for paint adhesion. This helps create a smooth, beautiful whitewashed finish on veneer pieces.
Conclusion
Transforming dark furniture into bright, inviting pieces is a rewarding project. Learning how to whitewash dark furniture allows you to update your home’s aesthetic without buying new items. You can lighten your space and give old furniture a fresh, new look. I believe this DIY technique offers immense creative freedom and practical benefits.
From meticulous preparation to the careful application of your chosen whitewash technique, each step contributes to a stunning result. Remember the importance of cleaning, sanding, and priming your dark pieces. These foundations ensure your whitewash adheres beautifully and prevents issues like bleed-through. Experiment with different ratios and wiping methods to achieve the perfect translucent finish. Finally, seal your hard work to protect it for years to come. Embrace the challenge and enjoy the satisfaction of creating something beautiful with your own hands. Give your dark furniture a bright new future today!
- whitewash furniture
- DIY furniture makeover
- dark wood transformation
- furniture painting
- distressing furniture

Todd Martin
Senior Writer
With over 15 years of experience in home renovation and design, I started HEG to share what I’ve learned with homeowners who want to create spaces that are both beautiful and functional. I’ve always believed in a hands-on approach, and over the years, I’ve picked up practical solutions that actually work. Through HEG, I aim to make home improvement more approachable, sharing real tips that help you create a home you truly love.