· Todd Martin · Automotive Maintenance · 18 min read
How To Clean Cylinder Head
How To Clean Cylinder Head Effectively
Cleaning a cylinder head is an important part of engine maintenance. Carbon deposits build up over time. These deposits hurt engine performance. Proper cylinder head cleaning restores efficiency. It also extends your vehicle’s life. I will show you how to tackle this task with confidence. We will cover necessary tools, step-by-step processes, and important safety tips. Get ready to learn about bringing your engine back to its best.
Takeaway
Cleaning your cylinder head is a critical maintenance task for engine health and performance.
- Remove the cylinder head: This is usually necessary for a thorough cleaning.
- Use specialized tools and chemicals: Carbon scrapers, wire brushes, and chemical decarbonizers are essential.
- Focus on critical areas: Clean combustion chambers, valve ports, and gasket surfaces carefully.
- Inspect and replace parts: Check valves, springs, and seals. Always use new gaskets during reassembly.
- Reassemble precisely: Follow torque specifications for bolts to ensure a proper seal.
To clean a cylinder head, you must typically remove it from the engine. Then, you mechanically scrape and chemically dissolve carbon deposits from combustion chambers, valve ports, and gasket surfaces. This process restores proper airflow and sealing, improving engine efficiency. Proper cleaning prevents future performance issues.
Why Cleaning Your Cylinder Head Matters for Engine Health
The cylinder head is a vital component of your engine. It sits atop the engine block. It seals the combustion chambers. This part also houses the valves, camshaft, and spark plugs. Over time, carbon deposits form in the combustion chambers and valve ports. These deposits come from burning fuel and oil. They can significantly impact your engine’s performance.
Carbon buildup reduces the volume of the combustion chamber. This lowers the compression ratio. It also creates hot spots. These hot spots can lead to pre-ignition or “pinging.” This condition causes engine knocking. It also reduces fuel efficiency. Dirty valve ports restrict airflow. This limits how much air and fuel can enter or exit the cylinders. This directly translates to less power and poorer throttle response.
A clean cylinder head allows for optimal airflow and combustion. It ensures your engine runs as efficiently as possible. Cleaning prevents further damage to engine components. It also helps avoid costly repairs down the road. Regular maintenance, including targeted cleaning, makes your engine last longer. I find that investing time in this process pays off in vehicle longevity and better performance.
Essential Tools and Materials for Cylinder Head Cleaning
Before you begin the cylinder head cleaning process, gather all necessary tools and materials. Having everything ready saves time and ensures a smooth operation. Safety gear is always first. You will be working with chemicals and sharp tools. So, protect yourself properly.
Here is a list of what you will need:
- Safety Gear:
- Safety glasses or goggles: Protect your eyes from debris and chemicals.
- Chemical-resistant gloves: Prevent skin contact with harsh cleaners.
- Respirator or face mask: Guard against inhaling chemical fumes and fine particles.
- Basic Disassembly Tools:
- Socket set and wrenches: For removing bolts and nuts.
- Torque wrench: Essential for proper reassembly, ensuring bolts are tightened to specification.
- Scrapers: Gasket scrapers for removing old gasket material. Carbon scrapers for heavy deposits.
- Wire brushes: Various sizes and types (brass, steel, nylon) for different surfaces.
- Cleaning Agents:
- Degreaser: For initial cleaning of oil and grease.
- Carburetor cleaner or specialized carbon remover: Powerful solvents for dissolving stubborn carbon deposits.
- Brake cleaner: Good for final rinse and quick drying.
- Parts cleaning solvent: For soaking smaller components.
- Brushes and Applicators:
- Nylon brushes: For less aggressive cleaning and delicate areas.
- Small detail brushes: For intricate valve guides and ports.
- Plastic scrapers: To avoid scratching aluminum surfaces.
- Measuring Tools:
- Feeler gauges: To check valve clearances.
- Straight edge: To check the cylinder head for warping.
- Miscellaneous:
- Shop rags or towels: For wiping and cleaning.
- Bucket or basin: For soaking parts.
- Compressed air: For blowing out debris and drying parts.
- New head gasket and valve stem seals: Always replace these during reassembly.
Having these items on hand makes the cleaning process much more efficient. It also helps ensure a professional result. I always double-check my inventory before starting any significant engine work. This prevents unexpected stops in the middle of the job.
Disassembly and Preparation for Cylinder Head Cleaning
Proper disassembly is the first critical step when you want to clean cylinder head thoroughly. This process ensures you access all areas needing attention. It also prevents damage to other engine components. Remember, patience and organization are key here. I always recommend taking photos at each stage. This helps immensely during reassembly.
Draining Fluids and Disconnecting Components
First, safely drain the engine coolant and engine oil. Place proper collection pans underneath. Then, disconnect the battery. This prevents accidental electrical shorts. Next, you need to remove various hoses and electrical connectors. These typically include:
- Coolant hoses
- Fuel lines (depressurize first)
- Vacuum lines
- Electrical wiring harnesses for injectors, sensors, and spark plugs
Labeling each hose and connector as you remove it is a smart idea. You can use tape and a marker for this. This simplifies the reassembly process. Trust me, you will thank yourself later for this small effort.
Removing Ancillary Components
Before the head itself comes off, you must remove parts attached to it. This includes:
- The intake manifold
- The exhaust manifold
- Spark plugs
- Valve cover
- Rocker arms and pushrods (if applicable)
- Camshaft (if head-mounted)
Be gentle when removing these parts. Some gaskets might stick. Use a plastic scraper to avoid damage. Keep all fasteners organized. I like to use labeled plastic bags for bolts from different sections. This ensures every bolt goes back to its original location. Different bolts often have different lengths or thread types.
Detaching the Cylinder Head
Finally, you can remove the cylinder head bolts. These bolts are usually tightened in a specific sequence. Consult your vehicle’s service manual for the correct loosening pattern. This pattern prevents warping the head. Loosen them in stages, typically half a turn at a time, following the reverse of the tightening sequence. Once all bolts are loose, carefully lift the cylinder head off the engine block. It might be heavy, so get help if needed.
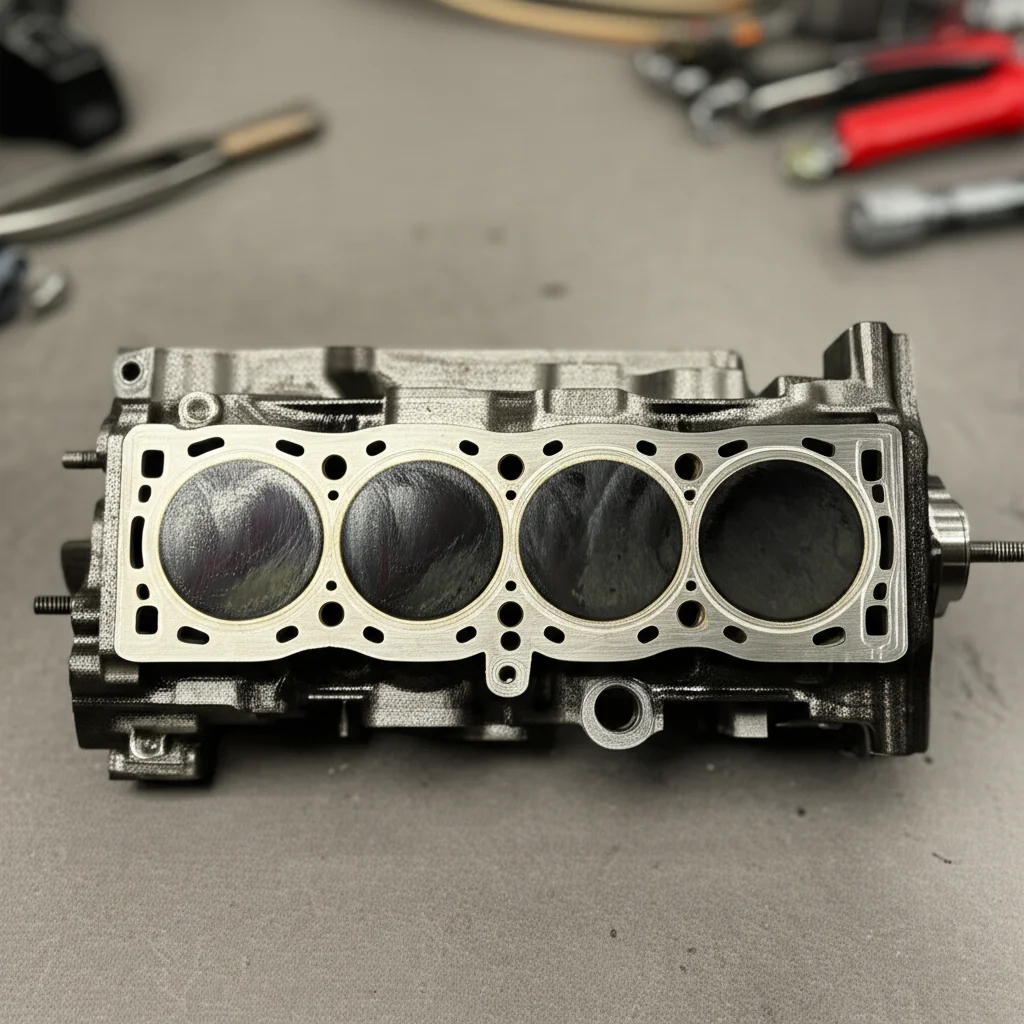
Inspect the old head gasket. Note where it was stuck or if there were any signs of leaks. This information can be useful for diagnosing past engine issues. With the cylinder head off, you are ready for the cleaning phase. This preparation is foundational. It ensures that your cylinder head cleaning is effective and safe.
Cleaning Methods for Cylinder Head Components
Once the cylinder head is off the engine, you can begin the detailed cylinder head cleaning process. This involves several steps and techniques to remove carbon, oil, and old gasket material. Each component requires specific attention. I focus on meticulous cleaning because even small deposits can affect performance.
Removing Old Gasket Material and Surface Preparation
Start by removing any remnants of the old head gasket from the mating surface. Use a dedicated gasket scraper. Hold it at a low angle. Scrape gently to avoid gouging the aluminum or cast iron surface. For aluminum heads, be extra careful. Aluminum is softer. You can also use a fine-grade abrasive pad on a drill, but use extreme caution. Ensure the gasket surface is perfectly clean and flat. Any remaining material can cause leaks with the new gasket. Learn more about how to clean aluminum head gasket surface effectively for best results.
Decarbonizing Combustion Chambers and Valve Ports
This is where the bulk of the carbon buildup resides. These areas are crucial for engine efficiency.
- Soaking: Apply a generous amount of carburetor cleaner or specialized carbon remover to the combustion chambers and valve ports. Let it soak for several hours, or even overnight, as per the product instructions. This softens the hardened carbon.
- Mechanical Cleaning: After soaking, use a combination of wire brushes (brass for softer surfaces, steel for stubborn cast iron) and scrapers. Small detail brushes are excellent for reaching into valve guides and tight corners. I often use a stiff toothbrush for intricate areas. Compressed air helps blow out loosened debris.
- Valve Cleaning: If you have removed the valves, clean the valve faces and stems separately. Use a wire wheel on a bench grinder for valve faces, but be gentle. Clean valve stems with a wire brush and solvent. If you haven’t removed the valves, you can still clean the visible parts of the valves and their seats. Sometimes, you can clean a cylinder head without removing valves. This might be a quicker method for light buildup. Check out tips for how to clean cylinder head without removing valves if that applies to your situation.
Cleaning Valve Guides and Seats
These areas are critical for valve sealing and proper operation.
- Valve Guides: Use small, cylindrical wire brushes specifically designed for valve guides. Work them through the guides to remove carbon. Ensure the guides are completely clear.
- Valve Seats: While difficult to fully clean without specialized equipment (like seat cutters), you can use solvent and a small brush to remove loose carbon. The goal is to ensure the valve seats are smooth for proper valve sealing. If valve seats are pitted or damaged, professional machining might be necessary.
Cleaning Oil Passages and Coolant Passages
Use pipe cleaners, small brushes, and compressed air to clear all oil and coolant passages. These passages ensure proper lubrication and cooling. Blockages can lead to serious engine problems. Flush them thoroughly with a degreaser or cleaning solvent. Then, blow them dry with compressed air.
Thorough cylinder head cleaning requires time and attention to detail. Doing it right will significantly contribute to your engine’s renewed performance.
Detailed Steps for Cleaning Stubborn Carbon Buildup
Stubborn carbon buildup is the biggest challenge when you clean cylinder head. It adheres strongly to surfaces. It needs targeted techniques. I have found a combination of chemical and mechanical methods works best. This approach ensures thorough removal without damaging the metal.
Chemical Soaking for Penetration
The first step for hardened carbon is chemical penetration. I apply a robust carbon remover or carburetor cleaner. These products contain strong solvents. They break down the chemical bonds of carbon deposits.
- Application: Spray or pour the cleaner directly onto the affected areas. Cover the combustion chambers, valve ports, and the valve faces (if valves are removed).
- Dwell Time: Allow the cleaner to soak. Follow the product’s instructions for dwell time. For very heavy deposits, I let it sit for several hours, even overnight. Keeping the surface wet helps. You can cover the head with plastic wrap to prevent evaporation. This long soak allows the chemicals to penetrate deeply into the carbon layers.
Mechanical Removal Techniques
After soaking, the carbon becomes softer. This makes mechanical removal easier.
- Scraping: Use a dedicated carbon scraper or a small, blunt chisel. Gently scrape away the softened carbon. Be careful not to gouge the metal, especially on aluminum heads. For intricate areas, a dental pick or a small screwdriver can be useful.
- Brushing: Employ wire brushes of various sizes and stiffness.
- Brass brushes: These are softer. They work well for aluminum surfaces. They remove carbon without scratching.
- Steel brushes: Use these for cast iron heads and very stubborn spots. Use them with caution on softer metals.
- Nylon brushes: These are good for final scrubbing or less aggressive areas.
- Rotary Tools: A Dremel or similar rotary tool with a small wire brush attachment can be effective for hard-to-reach areas. Use it at a low speed. Apply light pressure. Excessive speed or pressure can damage the metal. I use these tools carefully.
- Compressed Air: After scraping and brushing, blow out all loose debris with compressed air. Wear eye protection. This step is crucial. It removes small particles that could get lodged in passages.
Repeated Cycles for Heavy Deposits
For exceptionally heavy carbon buildup, you might need to repeat the soaking and mechanical cleaning cycle. It is often better to do multiple lighter passes than one aggressive attempt. This minimizes the risk of damage. After each cycle, inspect the surface closely. Look for any remaining black spots or rough textures. My goal is a smooth, clean metal surface. This meticulous approach ensures optimal engine performance after reassembly.
Cleaning Valve Guides and Valve Seats: Precision Matters
Cleaning the valve guides and valve seats requires precision. These components are vital for proper valve operation and engine compression. Neglecting them can lead to poor sealing, oil consumption, and reduced performance. I approach these areas with extra care.
The Role of Valve Guides and Seats
- Valve Guides: These cylindrical sleeves guide the valve stem. They ensure the valve opens and closes accurately. Carbon buildup inside the guides can cause valves to stick. It can also lead to excessive wear on the stem.
- Valve Seats: These are machined surfaces on the cylinder head where the valve head rests when closed. A perfect seal between the valve face and the valve seat is crucial. It contains the combustion pressure. Carbon on the seat can prevent a tight seal. This results in compression loss.
Cleaning Valve Guides
Cleaning valve guides often happens in two ways: with valves in or valves removed.
- Valves Removed: This is the ideal scenario for thorough cleaning.
- Use specialized valve guide brushes. These are cylindrical brushes, often made of nylon or brass. They match the guide’s diameter.
- Apply a generous amount of carbon cleaner or parts solvent.
- Insert the brush into the guide. Twist and push it back and forth. Work the brush through the entire length of the guide.
- Repeat this process several times until the brush moves freely.
- Finally, blow out the guide with compressed air. Ensure no debris remains. I inspect with a flashlight to verify cleanliness.
- Valves In (Less Thorough): If valves are not removed (e.g., for a lighter cleaning), apply solvent around the valve stem. Use a small detail brush or cotton swab to clean as much of the exposed stem and guide as possible. Cycle the valve to move the carbon. This method is less effective for heavy buildup but can help for minor deposits.
Cleaning Valve Seats
Valve seats are more challenging to clean thoroughly without professional equipment. However, you can still improve them.
- Chemical Soaking: Apply carbon cleaner directly to the valve seats and the surrounding combustion chamber. Let it soak extensively.
- Gentle Mechanical Scrubbing: After soaking, use a non-abrasive tool. A plastic scraper or a stiff nylon brush can help remove softened carbon from the seat surface. Do not use metal tools that could scratch or damage the precise angle of the seat.
- Inspection: Inspect the valve seats for pits, cracks, or excessive wear. If the seats are damaged, they will not seal properly. In such cases, the cylinder head might need professional machining. This involves grinding or cutting the seats to restore their proper angle and finish. This is beyond DIY scope.
Maintaining clean valve guides and seats ensures valves operate smoothly. It also provides a strong seal. This is fundamental for your engine’s power and efficiency.
Final Inspection, Assembly, and Post-Cleaning Tips
After the thorough cylinder head cleaning, the job is not yet done. A final inspection and proper reassembly are just as critical as the cleaning itself. Rushing this stage can undo all your hard work. I take my time here to ensure everything is perfect before the engine goes back together.
Thorough Final Inspection
Before you even think about putting parts back, give the cylinder head a complete, detailed inspection.
- Cleanliness Check: Use a bright light and look into every passage and corner. Ensure no carbon, old gasket material, or debris remains. Any lingering particle can cause problems.
- Surface Flatness: Place a straight edge across the gasket surface in multiple directions. Use feeler gauges to check for warpage. Even a slight warp (e.g., more than 0.002-0.004 inches, depending on manufacturer specs) can cause a head gasket leak. If the head is warped, it needs to be machined by a professional shop.
- Cracks and Damage: Inspect the cylinder head for any cracks, especially around valve seats, spark plug holes, and coolant passages. Look for signs of pitting or erosion. Small cracks can grow under heat and pressure.
- Valve and Guide Wear: If valves were removed, inspect valve stems for wear. Check valve guides for excessive play. If play is significant, new guides might be needed.
- Thread Condition: Inspect all bolt holes. Ensure threads are clean and undamaged. Run a thread chase through them if necessary to clean them out.
Reassembly with New Components
Always use new gaskets and seals when reassembling the cylinder head. Old gaskets cannot provide a proper seal.
- New Head Gasket: Place the new head gasket onto the engine block. Ensure it is oriented correctly. Head gaskets are designed for specific engines and directions.
- Install Cylinder Head: Carefully lower the cleaned cylinder head onto the engine block, aligning it with the gasket and dowel pins. This can be tricky due to weight.
- Cylinder Head Bolts: Install new cylinder head bolts if your vehicle manufacturer recommends it (many do, as they are “torque-to-yield” bolts). Apply a light coat of engine oil to the bolt threads and under the bolt heads, unless specified otherwise.
- Torque Sequence: This is paramount. Consult your vehicle’s service manual for the exact torque specifications and sequence for the cylinder head bolts. Tighten them in stages, following the specified pattern, usually in three or more steps. Using a torque wrench is non-negotiable for this. Improper torque can cause head warpage or gasket failure.
- Reinstall Components: Reinstall the camshaft, rocker arms, valve cover, manifolds, spark plugs, and all other components you removed. Follow the reverse order of disassembly. Ensure all electrical connectors and hoses are reattached and secure. Double-check your labels.
Post-Cleaning and Start-Up Tips
- Refill Fluids: Add new engine oil and coolant.
- Bleed Air: Ensure you properly bleed air from the cooling system. Air pockets can cause overheating.
- Initial Start-Up: Start the engine. Listen for any unusual noises. Check for leaks around the head gasket and other connections.
- Monitor: Drive the vehicle gently for the first few hundred miles. Monitor temperature, oil pressure, and coolant levels closely. Re-torque cylinder head bolts after a specified mileage if your manual recommends it.
By following these steps, you will ensure your cylinder head cleaning job is not only successful but also leads to a reliable and improved engine performance. This attention to detail is what makes a difference in engine longevity.
Frequently Asked Questions About Cleaning Cylinder Heads
How often should I clean my cylinder head?
Cylinder head cleaning is not a routine maintenance item like an oil change. It is typically done when there are signs of significant carbon buildup impacting performance, such as misfires, reduced power, or knocking. It is often part of a larger engine repair, like a head gasket replacement. For most daily drivers, this might be a once-in-a-lifetime repair or never, depending on engine design and maintenance habits.
Can I clean a cylinder head without removing it from the engine?
Yes, you can perform a basic “on-engine” decarbonization using chemical additives. These are poured into the fuel tank or directly into the intake system. While these methods can help reduce light carbon buildup, they are far less effective than a full, off-engine cleaning. A thorough cleaning always requires removing the cylinder head to access all areas.
What are the signs that my cylinder head needs cleaning?
Signs of a dirty cylinder head or excessive carbon buildup include reduced engine power and acceleration, decreased fuel economy, persistent engine knocking or pinging, misfires, and rough idle. You might also notice increased oil consumption or even a check engine light if the issues become severe. These symptoms indicate inefficient combustion due to carbon.
Is professional cylinder head cleaning necessary?
For minor carbon buildup, DIY chemical cleaning can help. However, for severe buildup, warping, or damage, professional service is often necessary. Machine shops have specialized equipment to hot-tank the head, resurface it (mill it flat), and perform valve seat grinding or valve guide replacement. These tasks require precision that is difficult to achieve at home.
How long does it take to clean a cylinder head?
The cleaning process itself, once the head is off, can take several hours to a full day, depending on the severity of the carbon buildup and the cleaning methods used. This does not include the time required for engine disassembly and reassembly, which can add significant hours. For a DIY mechanic, the entire job might span a weekend or several days.
Can cleaning a cylinder head improve fuel efficiency?
Yes, absolutely. Carbon buildup in the combustion chambers and on valve seats can reduce the engine’s compression and hinder proper airflow. This makes the engine work harder and less efficiently. By thoroughly cleaning the cylinder head, you restore optimal combustion and airflow, which directly contributes to improved fuel efficiency and overall engine performance.
Conclusion: Restoring Engine Performance Through Cylinder Head Cleaning
Cleaning your cylinder head is a detailed but rewarding process. It directly addresses issues caused by carbon buildup. This buildup, over time, reduces engine power and efficiency. By following the steps I outlined, you can effectively remove these harmful deposits. This restores your engine’s original performance.
We covered why cleaning cylinder head is vital, the tools you need, and the precise steps for disassembly and cleaning. We also discussed how to handle stubborn carbon and clean critical valve components. Finally, we looked at careful reassembly. This comprehensive approach ensures a job well done. Proper cylinder head maintenance extends your engine’s life. It also keeps your vehicle running smoothly. If you feel ready to tackle this task, gather your tools and get started. Your engine will thank you for the meticulous care.
- engine cleaning
- carbon buildup
- cylinder head maintenance
- engine repair
- DIY auto repair

Todd Martin
Senior Writer
With over 15 years of experience in home renovation and design, I started HEG to share what I’ve learned with homeowners who want to create spaces that are both beautiful and functional. I’ve always believed in a hands-on approach, and over the years, I’ve picked up practical solutions that actually work. Through HEG, I aim to make home improvement more approachable, sharing real tips that help you create a home you truly love.