· Todd Martin · Audio Equipment Maintenance · 21 min read
How To Clean Turntable Needle
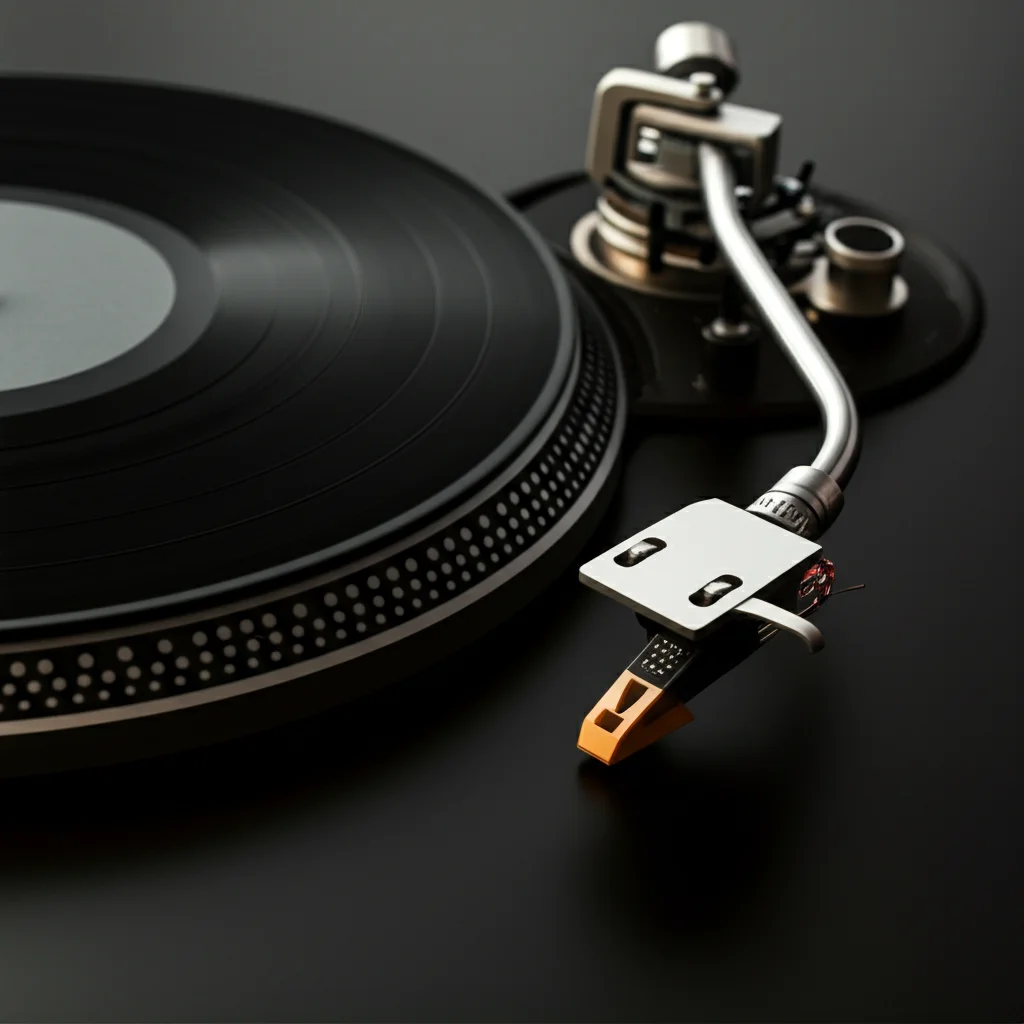
How to Clean Your Turntable Needle: A Comprehensive Guide
Do you love listening to records? Vinyl records offer a unique sound experience. Many people enjoy the warm, rich audio that only a turntable can provide. But sometimes, your records might not sound as good as you remember. A common reason for poor sound quality is a dirty turntable needle. Learning how to clean turntable needle is important for all vinyl enthusiasts.
A clean needle makes your music sound much better. It also helps your records last longer. A dirty needle can collect dust and grime. This debris then grinds into your records. This can damage both the needle and your precious vinyl. I will guide you through the process. This article shows you how to properly clean your turntable needle. We will cover essential tools, methods, and tips. You will discover simple steps to improve your listening experience.
Takeaway
Keeping your turntable needle clean is simple and crucial for sound quality and record longevity.
- Always use the right tools, like a dedicated stylus brush.
- Brush the needle from back to front, never side to side.
- Inspect your needle often with a magnifying glass.
- Clean your records regularly to reduce dirt on the needle.
- A clean needle protects your vinyl and delivers the best sound.
How to Clean a Turntable Needle
To clean a turntable needle, gently brush it from back to front using a specialized stylus brush. For stubborn dirt, apply a small drop of dedicated stylus cleaning fluid to the brush before sweeping. Always handle the needle with care to avoid damage. This keeps your records sounding clear and extends needle life.
Why Cleaning Your Turntable Needle Matters
Cleaning your turntable needle, also called a stylus, is not just a suggestion. It is a necessary part of caring for your vinyl setup. The needle is the only part that touches your records. It reads the tiny grooves on the vinyl surface. If the needle is dirty, it cannot read these grooves properly.
A dirty turntable needle causes many problems. First, your music sounds muffled or distorted. You might hear crackling noises more often. Dust and dirt build up on the stylus tip. This creates a barrier between the needle and the record groove. This barrier prevents clear sound reproduction. You lose the fine details in your music.
Second, a dirty needle damages your records. The accumulated grime acts like sandpaper. It grinds away at the delicate vinyl grooves. This creates permanent damage. Over time, your records will sound worse. This damage cannot be repaired. Protecting your records begins with a clean needle. Many people learn how to clean record player needle to keep their collection safe.
Third, a dirty needle shortens the life of your stylus. The tip of the needle is very small and fragile. It is usually made from diamond. Dirt and debris cause extra friction. This extra friction wears down the needle faster. A worn needle tracks poorly and sounds bad. Replacing a stylus can be expensive. Regular cleaning extends its lifespan. This saves you money in the long run. Proper care is key for any audio equipment.
Finally, cleaning your turntable needle helps you enjoy your music more. A clean stylus provides the best sound. You hear the music as the artists intended. It is a simple step that makes a big difference. This small task protects your investment. It also enhances your listening pleasure. Always remember the importance of this simple act.
When and How Often to Clean Your Turntable Needle
Knowing when to clean your turntable needle is as important as knowing how. There are clear signs that your stylus needs attention. Pay close attention to these signals. This helps you maintain good sound quality. It also prevents damage to your records.
How to Spot a Dirty Needle
You can often see dirt on your stylus with your eyes. Look closely at the needle tip. Dust, lint, or other debris might be stuck to it. Use a magnifying glass for a better view. Many audiophiles keep a small jeweler’s loupe for this purpose. Even a small piece of dust can affect sound.
Your ears also tell you if the needle is dirty. Muffled sound is a common symptom. The music might sound less clear. High frequencies, like cymbals or vocals, might seem dull. You might hear static or crackling sounds. These sounds are often louder than usual. Skipping or mistracking can also happen. The needle might jump out of the record groove. These audio issues point to a dirty stylus. This is a good time to learn how to clean your record player needle.
Cleaning Frequency Recommendations
There are general guidelines for cleaning frequency. Many experts recommend cleaning your needle before each listening session. This means every time you plan to play records. This ensures maximum cleanliness. It prevents dirt from building up. This habit keeps your records in top condition.
If you play records frequently, daily cleaning is ideal. If you listen less often, clean before each use. Some people clean after every few record sides. This depends on how clean your records are. Dusty records make the needle dirty faster. It also depends on your home environment. A dusty room requires more frequent cleaning.
A good rule of thumb is to inspect the stylus often. If you see visible debris, clean it. If your sound quality drops, clean it. Being proactive saves your records. It also keeps your sound system performing its best. Make cleaning a regular part of your vinyl routine. This simple step preserves your gear. It also keeps your music sounding pristine.
Essential Tools for Turntable Needle Cleaning
Having the right tools makes turntable needle cleaning easy and safe. Using improper tools can damage your delicate stylus. Gather these items before you start the cleaning process. Each tool plays an important role. They help ensure a thorough and safe cleaning.
Stylus Cleaning Brush
A dedicated stylus cleaning brush is the most important tool. These brushes have very fine, soft bristles. They are designed to safely remove dirt from the tiny needle tip. Do not use an old toothbrush or any other brush. Those bristles are too stiff. They can damage the stylus or cantilever. Look for a carbon fiber stylus brush or a special nylon brush. These brushes lift dirt effectively without scratching. They are easy to find at audio equipment stores. A good brush is the foundation of proper record player needle cleaning.
Stylus Cleaning Fluid
For stubborn dirt, a specialized stylus cleaning fluid is necessary. These fluids are formulated to dissolve grime. They evaporate quickly and leave no residue. Do not use alcohol, water, or other household cleaners. These can harm the stylus adhesive or cantilever. Many fluid brands come with a small application brush. You only need a tiny drop of fluid. Apply it directly to your stylus brush, not the needle itself. This prevents liquid from getting into the cartridge. Always follow the fluid manufacturer’s instructions.
Magnifying Glass or Loupe
A magnifying glass or jeweler’s loupe is very helpful. The turntable needle is extremely small. It is hard to see tiny specks of dust with the naked eye. A magnifying tool lets you inspect the stylus closely. You can see exactly where the dirt is. This helps you clean more effectively. It also lets you check if the needle is truly clean after your efforts. Many loupes offer 10x or 30x magnification. This is enough to see the stylus tip clearly.
Other Useful Items
- Clean Microfiber Cloth: Keep a clean, lint-free microfiber cloth nearby. Use it to wipe down your turntable platter or dust cover. This helps reduce dust in the area.
- Anti-Static Record Brush: Cleaning your records helps keep your needle clean. Use an anti-static brush before playing each record. This removes surface dust and static charge. Less dust on the record means less dust transferred to the needle. This is an important step for overall vinyl care.
- Good Lighting: Work in a well-lit area. This helps you see the needle clearly. Bright light is essential when using a magnifying glass. Good visibility prevents accidental damage.
Having these tools ready makes the cleaning process simple. They ensure you clean your turntable needle safely. This keeps your sound system working its best.
Step-by-Step Guide to Manual Turntable Needle Cleaning
Cleaning your turntable needle manually is straightforward. It requires a steady hand and gentle movements. Follow these steps carefully to ensure you clean your stylus effectively without causing damage. This method uses a stylus brush and, if needed, a cleaning fluid.
Step 1: Prepare Your Turntable
First, turn off your turntable. Remove the record from the platter. This prevents accidental movement. It also ensures the area is clear for cleaning. Make sure the turntable is stable. You do not want it to wobble during the process. Move your tonearm to the tonearm rest. Secure it if your turntable has a locking mechanism. This prevents the tonearm from swinging freely.
Step 2: Inspect the Needle
Bring a magnifying glass close to the stylus. Look at the tip of the needle. See if you can spot any dust, lint, or debris. Note where the dirt is concentrated. This visual check helps you target your cleaning efforts. It also gives you an idea of how much cleaning is needed.
Step 3: Use a Dry Stylus Brush
Pick up your dedicated stylus cleaning brush. Hold the brush so the bristles are flat against the needle. Brush gently from the back of the stylus towards the front. Imagine the direction the record spins. You are moving the brush in the same direction the record moves under the needle.
- Key Point: Always brush from back to front. Never brush side to side. Never brush from front to back. Brushing in the wrong direction can bend or break the delicate cantilever. The cantilever is the tiny arm holding the stylus.
- Repeat this gentle brushing motion several times. Use very light pressure. The goal is to sweep away loose dust.
Step 4: Apply Stylus Cleaning Fluid (If Needed)
If the dry brush did not remove all the dirt, use stylus cleaning fluid. Put a tiny drop of the fluid onto your stylus cleaning brush. Do not apply the fluid directly to the needle itself. This prevents excess liquid from reaching the cartridge. A small amount of fluid is enough.
- Important: Only use fluid designed for stylus cleaning. Other liquids can damage your cartridge.
Once the fluid is on the brush, repeat the brushing motion. Brush from back to front again. The fluid will help dissolve sticky grime. It helps remove more stubborn contaminants. Allow the fluid to evaporate fully. This usually takes only a few seconds. Do not play a record until the needle is completely dry.
Step 5: Re-Inspect the Needle
After cleaning, use your magnifying glass again. Check the stylus tip one more time. Make sure all visible debris is gone. The needle should look clean and shiny. If you still see dirt, repeat steps 3 and 4. Be patient and gentle. A clean stylus ensures optimal sound quality. It also protects your vinyl collection.
Regular manual cleaning keeps your turntable needle in excellent condition. This simple routine improves your listening experience. It also extends the life of your valuable audio equipment. Remember that maintaining your record player’s needle is part of responsible ownership.
Advanced Turntable Needle Cleaning Methods
While manual brushing is effective, some advanced methods offer deeper cleaning. These methods are useful for deeply embedded grime or for those who seek the absolute best performance. They might involve specialized devices. These tools often provide a more thorough clean than a brush alone.
Ultrasonic Stylus Cleaners
Ultrasonic cleaners use high-frequency vibrations. These vibrations create microscopic bubbles in a cleaning solution. The bubbles then collapse, creating a scrubbing action. This action dislodges dirt and debris from the stylus tip. It reaches areas a brush might miss.
To use an ultrasonic cleaner:
- Fill the tray: Add a small amount of dedicated stylus cleaning fluid to the cleaner’s tiny tray.
- Lower the stylus: Carefully lower your turntable’s stylus into the fluid in the tray. Ensure only the very tip of the stylus touches the liquid. The cartridge body must stay dry.
- Activate: Turn on the ultrasonic cleaner for a few seconds. Most units have a pre-set cycle.
- Lift and dry: Lift the stylus out. Allow it to air dry completely. Some cleaners come with a small, soft pad to gently wick away excess liquid.
Ultrasonic cleaners offer a very deep clean. They can remove even the most stubborn buildup. However, they are more expensive than brushes and fluids. Some people worry about the long-term effects of vibration on the stylus suspension. Always research and choose a reputable brand. Ensure the cleaner is specifically designed for turntable styli. Using a general ultrasonic cleaner can be too powerful and cause damage. This method is a more intense way to keep your record player’s needle pristine.
Zero-Dust Stylus Pads
Zero-dust pads are a simpler advanced cleaning method. These pads are made of a special, high-tech polymer. The surface is very sticky. When you lower your stylus onto the pad, the sticky surface pulls off dust and debris.
To use a zero-dust pad:
- Place the pad: Put the pad on your turntable platter or a flat, stable surface.
- Lower the stylus: Carefully lower your tonearm. Let the stylus gently rest on the surface of the pad. Do not press down. The weight of the tonearm is enough.
- Lift: Lift the tonearm straight up. The pad will have pulled the dirt off the stylus.
- Clean the pad: Most pads can be rinsed with water to restore their stickiness. Let them air dry.
Zero-dust pads are very effective for daily cleaning. They are quick and easy to use. They remove loose dust and some stickier grime. They are a good alternative or complement to a stylus brush. They are less aggressive than ultrasonic cleaners. They are a great way to maintain tips for cleaning a record player stylus between deeper cleanings.
Both advanced methods can contribute to better sound and a longer-lasting stylus. Choose the method that fits your needs and budget. Consistent cleaning, whether basic or advanced, is key.
Common Mistakes to Avoid When Cleaning Your Turntable Needle
Cleaning a turntable needle is delicate work. Making mistakes can cause serious damage to your stylus or cartridge. This can lead to poor sound or costly repairs. Knowing what not to do is as important as knowing what to do. Avoid these common pitfalls to keep your vinyl setup safe.
1. Brushing in the Wrong Direction
This is the most common and damaging mistake. Always brush the stylus from back to front. This is the direction the record groove moves under the needle. Brushing from front to back can push the cantilever backwards. This can bend or break it. The cantilever is the tiny rod that holds the diamond tip. Brushing side to side can also damage the cantilever suspension. This part allows the stylus to move freely. A damaged cantilever means a damaged stylus. Always remember the back-to-front motion. This protects the delicate components. This is a critical rule when learning how to clean your record player needle.
2. Using the Wrong Cleaning Solutions
Never use alcohol, tap water, or household cleaners. These liquids are not designed for stylus cleaning. Isopropyl alcohol can dissolve the adhesive holding the diamond tip. It can also dry out rubber parts in the cartridge. Tap water leaves mineral deposits. Household cleaners contain harsh chemicals. These chemicals can corrode metal parts. They can also leave sticky residues. Always use a cleaning fluid specifically made for turntable styli. These fluids are safe and effective. They evaporate completely and leave no residue.
3. Applying Too Much Pressure
The stylus and cantilever are extremely fragile. Applying too much pressure while brushing can bend or break them. Use only light, gentle strokes. Let the fine bristles of the stylus brush do the work. The goal is to sweep away dust, not scrub it off. Imagine you are dusting a delicate flower. A light touch prevents accidental damage.
4. Cleaning Too Infrequently
Some people clean their needle only when sound quality severely degrades. This is too late. By then, significant dirt buildup has occurred. This buildup can already be damaging your records. Frequent, light cleaning is better than infrequent, harsh cleaning. Make it a habit to clean your stylus often. Before each listening session is ideal. This prevents stubborn grime from forming. It keeps your records and needle in optimal condition. This consistent approach extends the life of your equipment.
5. Touching the Stylus with Your Fingers
Avoid touching the stylus tip with your fingers. Your skin has natural oils and dirt. These substances can transfer to the stylus. This creates a sticky residue that attracts more dust. It makes cleaning harder. Always use the proper tools. If you accidentally touch it, clean the stylus immediately.
6. Ignoring Record Cleanliness
A dirty record directly contributes to a dirty needle. If your records are dusty, that dust will transfer to your stylus. Cleaning your records regularly reduces the amount of debris your needle picks up. Use an anti-static brush before playing each record. Consider a record cleaning machine for deeper cleaning. A clean record means a cleaner stylus. This combined approach is the most effective. It ensures a longer life for your stylus and clearer sound. It simplifies stylus cleaning in the long run.
Avoiding these common mistakes ensures your turntable needle stays in top condition. Proper care prolongs the life of your equipment. It also maintains excellent sound quality for your vinyl collection.
Maintaining Your Records for a Cleaner Turntable Needle
The cleanliness of your records directly affects your turntable needle. A dirty record transfers its grime to the stylus. This makes your needle dirty faster. It also grinds the dirt into the record grooves. This causes permanent damage. Implementing good record maintenance habits reduces needle cleaning frequency. It also improves overall sound quality.
Always Clean Records Before Playing
This is the most important rule. Before placing any record on your platter, give it a quick clean. Even new records can have manufacturing residue or dust from storage. Used records almost always need cleaning.
- Anti-Static Brush: Use a high-quality carbon fiber anti-static brush. Place the record on the platter. Start the platter spinning. Gently hold the brush on the record surface. Let it make a few rotations. Sweep the dust towards the edge. Then, carefully lift the dust off the record. This removes loose surface dust and static electricity. This simple step greatly reduces the amount of debris the needle picks up. This makes proper record player needle cleaning easier.
Store Records Properly
Proper storage keeps records clean and free from dust.
- Vertical Storage: Always store records vertically. Storing them flat can cause warping over time.
- Inner Sleeves: Use anti-static inner sleeves for your records. The paper sleeves that come with records can shed fibers. They can also scratch the vinyl. Poly-lined or rice paper sleeves are much better. They prevent static buildup and protect the record surface.
- Outer Sleeves: Use clear plastic outer sleeves. These protect the record jacket from dust, dirt, and wear. They add an extra layer of protection against environmental contaminants.
- Controlled Environment: Store records in a clean, dry area. Avoid direct sunlight, extreme temperatures, and high humidity. These conditions can damage vinyl. Dust-free environments mean cleaner records.
Deep Cleaning Records Periodically
For records with embedded dirt or grime, a deep clean is necessary. An anti-static brush only removes surface dust. Deeper cleaning methods get into the grooves.
- Record Cleaning Solutions: Use a dedicated record cleaning solution and a microfiber cloth. Spray the solution sparingly onto the record. Wipe gently in a circular motion, following the grooves. Use a separate clean cloth to wipe dry.
- Record Cleaning Machines: For serious collectors, a record cleaning machine is a worthwhile investment. These machines offer thorough cleaning. They use vacuum suction or ultrasonic technology to remove deeply embedded dirt. They are the most effective way to clean records. A clean record means less turntable needle cleaning.
By maintaining clean records, you ensure your turntable needle stays cleaner longer. This reduces wear on both your stylus and your vinyl collection. It also leads to a much clearer and more enjoyable listening experience. Good record care is part of comprehensive vinyl system maintenance.
Understanding Your Turntable Stylus Types and Their Care
Different turntable styli have unique shapes and materials. Understanding these differences helps you care for your specific needle. While the core cleaning principle (back-to-front brushing) remains the same, knowing your stylus type can inform your cleaning frequency and the care you give it.
Common Stylus Materials
- Diamond: Almost all modern styli use industrial-grade diamonds. Diamond is extremely hard and durable. It provides excellent sound reproduction. Even diamond can wear down over time, especially if dirty. Regular cleaning is crucial for diamond tips.
- Sapphire: Some older or very inexpensive turntables might use sapphire styli. Sapphire is softer than diamond. It wears out much faster, often after only a few hundred hours of play. If you have a sapphire stylus, cleaning is still important, but be aware it will need replacing more frequently.
Common Stylus Cuts (Shapes)
The shape of the stylus affects how it sits in the record groove. Different shapes pick up different levels of detail.
- Conical (Spherical): This is the simplest and most common stylus shape. It has a rounded tip. Conical styli touch the groove walls at two points. They are very forgiving of minor setup errors. They are also less prone to damage from aggressive cleaning. However, they pick up less detail than other shapes. Cleaning a conical stylus is usually straightforward with a brush.
- Elliptical (Bi-radial): An elliptical stylus has a more elongated shape than a conical one. It touches a larger area of the groove wall. This allows it to trace the groove more accurately. It picks up more detail and offers better high-frequency response. Elliptical styli are more delicate than conical ones. They are more sensitive to incorrect brushing. Gentle, consistent back-to-front motion is critical. This is a common shape found when performing how to clean a record player needle.
- Line Contact (Shibata, MicroLine, Fine Line, etc.): These are advanced stylus shapes. They have a very narrow contact area with the groove. They trace the groove with extreme precision. This results in superior detail retrieval and extended frequency response. Line contact styli last longer because their contact area is spread out. However, they are the most delicate styli. They are very sensitive to setup and cleaning. Any accidental side-to-side movement during cleaning can cause damage. They also show dirt accumulation more readily due to their precise contact. Frequent, gentle cleaning is essential for these types. Using a magnifying glass for inspection is highly recommended.
Stylus Care and Lifespan
Regardless of the type, every stylus has a lifespan. Playing dirty records or failing to clean your stylus significantly shortens its life.
- Conical: Approximately 500-1000 hours of play.
- Elliptical: Approximately 300-800 hours of play.
- Line Contact: Approximately 800-1500+ hours of play (due to larger contact area spreading wear).
These are just estimates. Factors like record condition, tracking force, and cleaning habits influence actual lifespan. Regular inspection with a magnifying glass helps you see wear. A worn stylus will sound dull. It can also damage your records. Replace your stylus when it shows significant wear or sounds poor. Proper stylus cleaning extends these lifespans considerably. Understanding your stylus helps you give it the best care possible.
Troubleshooting Common Turntable Needle Cleaning Issues
Even with the right tools and methods, you might face some challenges. Knowing how to troubleshoot common issues ensures your turntable needle stays clean and functional. Here are some problems you might encounter and their solutions.
Issue 1: Stubborn Dirt Won’t Come Off
Sometimes, loose dust is not the only problem. You might have sticky grime or hardened debris on your stylus. This happens if you play many dirty records. It also happens if the needle has not been cleaned in a long time.
Solution:
- Use Stylus Cleaning Fluid: A dry brush might not be enough. Apply a tiny drop of dedicated stylus cleaning fluid to your stylus brush. Then, gently brush from back to front. The fluid helps dissolve the sticky residue.
- Multiple Applications: For very stubborn dirt, you might need to repeat the fluid application a few times. Allow the stylus to dry completely between applications.
- Consider a Zero-Dust Pad: For very sticky contaminants, a zero-dust pad can be effective. It lifts off debris through adhesion. Gently lower the stylus onto the pad. Then lift straight up.
- Professional Cleaning: If nothing works, consider taking your cartridge to an audio specialist. They have advanced tools like ultrasonic cleaners that can often dislodge very stubborn grime safely.
Issue 2: Stylus Appears Clean But Sound Is Still Muffled
You have cleaned your turntable needle. It looks perfectly clean under the magnifying glass. But your records still sound dull or distorted. This indicates the problem might not be dirt on the stylus.
Solution:
- Check Record Cleanliness: The most likely culprit is dirty records. Even a clean needle cannot make a dirty record sound good. Use an anti-static brush on your records before each play. Consider a deep clean for your records using a record cleaning solution or machine.
- Verify Turntable Setup: Incorrect turntable setup affects sound. Check your tracking force. Too much or too little force causes poor tracking. Check your anti-skate setting. Improper anti-skate can cause distortion or channel imbalance.
- Inspect Stylus Wear: A stylus eventually wears out. A worn stylus cannot trace the grooves accurately. Use a powerful magnifying loupe (e.g., 60x
- turntable needle cleaning
- stylus care
- record player maintenance
- vinyl record upkeep
- audio quality

Todd Martin
Senior Writer
With over 15 years of experience in home renovation and design, I started HEG to share what I’ve learned with homeowners who want to create spaces that are both beautiful and functional. I’ve always believed in a hands-on approach, and over the years, I’ve picked up practical solutions that actually work. Through HEG, I aim to make home improvement more approachable, sharing real tips that help you create a home you truly love.