· Todd Martin · Computer Maintenance · 17 min read
How To Clean Computer

How To Clean Your Computer: A Complete Guide
Have you ever noticed your computer slowing down? Does it sound like a jet engine, or does its screen look dull? These are common signs that your device needs a good cleaning. Learning how to clean your computer helps keep it running fast and extends its lifespan. A clean computer also looks better and provides a healthier workspace. This article explains how to clean your computer, covering both physical and digital aspects. We will discuss the tools you need, safety precautions, and step-by-step instructions for each component. You will discover methods for external cleaning, internal dust removal, and file management.
Takeaway
- Regularly clean your computer to improve performance and extend its life.
- Gather necessary tools like compressed air, microfiber cloths, and cleaning solutions.
- Always power down and unplug your computer before physical cleaning.
- Address both physical dust and digital clutter for best results.
- Follow specific steps for keyboards, mice, monitors, and internal components.
Cleaning your computer involves removing physical dust and debris from its components and decluttering its digital files. Start by powering down and unplugging the device. Use compressed air to clear dust from vents and fans. Wipe screens with a microfiber cloth and specialized cleaner. Clean keyboards and mice with suitable tools and wipes. Organize and delete unnecessary files and programs to optimize software performance.
Why Cleaning Your Computer Matters for Performance
Keeping your computer clean is more than just good hygiene; it directly impacts performance. Dust acts as an insulator, trapping heat inside your computer. This trapped heat causes components like the CPU and GPU to overheat. When these parts get too hot, they slow down to prevent damage. This slowdown makes your computer feel sluggish. You might experience freezing or crashes more often.
A clean computer runs cooler and more efficiently. Good airflow helps dissipate heat, allowing your components to work at their optimal speeds. This means faster load times, smoother multitasking, and better overall responsiveness. Beyond performance, cleaning also extends the life of your hardware. Overheating can cause permanent damage to electronic parts over time. Regular cleaning prevents this wear and tear, saving you money on repairs or replacements. A well-maintained machine is a reliable machine.
Cleaning also improves your user experience. A clean screen provides clearer visuals, reducing eye strain. A clean keyboard feels better to type on, reducing stickiness or missed keystrokes. I know from experience that a dusty fan can be very annoying. The loud noise of an overworked fan can disrupt your work or entertainment. Keeping your computer clean ensures a quiet and pleasant operating environment. It feels good to use a device that looks and performs like new.
Essential Tools for Effective Computer Cleaning
Before you begin cleaning your computer, gather the right tools. Using the correct items ensures safety and effectiveness. You can find most of these items at a local electronics store or online. Having everything ready beforehand makes the cleaning process smooth. It helps prevent damage to delicate components.
First, you will need compressed air. This comes in a can with a thin straw. Compressed air is crucial for blowing dust out of vents, fans, and tight spaces. Remember to use short bursts and hold the can upright to prevent liquid propellant from spraying. Next, get several microfiber cloths. These soft cloths are lint-free and gentle on surfaces. They are perfect for wiping screens, cases, and peripherals without scratching them. Avoid paper towels or rough cloths, as these can leave fibers or scratches.
For screens, a specialized screen cleaner is essential. These cleaners are alcohol-free and ammonia-free. They do not leave streaks or damage anti-glare coatings. Never use window cleaner or household sprays on your computer monitor. For general surfaces, isopropyl alcohol (70% or higher) is a good choice. Apply it sparingly to a microfiber cloth, not directly onto the device. This alcohol evaporates quickly and disinfects surfaces. You might also want cotton swabs for small crevices and a small, soft brush for dusting keyboards.
Finally, consider a small vacuum cleaner specifically designed for electronics or a portable mini vacuum. These can pick up dust without generating static electricity, which can be harmful. A screwdriver set might be useful if you plan to open your computer case. Always ensure your tools are clean before use. Dirty tools can transfer grime back onto your computer.
Cleaning Your Computer’s Exterior Components
The external parts of your computer are often the dirtiest. They collect fingerprints, dust, and grime from daily use. Cleaning these components regularly improves their appearance and prevents buildup from getting inside. Let’s break down how to clean each external part.
Cleaning the Computer Monitor
Your monitor screen accumulates dust and smudges quickly. Always turn off your monitor before cleaning. This makes dirt easier to see and prevents accidental changes to settings. Use a clean, dry microfiber cloth first. Gently wipe the screen in one direction to remove loose dust. If streaks or smudges remain, dampen a separate microfiber cloth with a small amount of specialized screen cleaner. Do not spray the cleaner directly onto the screen. Wipe the screen gently, working from top to bottom. For persistent marks, you may need to apply very light pressure. Ensure no liquid drips into the monitor’s edges. Different screens may require specific care, for instance, learning how to clean a MacBook computer screen or a touch screen computer involves unique considerations to protect sensitive surfaces. Always check your monitor’s manual for specific cleaning instructions. My personal rule is always less liquid is more.
Cleaning the Computer Keyboard
Keyboards are notorious for collecting crumbs, dust, and skin oils. They can harbor many germs. First, unplug your keyboard from the computer. If it is a laptop, turn off the laptop. Turn the keyboard upside down and gently shake it to dislodge loose debris. Use a can of compressed air to blow out dust and crumbs from between the keys. Hold the can upright and use short bursts.
Next, you can use a small, soft brush or a specialized keyboard brush to sweep away stubborn dirt. For surface cleaning, dampen a microfiber cloth with isopropyl alcohol (70%). Wipe the surface of each keycap and the surrounding areas. For very dirty spots or sticky keys, a cotton swab lightly dipped in alcohol can target individual areas. Allow the keyboard to dry completely before plugging it back in. This ensures no moisture damages the internal circuits.
Cleaning the Computer Mouse
Your mouse gets a lot of direct contact with your hand, making it a hotspot for dirt and oils. Unplug your mouse from your computer. If it is a wireless mouse, remove the batteries. Use a microfiber cloth lightly dampened with isopropyl alcohol (70%) to wipe down the entire surface of the mouse. Pay attention to buttons and scroll wheels. For the optical sensor on the bottom, use a cotton swab lightly dipped in alcohol to clean the area around it. Avoid pushing dirt into the sensor. For mechanical mice with a ball, remove the ball and clean its housing with alcohol and cotton swabs. Let the mouse air dry completely before reconnecting or replacing batteries. Maintaining a clean mouse prevents tracking issues and improves your comfort. Many people forget how easy it is to clean your computer mouse.
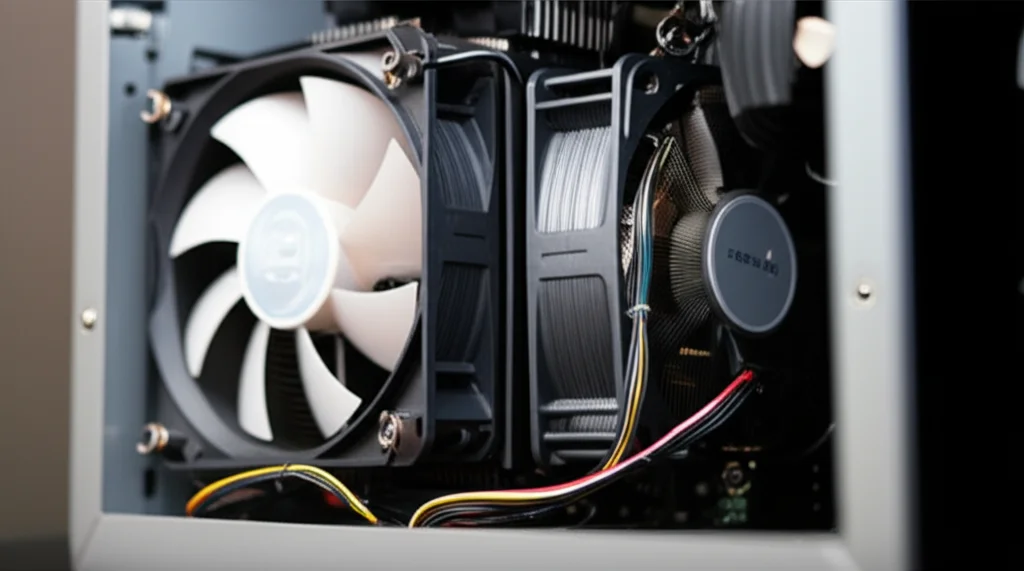
Tackling the Interior: Dust and Fans
Cleaning the inside of your computer might seem daunting, but it is vital. Internal components, especially fans and heatsinks, attract dust like magnets. This dust accumulation significantly hinders cooling, leading to performance issues and potential hardware failure. Taking the time to properly clean the interior can make a dramatic difference.
Preparing for Interior Cleaning
Safety is the most important step before opening your computer. First, completely shut down your computer. Do not just put it to sleep. Next, unplug all power cords and any connected peripherals. This includes the monitor, keyboard, mouse, and any USB devices. Move your computer to a clean, well-lit workspace. You should also touch an unpainted metal surface, like a metal table leg or the computer case itself (after unplugging), to discharge any static electricity from your body. Static electricity can damage delicate internal components.
Opening the Computer Case
For desktop computers, you usually need to remove the side panel. Most cases have thumb screws or standard screws at the back. Unscrew these and carefully slide or pull off the panel. For laptops, opening the case is often more complex and might require specific tools or knowledge. Many laptops have screws on the bottom panel. If you are unsure, consult your laptop’s manual or look up a guide specific to your model. If you are not comfortable opening your laptop, consider professional cleaning or focus on external cleaning and vents. This guide focuses more on desktops, but the principles apply.
Cleaning Internal Components
Once the case is open, you will likely see layers of dust. Your primary tool here is compressed air. Hold the can upright to prevent liquid propellant from spraying. Use short bursts to dislodge dust. Focus on the largest dust collectors first. The CPU heatsink and fan are critical. Blow air into the heatsink fins and through the fan blades. For a comprehensive cleaning, you might even consider cleaning your computer fan more thoroughly.
Next, target the graphics card (GPU) fan and heatsink. These are also major heat generators. Pay attention to the power supply unit (PSU). Many PSUs have their own fans and can accumulate a lot of dust inside. Blow air through its vents. Clean the case fans, which are usually located at the front, back, or top of the case. Finally, blow dust off the motherboard, RAM sticks, and any other expansion cards. Be gentle. Avoid touching components directly with your hands. Remember, a dusty computer is an unhappy computer. After blowing out the dust, you can use a small computer vacuum or a clean microfiber cloth to pick up any remaining clumps of dust that fell to the bottom of the case. Once finished, carefully replace the side panel and reconnect all cables.
Digital Declutter: Cleaning Up Your Computer Files
Physical cleaning is only half the battle. Your computer’s performance also depends heavily on its software health. Over time, your hard drive accumulates many unnecessary files. These can slow down your system and take up valuable space. Cleaning computer files helps your operating system run more efficiently. It makes your computer feel faster and more responsive.
Uninstall Unused Programs
Think about the programs you have installed. Do you use all of them? Many people have applications they downloaded once and never opened again. These programs take up disk space and sometimes run background processes. To uninstall programs on Windows, go to Settings > Apps > Apps & features. On macOS, drag the application from your Applications folder to the Trash. Be careful not to uninstall essential system software. Removing software you no longer need frees up resources. It also reduces potential security vulnerabilities from outdated programs.
Delete Temporary Files and Downloads
Your operating system and web browsers create temporary files. These files help speed up processes temporarily. They can accumulate over time and become quite large. Windows has a built-in Disk Cleanup utility. Search for “Disk Cleanup” in the Start menu. Select the drive you want to clean, then check the boxes for “Temporary files,” “Downloads” (be careful with this one if you need anything in it), “Recycle Bin,” and other unnecessary files. macOS users can use “Optimize Storage” from “About This Mac > Storage > Manage.” Regularly clearing these files prevents them from bogging down your system. I make it a point to empty my Downloads folder weekly.
Organize and Remove Duplicate Files
A disorganized file system makes it hard to find things and contributes to clutter. Take time to organize your documents, photos, and videos into logical folders. Delete old versions of documents or files you no longer need. Consider using a duplicate file finder tool to locate and remove identical files that are wasting space. However, use such tools with caution and review files before deleting. Cloud storage services can also help you offload large files from your local drive. This keeps your primary storage leaner.
Manage Startup Programs
Many applications automatically start when your computer boots up. While some are necessary, many are not. These background programs consume memory and CPU resources, slowing down your startup time. On Windows, open Task Manager (Ctrl+Shift+Esc), go to the “Startup” tab, and disable unnecessary programs. On macOS, go to System Settings > General > Login Items. Disable any programs you do not need running at startup. This simple step can significantly improve your computer’s responsiveness.
Safety First: Important Precautions Before You Start
Cleaning your computer, especially the internal components, requires careful attention to safety. Ignoring these precautions can lead to component damage or even personal injury. Always prioritize safety to ensure a successful cleaning process.
Power Down and Unplug Completely
This is the most critical step. Before touching any internal component or using cleaning solutions on external parts, you must turn off your computer. Not just sleep, but a full shutdown. Then, unplug the power cord from the wall outlet and the computer itself. Disconnect all peripherals too: monitor, keyboard, mouse, USB drives, and network cables. This prevents accidental power surges and removes the risk of electric shock. It also ensures components are cool to the touch.
Discharge Static Electricity
Static electricity is an invisible enemy of computer components. A small static discharge can permanently damage delicate circuits. Before opening your computer case or touching any internal parts, you must discharge any static buildup from your body. You can do this by touching an unpainted metal surface, like a metal table leg, for a few seconds. Better yet, wear an anti-static wrist strap. Attach the strap to an unpainted metal part of your computer case. Keep it on throughout the internal cleaning process. Do not wear wool sweaters or stand on carpet while cleaning your computer, as these can generate static.
Use the Right Tools and Methods
As discussed, using appropriate tools is vital. Never use harsh chemicals like ammonia-based cleaners, window cleaners, or abrasive materials. These can corrode plastics, strip coatings, or scratch surfaces. Always apply cleaning solutions to a cloth, not directly to the computer. When using compressed air, hold the can upright to prevent liquid propellants from escaping. Use short bursts. Do not invert the can. Avoid using a standard vacuum cleaner for internal dusting. They can generate static electricity and have strong suction that might dislodge components. A small, electronics-specific vacuum is safer if you choose to vacuum.
Work in a Well-Ventilated Area
Some cleaning products, like compressed air or isopropyl alcohol, can produce fumes. Work in a well-ventilated room to avoid inhaling these fumes. If possible, open windows or use a fan to circulate air. Also, ensure your workspace is clean and organized. This reduces the chance of losing small screws or misplacing tools. I always lay out a clean towel to place parts on.
Be Gentle and Patient
Computer components are delicate. Apply gentle pressure when wiping screens or surfaces. When cleaning internal parts, do not force anything. If a part feels stuck, re-evaluate rather than pulling hard. Take your time. Rushing through the cleaning process increases the risk of damage. If you are unsure about a step, consult your computer’s manual or find a reliable online guide for your specific model. Your patience will pay off with a cleaner, healthier computer.
Maintaining a Clean Computer: Long-Term Tips
Regular cleaning helps your computer last longer. However, you can also take steps to keep it clean between major cleaning sessions. These habits reduce dust buildup and digital clutter, making future cleaning easier. Think of these as preventative measures.
Establish a Cleaning Schedule
Consistency is key for computer maintenance. I recommend a light external cleaning weekly or bi-weekly. This includes wiping down your screen, keyboard, and mouse. A deeper internal cleaning can happen every 3-6 months. This schedule depends on your environment. If you have pets, live in a dusty area, or smoke, you might need to clean more often. Setting reminders can help you stick to your schedule.
Improve Your Computer’s Environment
Where you place your computer affects its cleanliness. Avoid placing your computer directly on carpet, especially desktop towers. Carpets are huge dust producers. Instead, put your tower on a hard surface or a small stand. Ensure good airflow around your computer. Do not block vents with books or other objects. Keep the area around your computer tidy. Avoid eating or drinking directly over your keyboard. This simple habit prevents crumbs and spills.
Use Dust Filters
Some computer cases come with built-in dust filters. These filters capture dust before it enters the case, especially at intake fan points. If your case does not have them, you can buy magnetic dust filters. Clean these filters regularly, often by rinsing them with water or simply brushing off dust. They are much easier to clean than the internal components of your computer. My computer has front mesh filters, and cleaning them every few weeks prevents a lot of dust from entering.
Practice Good Digital Hygiene
Beyond physical dust, digital clutter also harms your computer’s performance. Regularly delete files you no longer need. Empty your Recycle Bin or Trash folder. Uninstall programs you do not use. Keep your operating system and software updated. Updates often include performance improvements and security patches. Regularly scan for malware and viruses. These practices reduce bloat and protect your system. A clean hard drive contributes to a faster computer.
Consider Professional Help
If you are uncomfortable opening your computer or dealing with complex issues, consider professional cleaning services. Technicians can safely clean internal components and perform deeper diagnostics. This is especially true for laptops, which are often harder to open than desktops. A professional clean might be a good investment if your computer runs very hot or freezes often despite your efforts. This ensures your computer remains in top condition without risk of damage.
Frequently Asked Questions
How often should I clean my computer?
I recommend a light external cleaning for your computer every 1-2 weeks. This includes wiping your screen, keyboard, and mouse. For internal components, aim for a deeper cleaning every 3 to 6 months. This frequency can change based on your environment. Computers in dusty homes or with pets might need cleaning more often.
Can cleaning my computer improve its speed?
Yes, cleaning your computer can significantly improve its speed. Dust acts as an insulator, trapping heat inside. Overheated components slow down to prevent damage. Removing dust allows components to run cooler and at their intended speeds. This means faster processing and a more responsive system overall.
What cleaning products should I avoid?
You should avoid harsh chemicals on your computer. Never use ammonia-based cleaners, window cleaners, or abrasive materials. These can damage plastics, coatings, and sensitive electronic parts. Always use specialized screen cleaners for monitors. For general surfaces, use isopropyl alcohol (70%) applied to a microfiber cloth, not directly to the device.
Is it safe to clean my laptop fan myself?
Cleaning a laptop fan can be safe if you follow proper procedures. You need to shut down and unplug the laptop completely. Use compressed air in short bursts from the external vents. Opening a laptop case is more complex than a desktop. If you are not comfortable opening it, focus on external cleaning or seek professional help.
What is the difference between physical and digital computer cleaning?
Physical cleaning involves removing dust, dirt, and debris from the computer’s external and internal hardware. This includes wiping screens, keyboards, and using compressed air to clear internal fans and components. Digital cleaning, on the other hand, involves optimizing software. This means uninstalling unused programs, deleting temporary files, managing startup items, and organizing digital data on your hard drive. Both are vital for optimal performance.
Conclusion
Learning how to clean your computer is a valuable skill for any user. We have covered the critical steps for both physical and digital maintenance. Regular cleaning helps prevent overheating, improves performance, and extends the lifespan of your device. You now know the essential tools to use and important safety precautions to follow. Remember to clean external components like your monitor, keyboard, and mouse regularly. Do not forget to tackle the internal dust and fan buildup too.
Beyond physical cleanliness, digital decluttering plays an equal role in your computer’s health. Uninstalling unused programs, deleting temporary files, and managing startup items will make a big difference. By integrating these cleaning habits into your routine, you ensure your computer runs smoothly and efficiently. Your device will feel faster and more responsive. Take action today to give your computer the care it deserves. Start with a simple wipe-down and gradually move to deeper cleaning. A clean computer is a happy computer, and it will serve you better for years to come.
- computer cleaning
- PC maintenance
- dust removal
- digital hygiene
- computer care

Todd Martin
Senior Writer
With over 15 years of experience in home renovation and design, I started HEG to share what I’ve learned with homeowners who want to create spaces that are both beautiful and functional. I’ve always believed in a hands-on approach, and over the years, I’ve picked up practical solutions that actually work. Through HEG, I aim to make home improvement more approachable, sharing real tips that help you create a home you truly love.