· Todd Martin · Computer Maintenance · 20 min read
How To Clean Dusty Computer

How to Clean a Dusty Computer Safely and Effectively
Have you ever noticed your computer running slower than usual? Perhaps it sounds like a small airplane about to take off? Often, the culprit is dust. Dust builds up inside your computer. This accumulation can cause big problems. Learning how to clean dusty computer parts is simple. It helps your machine run better.
Cleaning your computer is more than just aesthetics. It prevents overheating. It improves performance. It extends the life of your device. This guide helps you understand why dust is bad. It shows you the right tools to use. We will walk you through cleaning your desktop PC. We will cover laptops too. You will learn to clean your monitor, keyboard, and mouse. By the end, you will know how to keep your computer dust-free.
Takeaway
- Regularly cleaning your computer prevents overheating and improves performance.
- Use specific tools like compressed air and microfiber cloths.
- Always unplug your computer and discharge static before cleaning.
- Clean fans, heat sinks, and vents to ensure good airflow.
- Address both internal and external components for best results.
Cleaning a dusty computer involves safely removing accumulated dust from internal components and external surfaces. Use tools like compressed air, microfiber cloths, and anti-static brushes. This process improves airflow, reduces overheating, and boosts system performance. Always power down and unplug your device first.
Why Cleaning Your Dusty Computer Matters for Performance
Dust is more than just dirt. It is a silent killer for your electronics. When dust settles inside your computer, it causes several problems. These problems affect how well your computer works. They also impact how long it lasts. Understanding these issues helps you see why cleaning is important. I always stress the importance of regular cleaning to friends and family.
One major problem is overheating. Computer components generate heat when they run. Fans and heat sinks move this heat away. Dust acts like an insulator. It traps heat inside the computer case. This makes components run hotter. Hot components perform poorly. They can even shut down unexpectedly. This is a common reason for computer crashes. Over time, high temperatures damage the internal parts. This shortens the life of your computer.
Another issue is reduced performance. When a computer overheats, it protects itself. It lowers its processing speed. This is called thermal throttling. Your fast computer suddenly becomes slow. Tasks take longer. Games might stutter. Even simple web browsing feels sluggish. A dusty computer means you are not getting the full power from your machine. You paid for a certain level of performance. Dust steals that performance from you.
Finally, dust can cause physical damage. Dust is not just soft particles. It can contain tiny abrasive bits. It can be conductive. If dust builds up on electrical contacts, it can interfere with connections. In rare cases, it can even cause short circuits. Dust also clogs fans. Clogged fans work harder. They can become noisy. Eventually, they might fail completely. A failed fan means very rapid overheating. This can ruin expensive parts. Keeping your computer clean is a simple maintenance step. It saves you money in the long run. It keeps your computer running smoothly.
Understanding the Dangers of Dust Accumulation
Dust in a computer acts like a blanket. It covers sensitive electronic parts. This blanket traps heat. Computers need to cool themselves. They have fans and heat sinks. These parts work to move heat away. When dust covers them, heat cannot escape. This leads to higher internal temperatures.
High temperatures are bad for computer components. They can degrade quickly. A CPU or GPU running too hot will reduce its speed. This is a built-in safety feature. Your computer slows down to avoid damage. This slowdown makes your computer feel sluggish. It struggles with everyday tasks. Overheating also causes random shutdowns. This can corrupt data.
Dust can also carry static electricity. Static discharge can harm delicate circuits. It happens when you touch dusty components. Dust also contains fibers and skin cells. These materials can attract moisture. Moisture combined with dust can create conductive pathways. This risks short circuits on the motherboard. Regular cleaning removes these risks. It keeps your computer safe.
Signs Your Computer Needs Cleaning
Your computer often tells you when it needs a clean. Pay attention to these signs. They indicate dust buildup. Addressing them early saves trouble. I always listen for these warnings from my own machines.
First, listen for the fans. Are they louder than usual? Do they run constantly, even when doing little work? This means they are working harder. They are struggling to cool the system. Dust makes them less efficient. This extra effort creates more noise.
Next, feel the computer. Is it hot to the touch? This is especially true for laptops. Desktops might feel hot near vents. Excessive heat shows trapped warmth. This trapped heat harms components. It means dust blocks airflow.
Observe performance. Is your computer slower? Does it freeze or crash often? Programs might open slowly. Video playback might stutter. Games might have low frame rates. These are signs of thermal throttling. The computer slows itself down to prevent overheating. Cleaning often fixes these performance issues. It brings back original speed.
Finally, look at the vents. Can you see dust bunnies? Are the intake or exhaust grilles visibly clogged? This is a clear sign. If you see dust on the outside, imagine what is inside. Cleaning these visible areas is a good start. It indicates a need for deeper internal cleaning.
Essential Tools for a Safe Computer Clean
Before you start cleaning, gather your tools. Using the right tools ensures safety. It makes the job effective. You do not need many items. However, the right ones make a big difference. I always prepare my toolkit before I begin.
First, you need compressed air. This comes in a can. It blows dust away from components. Make sure to use short bursts. Do not tilt the can too much. Liquid propellant can spray out. This can damage parts. Always hold the can upright. Use it in a well-ventilated area. This helps disperse the dust. Never use a regular air compressor. Its air pressure is too high. It can also contain moisture.
Second, get some microfiber cloths. These are soft and lint-free. They are perfect for wiping surfaces. They pick up dust without scratching. Do not use paper towels. They can leave fibers behind. Lint can cause problems on electronic components. I keep several clean microfiber cloths on hand.
Third, an anti-static wrist strap is crucial. Static electricity is dangerous for computer parts. It can fry components instantly. The wrist strap grounds you. It prevents static discharge. Connect it to an unpainted metal part of your computer case. This creates a safe path for static. Always wear it when working inside the computer. It gives me peace of mind.
You will also need small brushes. A soft-bristle brush works well. You can find anti-static brushes online. These help dislodge stubborn dust. They are good for tight spaces. Cotton swabs are also useful. Dip them in isopropyl alcohol for specific spots.
Finally, get some isopropyl alcohol (at least 70%, preferably 90% or higher). This evaporates quickly. It leaves no residue. Use it for cleaning stubborn grime. It works well on fan blades or sticky keyboard keys. Always apply it to a cloth or swab first. Never spray it directly onto components. These tools make the cleaning process smooth. They ensure your computer remains safe.
Gathering Your Cleaning Arsenal
Gathering the right tools is the first step. You need specific items for safe computer cleaning. Do not substitute them with common household items. Regular vacuums or cloths can cause damage.
Start with a can of compressed air. This is your primary weapon against dust. It blasts dust from hard-to-reach areas. Ensure it is “canned air” or “dust remover.” These are designed for electronics. They do not contain moisture.
Next, get several microfiber cloths. These cloths trap dust effectively. They do not leave lint. Use separate cloths for different areas. One for the screen, one for the case. This prevents cross-contamination.
An anti-static wrist strap is a must-have. It protects sensitive components. Electrostatic discharge (ESD) can destroy parts. The strap grounds you. It equalizes your charge with the computer. Connect it to an unpainted metal surface on the computer.
Small, soft brushes are useful. They dislodge caked-on dust. An old, clean paintbrush works. Or buy a dedicated anti-static brush set. Cotton swabs are great for tiny crevices. They reach spots a brush cannot.
Finally, obtain high-purity isopropyl alcohol (90% or higher). It cleans sticky residue. It is safe for electronics. It evaporates quickly. Use it sparingly on a cloth or swab. Never spray it directly. These items prepare you for a thorough clean.
Safety First: Protecting Yourself and Your Device
Safety is paramount when cleaning electronics. Neglecting safety can damage your computer. It can also cause personal injury. I always take these precautions seriously.
First, always unplug your computer. Disconnect all cables. This means the power cord, USB devices, and monitor cables. Do not just turn it off. The power supply can still hold a charge. Removing all power makes it safe.
Second, discharge static electricity. Wear your anti-static wrist strap. Connect it to an unpainted metal part of the computer case. Touch a grounded metal object before you start. This dissipates any static charge from your body. Static can destroy delicate components. It causes invisible damage. The computer might appear fine. Later, it fails without warning.
Third, work in a well-ventilated area. Compressed air can kick up a lot of dust. You do not want to breathe this in. Go outside if possible. If not, open windows. Use a mask if you have allergies. This protects your lungs.
Fourth, avoid excessive force. Computer components are fragile. Do not yank on cables. Do not press hard on circuit boards. Use gentle motions. Be careful with small connectors. They break easily.
Finally, read your computer’s manual. Some manufacturers have specific cleaning instructions. They might have warnings. Knowing your device helps avoid mistakes. Following these steps ensures a safe clean. It protects both you and your valuable computer.
Step-by-Step Guide to Cleaning Your Desktop PC
Cleaning a desktop PC involves opening the case. This gives you access to internal components. It may seem daunting, but it is straightforward. Follow these steps carefully. I find it very satisfying to see the dust disappear.
Step 1: Preparation and Disconnection. First, shut down your computer completely. Turn off the power switch on the back. Unplug the power cord. Disconnect all peripherals. This includes your monitor, keyboard, mouse, speakers, and any USB devices. Move your computer to a clean, open workspace. A table is ideal. Avoid carpeted floors. Carpet creates more static electricity. Ensure good lighting.
Step 2: Opening the Case. Most desktop cases have thumbscrews or regular screws on the back. Loosen and remove these. Slide off the side panel. Usually, it is the left panel when facing the front. Be gentle. Some panels slide back before coming off. Lay the case on its side. This gives you easy access to the components. Put the screws in a small bowl. This prevents losing them.
Step 3: Initial Dust Removal with Compressed Air. Before touching anything, use compressed air. Hold the can upright. Use short bursts. Start from the top of the case. Work your way down. Blow dust out of the case. Pay attention to vents and fan grilles. Do not spray too close. Hold the can about 6 inches away. Keep the can upright to prevent liquid propellant discharge.
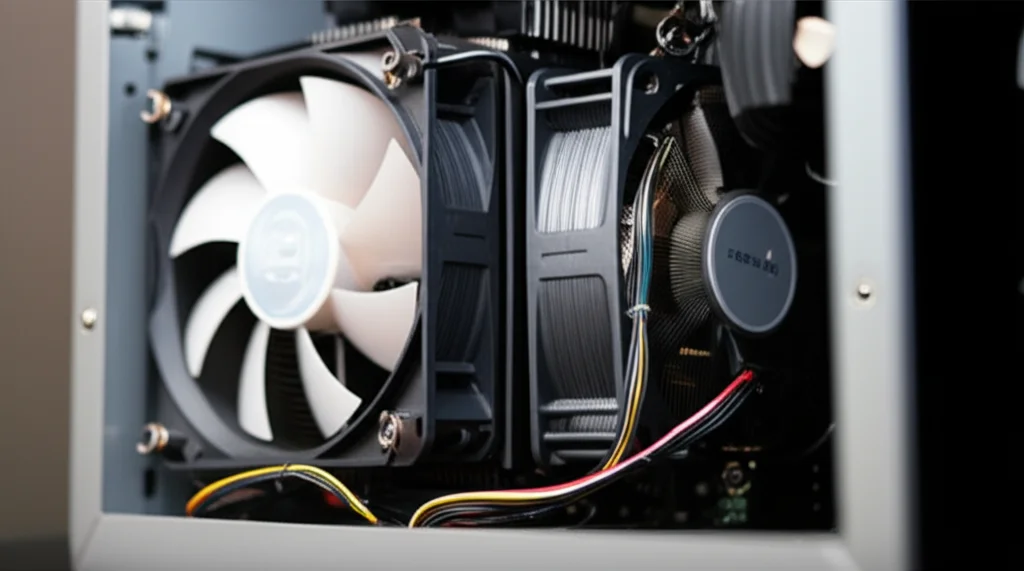
Step 4: Cleaning Fans. Fans are major dust collectors. They move air. This also pulls in dust. Hold each fan blade in place. Use your finger or a cotton swab. Do not let the fan spin freely when spraying. Spinning fans can damage bearings. They can also generate a small electrical current. Spray compressed air into the fan blades. Get between the blades. Clean the fan housing. You can learn more about this process in detail by checking our guide on how to clean computer fan.
Step 5: Cleaning the Heat Sink. The CPU and GPU often have heat sinks. These are metal fins. They dissipate heat. Dust clogs these fins. Use compressed air to blow dust through the fins. If the heat sink is removable, you can take it off. This allows for a more thorough clean. Be careful not to bend the fins. A soft brush helps dislodge stuck dust.
Step 6: Cleaning Other Components. Use compressed air for the graphics card. Also clean RAM sticks, and expansion cards. Blow air into the power supply unit. Be cautious. Do not open the PSU. It holds high voltage charges. Just blow air into its fan grilles. Use a microfiber cloth to wipe down flat surfaces. Clean the motherboard. Be gentle. Do not touch exposed circuits with your bare hands. Always wear your anti-static wrist strap.
Step 7: Reassembly and Final Touches. Once clean, put the side panel back on. Secure it with the screws. Reconnect all your peripherals. Plug in the power cord. Turn on your computer. You should notice quieter operation. Performance often improves. Your computer will thank you. Regular cleaning every 6-12 months is a good habit.
Disassembly and Initial Dust Removal
Disassembly opens your computer. It allows access to deep dust. Start by removing the side panel. Most desktop cases have two or three screws on the back. These screws secure the side panel. Use a screwdriver or your fingers for thumbscrews. Once loose, slide the panel backward. It should then lift off. Place the panel aside. Keep the screws in a safe place. A small cup works well.
Once the case is open, you will see the components. Before touching anything, use compressed air. Hold the can upright. Keep it about six inches away from components. Use short, controlled bursts. Start at the top of the case. Work your way down. Blow dust out of the case. Target large dust bunnies first. Focus on areas with clear airflow. This initial pass removes loose dust. It makes further cleaning easier.
Pay attention to vents and grilles. These are dust entry points. Blow air through them. Ensure dust exits the case. Avoid spraying into delicate connectors too closely. The goal is to push dust out. Not deeper into components. This step clears the path for a more focused clean. It prevents dust from recirculating inside.
Targeting Internal Components
After the initial sweep, target specific parts. These are where dust causes the most trouble. Fans, heat sinks, and the power supply are prime targets. Use caution and precision here.
Fans are critical for cooling. They pull in air. This also brings dust. To clean a fan, hold its blades still. Use your finger or a small stick. Do not let it spin when you spray. Compressed air can damage the fan’s bearings. It can also create an electrical charge. Blow compressed air directly into the fan blades. Get rid of dust on the fan housing. Clean both CPU and case fans. Our guide on how to clean computer fan offers more in-depth advice.
Heat sinks are arrays of metal fins. They sit on top of the CPU and GPU. Dust gets trapped between these fins. This blocks heat transfer. Use compressed air to blow through the fins. Aim from one side. Let the dust exit the other. Use short bursts. A soft brush can help dislodge stubborn dust. Be gentle to avoid bending the delicate fins.
The power supply unit (PSU) has its own fan. It draws air in. Dust often collects inside. Do not open the PSU. It contains large capacitors. They hold dangerous electrical charges. Simply blow compressed air through its vents. Angle the can to push dust out. Focus on the fan intake and exhaust grilles. These internal cleans ensure efficient heat dissipation. They keep your computer running cool.
Reassembly and Final Touches
After cleaning all internal components, it is time for reassembly. This step is usually quick. Double-check your work before closing the case.
First, ensure all cables are properly connected. Check any parts you may have moved. Make sure no tools are left inside the case. Confirm all screws for expansion cards or drives are tight. Loose connections can cause problems. I always do a visual scan of the entire interior.
Next, carefully slide the side panel back onto the case. Align it with the grooves or clips. Gently push it forward until it clicks into place. Reinsert the screws you removed earlier. Tighten them by hand. Do not overtighten them. Overtightening can strip the threads. This makes future access difficult.
Finally, move your computer back to its original spot. Reconnect all your peripheral devices. Plug in your monitor, keyboard, mouse, and other USB devices. Do not forget the power cord. Turn on the power switch on the back of the PSU. Then, press the power button on the front of your computer. Listen for the fans. They should sound quieter. Check system performance. You should notice a difference. Your computer will feel snappier. This regular maintenance ensures long-term health.
How to Clean a Dusty Laptop Safely
Cleaning a laptop is different from a desktop PC. Laptops are compact. Their parts are harder to access. However, cleaning is still important. Dust buildup affects laptops severely. It causes overheating. This leads to slower performance. I clean my laptop regularly. It helps keep it fast.
Step 1: Preparation. Just like a desktop, power down your laptop completely. Unplug the power adapter. Remove the battery if it is easily removable. Disconnect all USB devices and other cables. Move your laptop to a clean, flat surface. Ensure good ventilation. A table is perfect.
Step 2: Cleaning the External Vents. Laptops have vents on the sides or back. These are exhaust ports. Dust often clogs them. Use compressed air for these vents. Hold the can upright. Use short bursts. Angle the air stream. Aim to blow dust out of the vents. Do not blow dust deeper into the laptop. You might see dust bunnies emerge. This is a good sign. Be gentle. Do not stick anything into the vents.
Step 3: Cleaning the Keyboard. Keyboards collect crumbs and dust. Hold the laptop upside down. Gently shake it. This dislodges loose debris. Use compressed air. Hold it at an angle. Spray between the keys. This blows out trapped particles. For sticky keys, use a cotton swab. Dip it lightly in isopropyl alcohol. Gently wipe around the keycap. Do not use too much liquid. My guide on cleaning computer screens has related tips for cleaning tough spots.
Step 4: Cleaning the Screen. Laptop screens get dusty and smudged. Use a clean, dry microfiber cloth first. Gently wipe the screen. Move in one direction. This removes loose dust. For smudges, dampen a different microfiber cloth. Use distilled water or a special screen cleaner. Do not spray liquid directly on the screen. Wipe gently. Avoid harsh chemicals. They can damage the screen coating. You can find more specific advice on how to clean computer monitor and how to clean computer screen without streaks. If you have a MacBook, consider our guide on how to clean macbook computer screen. For touchscreens, check how to clean touch screen computer.
Step 5: Deep Cleaning (Advanced - Caution Advised). Accessing laptop internal fans is harder. It often requires unscrewing the bottom panel. This can void warranties. It also carries a risk of damage. If you are not comfortable, skip this step. Or seek professional help. If you proceed, follow your laptop’s specific service manual. Use anti-static precautions. Carefully remove the bottom panel. Locate the fan and heat sink. Clean them with compressed air. Hold the fan still. Reassemble carefully.
Regular external cleaning helps a lot. It reduces the need for deep internal cleaning. Aim for a quick clean every few weeks. A deeper clean once a year is good. This keeps your laptop cool. It ensures peak performance.
Laptop Cleaning: Special Considerations
Laptops are compact. This makes them portable. It also means dust gets trapped easily. Cleaning a laptop requires extra care. Their components are more fragile. They are packed together tightly.
Heat is a major enemy for laptops. Dust blocks tiny vents. These vents are crucial for airflow. When airflow is blocked, heat builds up fast. This leads to thermal throttling. Your laptop slows down significantly. This is why cleaning external vents is vital. It is often the first line of defense against dust.
Opening a laptop is often more complex. Many modern laptops are not designed for user access. They have hidden screws. They use clips that break easily. Some models require removing the keyboard or palm rest. This can void your warranty. Always check your laptop’s manual first. If you are unsure, do not force anything. Seek professional help instead.
Static electricity is still a risk. Even if you do not open the laptop, touching exposed ports can transfer static. Use an anti-static mat if you are doing a deep clean. Always discharge yourself by touching a grounded metal object. This protects the sensitive internal parts. Taking these precautions protects your device. It ensures a safe cleaning process.
Cleaning External Surfaces and Vents
External cleaning is easy. It makes a big difference. It prevents dust from entering. It keeps your laptop looking good. I do this weekly.
Start with the screen. Use a dry microfiber cloth first. Gently wipe from top to bottom. This removes loose dust. For fingerprints or smudges, use a separate, slightly damp microfiber cloth. Dampen it with distilled water or a specific screen cleaner. Never spray liquid directly on the screen. Wipe in one direction. Avoid harsh chemicals. They can damage coatings. Our article on how to clean computer screen without streaks has more tips.
Next, clean the keyboard. Turn the laptop upside down. Shake it gently. This dislodges crumbs. Use compressed air between the keys. Hold the can at an angle. Use short bursts. This blows out trapped debris. For sticky keys, use a cotton swab. Lightly dampen it with isopropyl alcohol. Wipe around the keycap. Do not let liquid seep under the keys.
Finally, address the vents. These are usually on the sides, back, or bottom. Use compressed air. Hold the can upright. Aim at the vents. Use short, focused bursts. Blow the dust out of the laptop. Do not blow it further inside. This improves airflow immediately. It helps cool your system. Regular external cleaning reduces the need for complex internal cleaning.
Deep Cleaning Laptop Internals (Caution Advised)
Deep cleaning a laptop means opening it. This is more difficult than a desktop. It carries more risks. Proceed only if you feel confident. Always consult your laptop’s service manual first.
Before Starting:
- Research Your Model: Find a disassembly guide or service manual for your specific laptop model. Many models have unique screw patterns or hidden clips.
- Gather Tools: You will likely need small precision screwdrivers (Phillips and possibly Torx), plastic prying tools, and an anti-static mat/wrist strap.
- Work in a Clean Area: Ensure a well-lit, dust-free surface. Avoid carpet.
The Process:
- Disconnect Everything: Power off, unplug power, remove battery (if possible), disconnect all peripherals.
- Remove Bottom Panel: Carefully unscrew all visible screws on the bottom. Pay attention to screw lengths. Some screws might be hidden under rubber feet or stickers. Use a plastic prying tool to gently separate the panel from the chassis. Do not force it. Listen for clips releasing.
- Locate Fan and Heat Sink: Once inside, identify the fan(s) and the heat sink. They are usually connected.
- Clean Fan Blades: Hold the fan blades still. Use compressed air in short bursts. Blow dust out of the fan assembly. Use a soft brush for caked-on dust. Our guide on how to clean computer fan is very relevant here.
- Clean Heat Sink Fins: Blow compressed air through the heat sink fins. Ensure dust exits. You might need to detach the heat sink from the CPU/GPU for a truly deep clean. This is advanced. It requires reapplying thermal paste. Only do this if you know how.
- Wipe Surfaces: Use a dry microfiber cloth for large, flat internal surfaces. Be gentle. Avoid touching circuit board components directly.
- Reassemble: Carefully place the bottom panel back. Ensure all clips engage. Reinsert and tighten all screws. Do not overtighten.
Deep cleaning provides the most thorough dust removal. It significantly improves cooling. However, the risk of damage or voiding warranty is real. If uncomfortable, consider professional services.
- computer cleaning
- dust removal
- PC maintenance
- laptop cleaning
- tech care

Todd Martin
Senior Writer
With over 15 years of experience in home renovation and design, I started HEG to share what I’ve learned with homeowners who want to create spaces that are both beautiful and functional. I’ve always believed in a hands-on approach, and over the years, I’ve picked up practical solutions that actually work. Through HEG, I aim to make home improvement more approachable, sharing real tips that help you create a home you truly love.