· Todd Martin · Computer Maintenance · 19 min read
How To Clean Computer Fan
How to Clean Computer Fan: A Guide to Optimal PC Performance
Your computer works hard every day. It runs programs, processes data, and keeps you connected. But what happens when its vital cooling system gets dirty? Dust and debris build up inside your PC, especially on the fans. This buildup can make your computer run slowly. It can even cause serious damage over time. Learning how to clean computer fan parts is a simple yet powerful way to keep your system healthy.
Cleaning your computer fan is important for maintaining peak performance. Dirty fans cannot move air properly. This causes your computer to overheat. Overheating shortens the lifespan of components like the CPU and GPU. It also leads to system crashes and reduced speed. This article provides a comprehensive guide. We will cover the tools you need, safety measures, and step-by-step instructions for both desktop and laptop fans. Get ready to give your computer the clean it deserves.
Takeaway
- Safety First: Always unplug your computer and discharge static electricity before cleaning.
- Use Proper Tools: Compressed air, microfibre cloths, and small brushes are essential.
- Target All Fans: Clean CPU, GPU, case, and power supply fans in desktops; internal fans in laptops.
- Regular Cleaning: Aim to clean your computer fans every 3-6 months.
- Improve Performance: A clean fan prevents overheating and extends your computer’s life.
How do I clean my computer fan?
You clean your computer fan by first powering down and unplugging your device. Use compressed air to blow dust out of fan blades and heat sinks. Gently hold the fan blades to prevent spinning them too fast. A soft brush or cotton swab can remove stubborn dirt.
Why Cleaning Your Computer Fan Matters for PC Health
Have you ever noticed your computer getting unusually hot? Or maybe it sounds louder than before? These are often signs that your computer fan needs cleaning. Dust acts as an insulating blanket. It traps heat inside your computer’s case. This makes the fans work harder to cool the system.
When fans work harder, they spin faster. This creates more noise. More importantly, it puts more stress on the fan motors. Dust also settles on heat sinks. These components move heat away from your CPU and GPU. A dusty heat sink cannot dissipate heat effectively. This leads to higher internal temperatures. High temperatures can cause performance issues. Your computer might slow down or even freeze. It can also permanently damage sensitive electronic parts. Regular fan cleaning helps your computer run cool. It maintains optimal performance and extends the life of your hardware.
Ignoring fan cleaning can lead to costly repairs. Overheated components break down faster. You may face issues like unexpected shutdowns. You might experience reduced gaming performance. Even simple tasks can become frustratingly slow. Cleaning the fan is a preventative measure. It saves you money and trouble in the long run. Keep your system running smoothly. Give its cooling system the attention it needs.
Essential Tools for Cleaning Your Computer Fan
Cleaning your computer fan does not require many specialized tools. You probably have some items already. Gather your supplies before you start. This makes the process efficient. Having the right tools helps you clean safely and effectively.
First, you need compressed air. This comes in a can with a small straw. Compressed air is perfect for blowing dust out of tight spaces. It reaches between fan blades and through heat sinks. Make sure to buy electronics-safe compressed air. Another vital tool is a microfiber cloth. These cloths are soft and do not leave lint. They are excellent for wiping down surfaces. Use them to clean the computer’s outer case or inside areas. For removing dust from fan blades, a small, soft-bristled brush works well. A clean paintbrush or a dedicated electronics brush is ideal. These brushes loosen dust without scratching surfaces.
You also need cotton swabs for intricate spots. These are good for cleaning corners or very small fan components. An anti-static wrist strap is also highly recommended. This strap connects to a metal part of your computer. It safely discharges any static electricity from your body. Static electricity can damage sensitive computer components. Using a wrist strap protects your hardware. Finally, you might consider a small screwdriver set. You may need this to open your computer case or remove certain fan units. A simple Philips head screwdriver often suffices for most desktop cases. Remember, a clean workspace also helps. Lay down some old newspapers or a mat to catch dust.
Safety Precautions Before You Begin
Safety is paramount when working inside your computer. Electronic components are sensitive. You must take precautions to avoid damage or injury. Rushing through the process can lead to mistakes. Always prioritize safety first.
The very first step is to power down your computer completely. Do not just put it to sleep. Shut it down fully. Once it is off, unplug it from the wall outlet. Disconnect all external cables. This includes the power cord, USB devices, monitor cables, and network cables. Removing power prevents accidental shocks. It also stops any electrical current from reaching components. This protects you and your computer.
Next, discharge any static electricity from your body. Static electricity is a silent killer for computer parts. It can cause irreversible damage. The best way to do this is by wearing an anti-static wrist strap. Attach one end to your wrist and the other to a grounded metal object. A good option is the unpainted metal frame of your computer case. If you do not have a wrist strap, you can frequently touch an unpainted metal part of your computer case. Do this before and during the cleaning process. Avoid working on carpeted floors. Carpets generate more static electricity. Work on a hard, non-conductive surface like a wooden table. Taking these steps ensures a safe cleaning experience. Your computer will thank you.
Step-by-Step Guide to Cleaning a Desktop PC Fan
Cleaning a desktop PC fan is a straightforward process. You do not need to be a tech expert. Follow these steps carefully for a thorough clean. This guide focuses on the main fans. These include CPU, GPU, case, and power supply fans.
H3: Accessing Your Desktop PC’s Interior
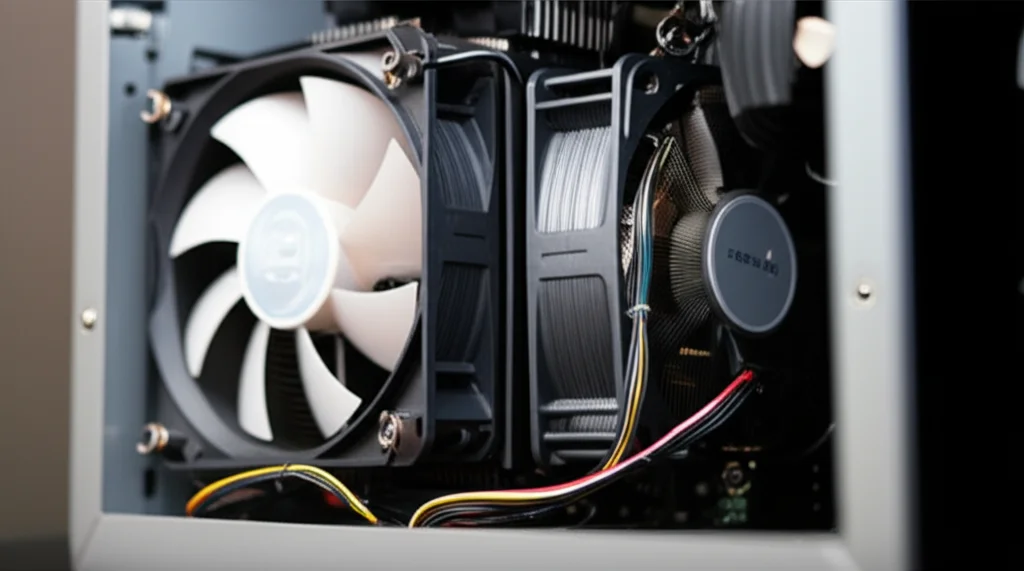
First, prepare your workspace. Lay down a clean, flat surface. Ensure good lighting. With your computer powered off and unplugged, gently remove the side panel of your PC case. Most cases use thumbscrews or a simple latch system. Place the screws or panel in a safe spot. This prevents them from getting lost. Now you can see the internal components. You will likely see the CPU fan assembly directly on the motherboard. You will also see other case fans mounted on the front, rear, or top of the case. The GPU fan is on your graphics card. The power supply fan is inside the power supply unit.
H3: Cleaning Each Fan Component
Start with the CPU fan. This fan cools your processor. It often collects the most dust. Hold the fan blades gently with your finger. This stops them from spinning. Spinning them too fast with compressed air can damage the bearings. Now, use short bursts of compressed air. Aim the air between the fan blades and into the heat sink fins. Blow dust away from the computer. Do this in a well-ventilated area, or outdoors. For stubborn dust, use a soft-bristled brush to loosen it. Then blow it away with air.
Next, move to the GPU fan(s). Graphics cards also have fans. They cool the graphics processing unit. Repeat the same process here. Hold the fan blades. Use compressed air in short bursts. Brush away any caked-on dust. Many GPUs have two or three fans. Clean each one.
Now, clean the case fans. These fans move air into and out of the computer case. They maintain overall airflow. There might be one at the front, one at the back, and possibly one on top. Clean these fans using compressed air and a brush. Pay attention to the fan grills as well. Dust builds up on these grills. This obstructs airflow. Use a microfiber cloth to wipe down the grills and the inside of the case. Remember, good airflow helps all components stay cool.
Finally, clean the power supply unit (PSU) fan. The PSU is usually at the bottom or top rear of your case. Its fan helps cool the power supply. Do not open the power supply unit. PSUs store dangerous electrical charges. Just use compressed air to blow dust out of the fan opening. Direct the air outwards. You can also use a small brush to dislodge visible dust from the external grill. For more general dust cleaning inside your computer, consider referring to a guide on how to clean dust off fan.
After cleaning all fans, inspect the entire interior. Remove any remaining dust with a microfiber cloth. Reattach the side panel. Plug in all cables. Your desktop PC should now run cooler and quieter.
Cleaning Laptop Fans: A Detailed Approach
Cleaning laptop fans requires a bit more care than desktop fans. Laptops are compact. Their components are more tightly packed. Accessing the internal fans can be tricky. However, it is a crucial maintenance task. Laptops often suffer more from overheating due to their confined space.
H3: External Cleaning for Laptops
For a quick clean, you can start externally. Locate the air vents on your laptop. These are usually on the sides, back, or bottom. Power off your laptop completely and unplug it. Use short bursts of compressed air. Direct the air into the vents. This helps blow out some loose dust. Hold the can upright to prevent propellant from spraying. Do not use a vacuum cleaner. Vacuums can create static electricity and damage components. This external method is good for regular, light maintenance. For general cleaning of fan-like appliances, you might find tips on how to clean a window fan or even how to clean a box fan useful, as the principles of dust removal are similar.
H3: Internal Cleaning for Laptops (Advanced)
For a deeper clean, you need to open your laptop. This step varies greatly by laptop model. Consult your laptop’s manual or an online disassembly guide for your specific model. Search for “[your laptop model] fan cleaning” or “[your laptop model] disassembly”. You will need a small screwdriver set. Pay attention to the screw types and locations. Some laptops have hidden screws under rubber feet.
Once you open the laptop, locate the internal fans. There may be one or two, often near the CPU and GPU. These fans are smaller than desktop fans. They are usually attached to a heat sink assembly. Hold the fan blades still with a finger or a small piece of cardboard. This prevents over-spinning. Use compressed air in short, controlled bursts. Blow dust away from the fan and heat sink fins. You can also use a soft brush or cotton swab for detailed cleaning. Gently remove any dust stuck to the fan blades. Be very careful not to apply too much pressure. Laptop components are delicate.
After cleaning, carefully reassemble your laptop. Make sure all screws are replaced in their correct spots. Double-check all connections. If you removed any cables, ensure they are securely reattached. Power on your laptop. Listen for fan noise. It should be much quieter. Monitor temperatures if you have monitoring software. Your laptop should now run cooler and more efficiently. Regular internal cleaning is especially important for older or heavily used laptops.
Cleaning External and Peripheral Fans
Computers often connect to external devices with their own fans. Gaming laptops might use external cooling pads. Dedicated graphics cards can come in external enclosures. Even some external hard drives have cooling fans. Cleaning these helps maintain their performance. It also reduces dust around your main computer.
External cooling pads for laptops are common. These pads sit under your laptop. They often have one or more large fans. These fans pull air away from the laptop’s bottom vents. Dust easily collects on these fans. Unplug the cooling pad first. Use compressed air to blow dust off the fan blades and through the grilles. A microfiber cloth can wipe down the entire pad. Some cooling pads allow you to remove the grilles for deeper cleaning. Follow the manufacturer’s instructions for disassembly if available.
Desktop computers may use peripheral fans. These are extra case fans you add for better airflow. They are cleaned the same way as internal case fans. Hold the blades and use compressed air. Wipe down the fan frame and grill. Ensure they are still securely mounted inside the case. Other devices like high-end external hard drive enclosures or network storage devices might have small fans. If these devices have accessible fan grilles, use compressed air to clean them. Always disconnect power first. A clean peripheral fan helps keep surrounding air dust-free. This benefits your main computer’s cooling system. Maintaining the cleanliness of all your computer-related fans contributes to a healthier computing environment.
Advanced Fan Maintenance and Optimization
Beyond basic cleaning, you can take steps to further optimize your computer’s cooling. This involves understanding airflow, checking thermal paste, and considering upgrades. These actions improve long-term system stability. They also enhance overall performance.
H3: Checking and Improving Airflow
Good airflow inside your computer case is essential. Fans work together to create a path for air. Intake fans bring cool air in. Exhaust fans push hot air out. Ensure cables inside your desktop PC are tied neatly. Loose cables can block airflow. Use cable ties to organize them. Make sure there are no obstructions around your computer. Do not place your desktop in a tight cabinet. Ensure your laptop’s vents are not blocked by blankets or clothing. Proper placement and cable management significantly improve cooling efficiency. Keeping your computer in an open, well-ventilated space helps the fans do their job.
H3: Replacing Thermal Paste (for Desktops)
Thermal paste sits between your CPU (or GPU) and its heat sink. This paste helps transfer heat efficiently. Over time, thermal paste can dry out or degrade. This reduces its effectiveness. If your CPU temperatures remain high even after cleaning the fan, the thermal paste might need replacement. This is a more advanced task. It involves removing the CPU cooler, cleaning off old paste, and applying new paste. Watch detailed tutorials before attempting this. Using a fresh application of high-quality thermal paste can significantly lower CPU temperatures. This applies mainly to desktop PCs. Laptop thermal paste replacement is more complex and often not recommended for beginners.
H3: Fan Upgrades and Monitoring Software
Consider upgrading your fans if your computer consistently runs hot. Larger fans often move more air at lower RPMs, meaning less noise. High-quality aftermarket fans can also offer better cooling performance. Research fan sizes compatible with your case or laptop. For desktops, case fans and CPU coolers are common upgrades.
Monitoring software helps you track temperatures. Programs like HWMonitor or SpeedFan display CPU, GPU, and hard drive temperatures. They can also show fan speeds. Use this software to see if your cleaning efforts made a difference. If temperatures are still high, it signals a deeper problem. This could be poor airflow, degraded thermal paste, or a failing fan. Regular monitoring helps you catch problems early. It allows you to address cooling issues proactively. Proper fan maintenance ensures your computer delivers peak performance. You get the most out of your hardware.
Frequency and Best Practices for Fan Maintenance
How often should you clean your computer fan? The answer depends on your environment and usage. Generally, cleaning your computer fans every 3 to 6 months is a good practice. This schedule helps prevent significant dust buildup. It keeps your system running smoothly.
If you live in a dusty environment, you might need to clean more often. Homes with pets, especially those that shed a lot, accumulate dust quickly. Construction nearby can also increase airborne particles. In these cases, consider cleaning every 2 to 3 months. Similarly, if your computer runs for long hours daily, or if you use it for demanding tasks like gaming or video editing, more frequent cleaning is beneficial. High usage means more heat generation. It also means fans work harder, pulling in more air and dust.
Here are some best practices for fan maintenance:
- Regular Visual Checks: Briefly inspect your computer’s vents and fans every few weeks. Look for visible dust. If you see a furry layer, it’s time for a clean.
- Keep Your Environment Clean: Dust your room regularly. Vacuum around your computer. This reduces the amount of dust that enters your system. Consider an air purifier if dust is a persistent problem.
- Proper Placement: Place your desktop tower on a solid surface, not carpet. Carpet can block bottom vents and generate more dust. Ensure laptops are on hard, flat surfaces. Avoid using them on beds or couches. These surfaces block vents and trap heat.
- Invest in Quality Filters (for Desktops): Many desktop cases come with dust filters over intake fans. Clean these filters regularly. Some are removable and washable. Clean filters stop dust from reaching internal components.
- Do Not Over-Spray Compressed Air: Use short, controlled bursts. Holding the can upside down can release propellant, which leaves a residue. Always hold the fan blades when using compressed air. This prevents damage to the bearings.
- Listen to Your Computer: A loud, whirring fan often indicates heavy dust buildup or a failing fan bearing. Do not ignore these sounds. They are your computer’s way of telling you it needs attention.
By following these practices, you extend the life of your computer. You ensure it performs at its best. Regular fan maintenance is a small effort for big rewards.
Common Issues and Troubleshooting Fan Problems
Even with regular cleaning, you might encounter fan issues. Understanding common problems helps you troubleshoot effectively. This section covers what to do if your fan is still loud, not spinning, or if temperatures remain high.
H3: Fan Still Noisy After Cleaning
A noisy fan after cleaning can indicate a few things. First, dust might remain on the fan blades or inside the bearings. Re-clean the fan more thoroughly. Use a smaller brush or cotton swab for detailed cleaning. Second, the fan bearing might be failing. Bearings wear out over time, especially with constant use. If the noise is a persistent grinding or rattling sound, the fan likely needs replacement. Third, the fan might be running at high speed because the computer is still overheating. This suggests an underlying cooling problem beyond just dust. Check thermal paste, as discussed earlier.
H3: Fan Not Spinning
If a fan completely stops spinning, it is a serious issue. Your computer will overheat quickly. First, check all power connections to the fan. Ensure they are secure. For desktop fans, they plug into the motherboard or power supply. For laptops, fan connections are internal. If connections are good, the fan itself might have failed. Fan motors can burn out. In this case, you must replace the fan. Do not continue using a computer with a non-spinning essential fan. This will cause critical component damage.
H3: High Temperatures Despite Clean Fans
Clean fans do not always guarantee low temperatures. If your computer still runs hot, consider other factors.
- Thermal Paste Degradation: As mentioned, old thermal paste loses effectiveness. Replacing it often solves high CPU or GPU temperatures.
- Poor Airflow: Check your computer’s internal cable management. Ensure no cables block air paths. Verify that intake and exhaust fans are oriented correctly. Air should flow in one direction through the case.
- Environmental Factors: Is your room very hot? Does your computer sit in direct sunlight? These external factors impact internal temperatures. Provide your computer with a cool, well-ventilated space.
- Malware or Background Processes: High CPU usage from malware or too many background programs can generate excessive heat. Run a malware scan. Close unnecessary applications.
- Component Failure: Rarely, a temperature sensor might fail, or a component itself might draw too much power. This requires professional diagnosis.
Troubleshooting takes patience. Address the simplest issues first. Monitor temperatures after each step. This helps pinpoint the problem. Regular cleaning minimizes many common fan-related issues. Remember, your computer screen also needs regular cleaning. For specific advice, you can check out guides like how to clean computer screen without streaks or how to clean macbook computer screen.
FAQ Section
Q1: How often should I clean my computer fan? A1: You should clean your computer fan every three to six months. If you have pets, live in a dusty environment, or use your computer heavily, cleaning every two to three months is better. Regular cleaning prevents dust buildup. This helps maintain optimal cooling performance.
Q2: Can I use a vacuum cleaner to clean my computer fan? A2: No, you should not use a vacuum cleaner. Vacuum cleaners generate static electricity. This static discharge can damage sensitive internal computer components. Always use compressed air or a soft brush for cleaning. These methods are safe for electronics.
Q3: What tools do I need to clean my computer fan? A3: You need a can of compressed air, a microfiber cloth, and a small, soft-bristled brush. For laptops, a small screwdriver set might be necessary. An anti-static wrist strap is highly recommended to protect components from static electricity.
Q4: Will cleaning my computer fan make my computer faster? A4: Cleaning your computer fan directly improves cooling. This prevents your computer from overheating. When a computer overheats, it slows down to protect its components (thermal throttling). By preventing overheating, cleaning helps your computer maintain its optimal speed and performance.
Q5: Is it safe to open my laptop to clean the fan? A5: Opening a laptop to clean its fan can be safe if you follow proper guidelines. Always power off and unplug the laptop first. Consult your specific laptop model’s manual or an online guide for disassembly instructions. Be gentle, as laptop components are delicate.
Q6: What if my computer fan is still loud after cleaning? A6: If your fan is still loud after cleaning, it might indicate a failing fan bearing. Fan bearings wear out over time, causing grinding or rattling noises. In this case, the fan likely needs replacement. Also, check for persistent overheating issues that might cause the fan to run at high speeds.
Conclusion
Keeping your computer fan clean is a simple but vital maintenance task. You now understand why it matters and how to do it safely. We covered the necessary tools, strict safety precautions, and detailed steps for both desktop and laptop fans. You learned about optimizing airflow and knowing when to seek advanced solutions. A clean computer fan ensures your system runs quietly and efficiently. It prevents overheating. This protects your valuable hardware.
Regularly cleaning your computer fan extends your computer’s lifespan. It maintains fast, stable performance. Do not wait for your computer to overheat or become noisy. Make fan cleaning a routine part of your computer care. Take action now. Grab your compressed air, and give your PC the refresh it deserves. Your computer will thank you with smooth, responsive operation for years to come.
- computer fan
- clean computer
- PC maintenance
- dust removal
- fan cleaning
- computer cooling

Todd Martin
Senior Writer
With over 15 years of experience in home renovation and design, I started HEG to share what I’ve learned with homeowners who want to create spaces that are both beautiful and functional. I’ve always believed in a hands-on approach, and over the years, I’ve picked up practical solutions that actually work. Through HEG, I aim to make home improvement more approachable, sharing real tips that help you create a home you truly love.