· Todd Martin · Outdoor Living · 22 min read
How To Make A Pizza Oven Table
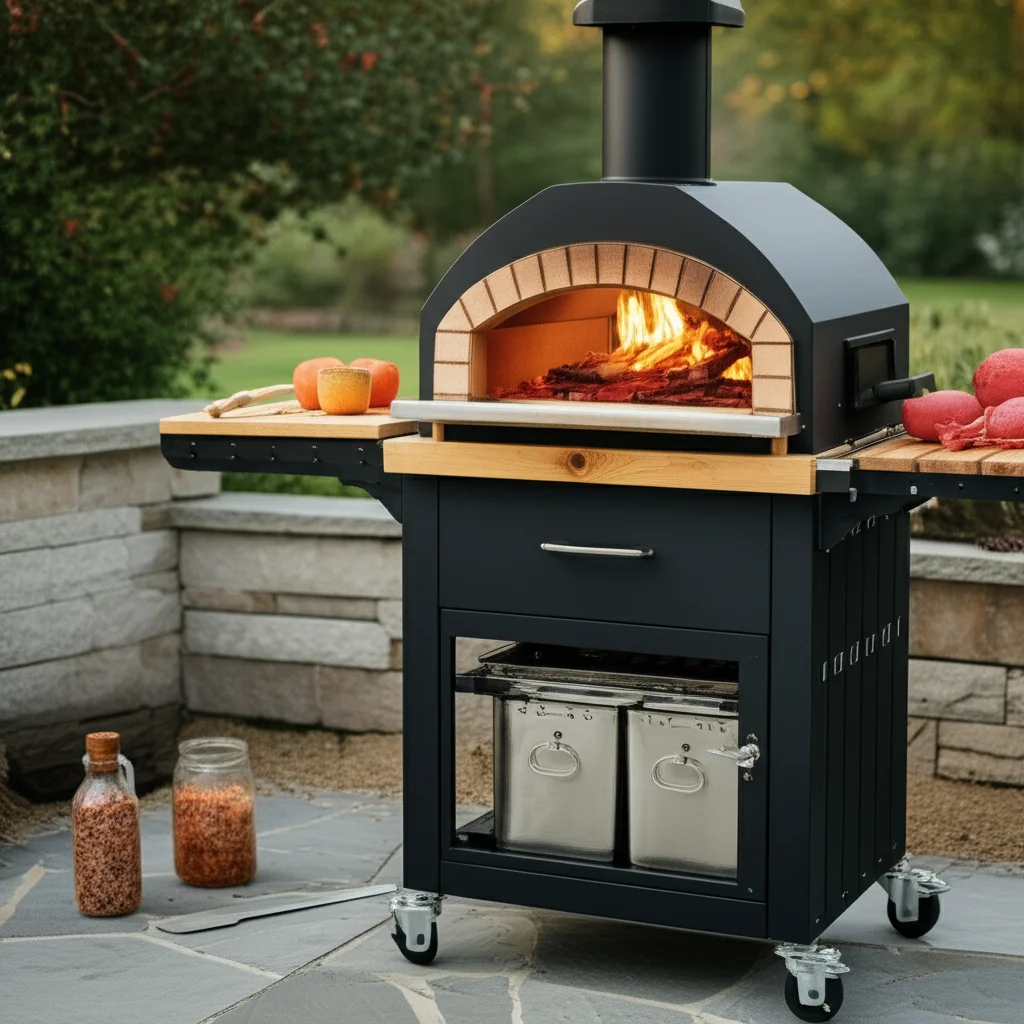
Build Your Own Pizza Oven Table: A Complete DIY Guide
Imagine hot, fresh pizza right in your backyard. A dedicated pizza oven makes this possible. But where does the oven go? Building a custom pizza oven table transforms your outdoor cooking space. It provides a stable base and valuable workspace. This article shows you how to make a pizza oven table. We will cover planning, material choice, construction steps, and finishing. Get ready to create a functional and beautiful outdoor hub for your pizza adventures.
Takeaway
- Plan your table’s design and dimensions carefully. This ensures it fits your oven and space.
- Choose durable, heat-resistant materials for safety and longevity.
- Gather all necessary tools before you start building.
- Construct a strong frame and base to support your oven’s weight.
- Add a functional countertop and integrated storage options.
- Finish the table for weather protection and a pleasing look.
To make a pizza oven table, you need to design for your oven’s size and weight. Select durable, heat-resistant materials like concrete, steel, or stone. Then, follow structural plans to build a sturdy base. Add adequate workspace and storage for an optimal outdoor cooking experience. This ensures your outdoor pizza setup is both functional and inviting.
Planning Your Custom Pizza Oven Table
The first step in making a pizza oven table is careful planning. Consider your specific pizza oven. Measure its dimensions accurately. This includes width, depth, and height. Also, weigh your oven. Most pizza ovens are heavy. Your table needs to support this weight safely. Think about where you will place the table. Will it be on a patio or deck? This affects material choices and foundation needs.
Consider the overall design. Do you want a simple stand or a full outdoor cooking station? Think about counter space around the oven. You will need room for preparing dough, toppings, and serving. Storage is another important aspect. Will you store wood, tools, or serving dishes? Plan for shelves, cabinets, or drawers.
Sketch out your design. Include all measurements. This helps you visualize the finished table. It also helps you create a material list. A well-planned design saves time and money. It also ensures your pizza oven table meets all your cooking needs.
Determining Size and Height
The size of your pizza oven table depends on your oven. Make sure the tabletop is larger than your oven’s base. This provides a stable platform. It also creates a small buffer zone around the hot oven. I typically add at least 6-12 inches of extra space around the oven. This gives me room to maneuver.
The height of the table is also important. The cooking surface of your pizza oven should be comfortable to use. Most people find a height between 36 to 40 inches comfortable. This is similar to standard kitchen counter heights. Taller individuals might prefer a slightly higher table. Shorter individuals might prefer a lower one. Consider who will use the oven most often.
Think about the total footprint of the table. Will it fit in your desired location? Allow space for people to move around the table. Do not block walkways or other outdoor features. Proper sizing makes your pizza oven table safe and enjoyable.
Essential Features and Layout
Your pizza oven table can be more than just a stand. Think about features that improve functionality. A main work surface next to the oven is crucial. This is where you prepare pizzas. You might want a secondary lower shelf for wood storage. This keeps fuel close at hand.
Consider adding hooks for peels and brushes. A built-in cooler or sink might be too complex for a first-time build. However, a small cutting board area or a pull-out shelf can be useful. Think about mobility. Do you want wheels on your table? Most outdoor pizza oven tables are heavy. Wheels make moving them easier. Make sure wheels are heavy-duty and lockable.
A well-designed layout streamlines your cooking process. It puts everything you need within reach. This makes pizza night more fun and less chaotic. A functional layout enhances your entire outdoor cooking experience.
Selecting the Right Materials for Your Table
Choosing the right materials is crucial when you make a pizza oven table. These materials must withstand outdoor conditions. They must also handle the heat from the oven. Durability is key for a long-lasting table. Appearance also matters. You want a table that complements your outdoor space. Think about the style of your home.
Common materials include wood, concrete, stone, and steel. Each has pros and cons. Wood is easy to work with but needs protection from weather and heat. Concrete is very durable and heat-resistant but requires more effort to build. Steel offers strength but can be costly. Stone is beautiful and heat-proof but heavy and expensive.
I recommend a combination of materials. For example, a sturdy frame of treated lumber or steel. Then, a countertop of concrete pavers or stone tiles. This balances strength, heat resistance, and cost. Always choose materials rated for outdoor use.
Durable Frame Construction Materials
The frame is the skeleton of your pizza oven table. It supports the oven’s weight. Treated lumber is a popular choice. It resists rot and insects. Look for pressure-treated wood suitable for ground contact. This ensures maximum longevity. Common sizes are 2x4s, 4x4s, or 6x6s.
Steel framing is another robust option. It offers superior strength and can support very heavy ovens. Steel is also fire-resistant. You might use galvanized steel studs or angle iron. Welding is often required for steel frames. This makes it a more advanced project.
CMU blocks (concrete masonry units) or concrete are also excellent for bases. These are very strong and heat-resistant. They create a solid, permanent structure. This approach is good for very large or heavy masonry ovens. They create a more permanent structure.
Heat-Resistant Countertop Surfaces
The tabletop surface directly under and around the oven needs high heat resistance. Natural stone, like granite or soapstone, is a superb choice. These materials handle extreme temperatures without cracking. They are also easy to clean. You can learn more about caring for surfaces like these by checking out how to clean a wood table.
Concrete pavers or slabs are another cost-effective and durable option. They can withstand heat and weather. You can arrange them on a cement board base. Fire bricks or refractory bricks are ideal directly under the oven. They provide insulation and protect the table structure.
Ceramic or porcelain tiles are also viable. Choose unglazed tiles for better slip resistance. Make sure the mortar and grout used are rated for high heat and outdoor use. These materials make your pizza oven table safe and functional. They also add to the aesthetic appeal. For specific outdoor applications, consider how to make an outdoor table top for other ideas.
Essential Tools for Your DIY Project
Before you start building your pizza oven table, gather all your tools. Having the right tools makes the job easier and safer. It also speeds up the construction process. You do not want to stop mid-project to buy something. Create a checklist of what you need.
Basic hand tools are always required. These include tape measures, pencils, and utility knives. Safety gear is non-negotiable. Always wear safety glasses, gloves, and ear protection. Building can be noisy and dusty. Power tools will save you a lot of time. A circular saw for cutting wood is essential. A drill/driver speeds up assembly.
Depending on your chosen materials, you might need specialized tools. If working with concrete, a mixer is helpful. For stone or tile, a wet saw makes clean cuts. Renting specialized tools is often cheaper than buying them for a single project.
Basic Hand Tools and Safety Gear
You will use these tools throughout the build. A good quality tape measure ensures accurate cuts. A carpenter’s square helps you make sure corners are true. A level ensures your table is flat. This is critical for supporting a heavy oven. A hammer is useful for minor adjustments or securing hardware.
Safety glasses protect your eyes from flying debris. Gloves protect your hands from splinters and cuts. Ear protection is important when using power tools. A dust mask is good for dusty work, like cutting wood or mixing concrete. I always wear these items. It keeps me safe.
Keep a first-aid kit nearby. Accidents can happen even with proper precautions. Being prepared helps you deal with small injuries quickly. Prioritize safety during every step. Your well-being comes first.
Power Tools and Specialized Equipment
Power tools greatly increase efficiency. A circular saw makes quick work of cutting lumber. Ensure you have the right blade for your wood type. A miter saw offers precise angle cuts for frames. This leads to a professional finish.
A cordless drill/driver is invaluable for fastening screws. Choose one with enough torque for driving long screws into tough wood. Have a variety of drill bits and driver bits. For concrete or masonry work, a hammer drill helps with anchors.
If you are pouring a concrete countertop, a concrete mixer speeds up the process. A trowel and float are needed for finishing the surface. For cutting tile or stone, a wet tile saw creates clean, chip-free edges. You can often rent these from tool rental stores. Consider if you need a specific type of table saw for certain cuts, which might also impact your design, similar to how one might approach making a table with folding legs for portability considerations.
Building the Frame and Base
Building a sturdy frame and base is the most important step for your pizza oven table. This foundation supports the entire weight of your oven. It also provides stability. A weak base can cause your oven to crack or even tip. Take your time with this part. Accuracy is key.
Start by cutting your lumber or steel pieces to the planned dimensions. Label them clearly. This prevents confusion during assembly. Lay out the base pieces on a flat surface. Use strong fasteners like structural screws or bolts. Make sure all connections are tight.
Verify that your frame is square and level at each stage. Use a large carpenter’s square and a spirit level. Small errors early on can cause big problems later. A solid frame ensures your pizza oven table will last for years.
Constructing the Main Support Structure
Begin by building the base rectangle or square. This forms the footprint of your table. Connect the four perimeter pieces. Use heavy-duty L-brackets or mortise and tenon joints for strong connections if you are skilled. For most DIYers, carriage bolts or large structural screws work well. Drill pilot holes to prevent wood splitting.
Next, add vertical posts to create the legs of the table. These posts connect to the base frame. Secure them with robust connections. Cross-bracing between the legs adds significant stability. This is especially important for heavy ovens. Think of diagonal supports or additional horizontal members.
If building with CMU blocks, lay your first course on a level concrete slab or compacted gravel. Use mortar to bond the blocks. Build up the courses, checking for level and plumb with each layer. This solid structure creates a permanent and extremely stable base for your pizza oven table.
Reinforcing for Heavy Pizza Ovens
Many outdoor pizza ovens are very heavy. Some weigh hundreds of pounds. Reinforcement is essential. For wooden frames, use larger dimension lumber, like 4x4s or 6x6s for legs. Add extra support beams under where the oven will sit. These beams distribute the weight.
Consider using steel connectors or hurricane ties for critical joints. These metal plates add significant strength to wood connections. If your table is long, add a central support leg or wall. This prevents sagging in the middle.
For masonry bases, ensure your footing is adequate. A concrete slab or reinforced gravel pad prevents settling. You might need rebar within mortar joints for very tall or wide block structures. Always err on the side of over-engineering the base. It is better to have it too strong than not strong enough. This robust construction makes your pizza oven table safe and reliable for many years of use.
Adding the Countertop and Work Surfaces
Once your table frame is solid, it is time to add the countertop. This is where the oven will sit. It also provides your valuable workspace. The countertop needs to be level, strong, and heat-resistant. This ensures safe operation and comfortable use of your pizza oven table.
Measure your frame carefully before cutting countertop materials. Double-check all dimensions. Laying out your countertop material before fixing it helps visualize the finished surface. This is true whether you are using large slabs, tiles, or pouring concrete.
Secure the countertop material firmly to the frame. Use appropriate adhesives, screws, or mortar. Ensure there are no gaps or uneven spots. A flat surface is critical for stability and food preparation. Your countertop becomes the heart of your outdoor pizza station.
Installing the Main Oven Platform
The platform directly under your pizza oven must be exceptionally strong. If using stone slabs or concrete pavers, ensure they are thick enough. A minimum of 2 inches thick is good for most materials. Lay a base layer of cement board or exterior-grade plywood over the frame. This provides a solid sub-surface.
Apply a thin-set mortar or construction adhesive to the sub-surface. Carefully place your chosen countertop material. Use shims if needed to ensure a perfectly level surface. Press down firmly to create a good bond. For very heavy ovens, you might need to embed steel plates or rebar within a concrete slab.
Allow any adhesives or mortar to cure completely. Follow the manufacturer’s instructions for drying times. Do not place the oven on the platform until it is fully set. This step is critical for the long-term stability and safety of your pizza oven table.
Creating Auxiliary Work Areas
Beyond the oven platform, you need space for food preparation. Extend the countertop to one or both sides of the oven. This creates dedicated prep zones. You can roll out dough, chop toppings, and assemble pizzas here. The ideal amount of space depends on your cooking style. I like at least 2-3 feet on one side.
Consider different countertop materials for these auxiliary areas. While heat resistance is paramount near the oven, other areas can use different materials. Treated wood, stainless steel, or even outdoor-rated laminates work well. These might be more cost-effective or easier to clean. For ideas on different materials, you might look at how to make an outdoor table top for general outdoor use.
Think about the workflow. You want to move easily from prepping to baking. Make sure these surfaces are at a comfortable working height. This makes the entire process enjoyable. A well-designed work area enhances the functionality of your pizza oven table.
Integrating Storage and Features
A pizza oven table is more than just a base for your oven. It can become a complete outdoor cooking hub. Integrating storage and smart features greatly enhances its utility. Think about what you need access to while making pizza. This includes fuel, tools, and serving items.
Plan these additions during the design phase. It is easier to build them in from the start. Adding them later can be difficult. Consider both open and closed storage options. Open shelves are convenient for wood. Closed cabinets protect items from weather.
These features make your outdoor cooking experience smoother. They keep your area tidy. A well-equipped pizza oven table becomes a true focal point for entertaining.
Fuel Storage Solutions
Most outdoor pizza ovens run on wood or gas. Plan specific storage for your fuel type. If you use wood, open shelving below the oven is ideal. It keeps logs dry and easily accessible. Design the shelves to allow airflow. This helps keep the wood seasoned. Make sure the storage area is big enough for a decent supply of wood.
For gas ovens, you will need a secure place for the propane tank. Some tables have a dedicated compartment with a door. This keeps the tank out of sight. It also protects it from direct sunlight. Ensure proper ventilation for gas tanks. Safety is paramount when storing fuel.
A well-designed fuel storage area keeps your cooking efficient. It also helps maintain a clean appearance for your pizza oven table. Nobody wants to see a messy pile of wood or an exposed gas tank.
Built-in Tool Holders and Accessories
Think about the tools you use for pizza making. A pizza peel, turning peel, brush, and thermometer are common. Integrate holders for these tools into your table design. Hooks on the side of the table keep peels within easy reach. A small drawer can store smaller items like a thermometer or cutter. For ideas on adding drawers, consider instructions on how to make a drawer out of wood.
Consider other accessories. A built-in bottle opener or a small cutting board section adds convenience. Some tables even incorporate a small trash bin for easy cleanup. These little touches make a big difference in usability.
These built-in features keep your workspace organized. They prevent tools from getting lost. Everything has its place. This makes your pizza oven table a joy to use. It creates a truly custom outdoor kitchen experience.
Finishing Touches and Protection
After constructing your pizza oven table, apply the finishing touches. This step improves its appearance. It also protects the materials from weather. Proper finishing ensures your table lasts for many years. Do not skip this important part of the build.
The type of finish depends on your chosen materials. Wooden tables need sealing or painting. Concrete or stone might need sealing to prevent stains. These finishes also guard against UV rays and moisture. UV rays can fade colors. Moisture can cause rot or mildew.
Take your time with finishing. A good finish enhances the look of your pizza oven table. It also makes it easier to clean. A well-finished table looks professional and inviting.
Sealing and Weatherproofing Your Table
If you used wood for your frame or countertop, it needs protection. Apply a good quality exterior wood sealer or stain. This penetrates the wood. It protects against moisture, rot, and UV damage. Reapply every few years as recommended by the product manufacturer. Make sure the wood is clean and dry before applying any finish.
For concrete or stone countertops, apply a concrete or stone sealer. These sealers prevent stains from food and grease. They also make cleaning easier. Many sealers offer a “wet look” finish. This enhances the color of the material. Always follow the manufacturer’s instructions for application and curing.
Metal components, like steel frames, might need a rust-resistant paint. Galvanized steel is already resistant. But painted steel adds an extra layer of protection. These steps extend the life of your pizza oven table. They keep it looking new. For care of outdoor wooden surfaces, you might find tips on how to clean a wood table helpful.
Aesthetic Enhancements and Decorative Elements
Beyond protection, think about making your pizza oven table visually appealing. You can add decorative elements. These personalize your outdoor space. Consider tiling the sides of the table. Use colorful outdoor tiles. This adds a unique touch.
Stucco or stone veneer can give your table a professional, built-in look. These materials can match your home’s exterior. They also add to the overall heat resistance. You can even create unique patterns or designs with these materials.
Lighting is another great aesthetic enhancement. Install LED strip lights under the countertop. This creates a warm ambiance at night. It also provides task lighting for cooking. Decorative hardware for cabinet doors or drawers also adds style. These small details transform your pizza oven table from functional to fabulous. It makes it a standout feature in your backyard.
Positioning and Curing Your New Table
You built a beautiful pizza oven table. Now, it is time to place it and get it ready for action. Correct positioning is crucial for safety and functionality. The curing process for your oven and table materials is also vital. Do not rush these final steps.
Choose a level spot for your table. Uneven ground can cause instability. This is especially dangerous with a heavy pizza oven. Make sure the area is clear of overhead obstructions. Avoid placing it directly under low tree branches.
Allow all materials to fully cure before heavy use. This includes any mortar, concrete, or sealants. Following these steps ensures your pizza oven table is safe, stable, and ready to make delicious pizzas for years to come.
Choosing the Ideal Location
Select a flat, stable surface for your pizza oven table. A concrete patio or sturdy deck is ideal. If placing it on grass, prepare a leveled gravel or paver base first. This prevents the table from settling unevenly over time. Ensure good drainage around the area.
Position the table away from flammable structures. Keep it a safe distance from your house, fences, and overhanging trees. Check local fire codes for specific clearance requirements. Good airflow around the oven is also important for safe operation.
Consider prevailing winds. Position the oven so smoke blows away from your gathering area. Think about convenience. Is it near your kitchen for easy prep? Is it close to your outdoor dining area? The right location makes your pizza oven table a true extension of your living space.
Curing the Oven and Table Materials
Most pizza ovens, especially masonry or pre-cast ones, require a curing process. This involves slowly increasing the temperature over several days. This allows any moisture to escape. It prevents cracks. Follow your specific oven manufacturer’s instructions for curing. This step is critical for the oven’s longevity.
Any concrete, mortar, or sealers used in your table also need to cure. This allows them to reach full strength. Again, follow the manufacturer’s recommendations for drying and curing times. For example, concrete typically takes 28 days to reach its full strength. Placing heavy weight on it too soon can compromise its integrity.
During curing, protect the table from heavy rain or extreme temperatures. Cover it if needed. Patience during this phase ensures your pizza oven table and oven are ready for safe and effective use. Rushing this step can lead to structural problems or oven damage.
Maintaining Your Pizza Oven Table
Your pizza oven table is an investment in your outdoor living. Proper maintenance ensures it stays in top condition. Regular care extends its lifespan. It also keeps it looking great. Taking a few simple steps protects your hard work.
Cleaning after each use is important. Remove ash and food debris from the oven. Wipe down the countertop. This prevents stains and keeps your workspace hygienic. A clean table is more inviting.
Periodically inspect your table. Look for any signs of wear or damage. Address issues promptly. This prevents small problems from becoming big ones. Good maintenance makes sure your pizza oven table is always ready for pizza night.
Regular Cleaning and Care
After each pizza session, let the oven cool down completely. Then, remove any ash and unburnt wood. You can use a small shovel and brush for this. For the oven’s interior, a brass brush is useful. Remember to clean your pizza stone as well. Learn more about how to clean pizza stone for best results.
Wipe down the countertop surfaces. Use a damp cloth and mild soap. For stubborn stains, use cleaners appropriate for your countertop material. Always rinse thoroughly. This prevents residue buildup. For concrete or stone, reapply sealant periodically. This maintains its stain resistance.
Clean any storage areas. Remove debris or dust. Keep wood dry and tidy. Regular cleaning keeps your pizza oven table sanitary and pleasant to use. It prevents pests and keeps your outdoor area looking sharp.
Seasonal Inspections and Repairs
At the start and end of each outdoor cooking season, inspect your table. Check all structural joints. Look for any loose screws or bolts. Tighten them as needed. Inspect wood for any signs of rot or insect damage. If found, treat or replace affected sections.
Check the countertop for cracks or chips. Small cracks in concrete or mortar can be repaired with appropriate fillers. Reapply wood stain or sealer if the finish looks faded or worn. This protects the material from harsh weather.
Check the oven itself. Look for cracks in the dome or base. Address these according to the oven manufacturer’s guidelines. Some cracks are normal, but large ones need repair. Maintaining your pizza oven table proactively prevents major issues. This ensures it remains a safe and reliable center for your outdoor entertaining.
Frequently Asked Questions
What materials are best for a pizza oven table?
The best materials for a pizza oven table are durable and heat-resistant. This includes concrete blocks, treated lumber, steel, and natural stone like granite or soapstone. Fire bricks are ideal for the direct oven platform. These materials ensure your table can withstand outdoor conditions and oven heat. They provide long-lasting stability.
How high should a pizza oven table be?
A comfortable height for a pizza oven table is typically between 36 to 40 inches. This matches standard kitchen counter heights. This allows for easy access to the oven mouth. It also provides a comfortable surface for preparing pizzas. Adjust the height slightly to suit your personal preference and height.
Can I build a pizza oven table on a wooden deck?
Yes, you can build a pizza oven table on a wooden deck. However, reinforce the deck structure underneath if your oven is very heavy. Use a heat-resistant barrier like cement board and fire bricks directly under the oven. Ensure ample clearance from flammable deck materials. Always check local fire codes for safety.
What tools do I need to build a DIY pizza oven table?
You will need basic hand tools like a tape measure, level, and square. Power tools like a circular saw and drill/driver are essential. Depending on materials, you might need a concrete mixer, trowel, or tile saw. Always wear safety glasses, gloves, and ear protection when working.
How long does it take to build a pizza oven table?
Building a pizza oven table can take anywhere from a weekend to several weeks. This depends on the complexity of your design and your skill level. A simple wooden frame with a tile top might be quicker. A full masonry or concrete table with integrated features will take longer. Proper curing time for materials also adds to the total duration.
How do I protect my pizza oven table from the weather?
Protect your pizza oven table from weather by using exterior-grade materials. Apply a high-quality wood sealer, stain, or exterior paint for wooden parts. Seal concrete or stone countertops with appropriate sealers. Consider a custom-fit cover for your table and oven during harsh weather or off-season periods.
Conclusion
Building your
- pizza oven table
- DIY outdoor kitchen
- build pizza stand
- outdoor cooking station
- homemade pizza table
- wood-fired oven stand

Todd Martin
Senior Writer
With over 15 years of experience in home renovation and design, I started HEG to share what I’ve learned with homeowners who want to create spaces that are both beautiful and functional. I’ve always believed in a hands-on approach, and over the years, I’ve picked up practical solutions that actually work. Through HEG, I aim to make home improvement more approachable, sharing real tips that help you create a home you truly love.