· Todd Martin · Home Improvement · 19 min read
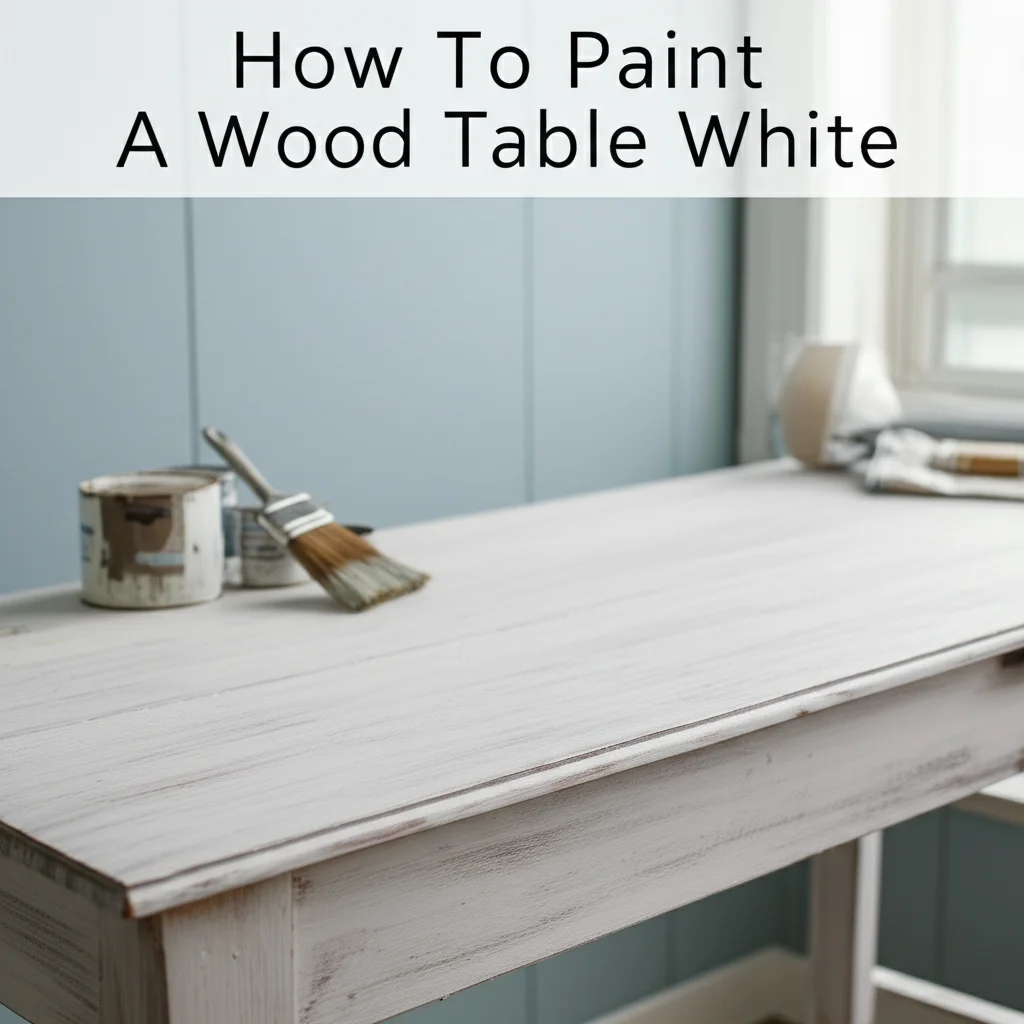
How To Paint China Cabinet
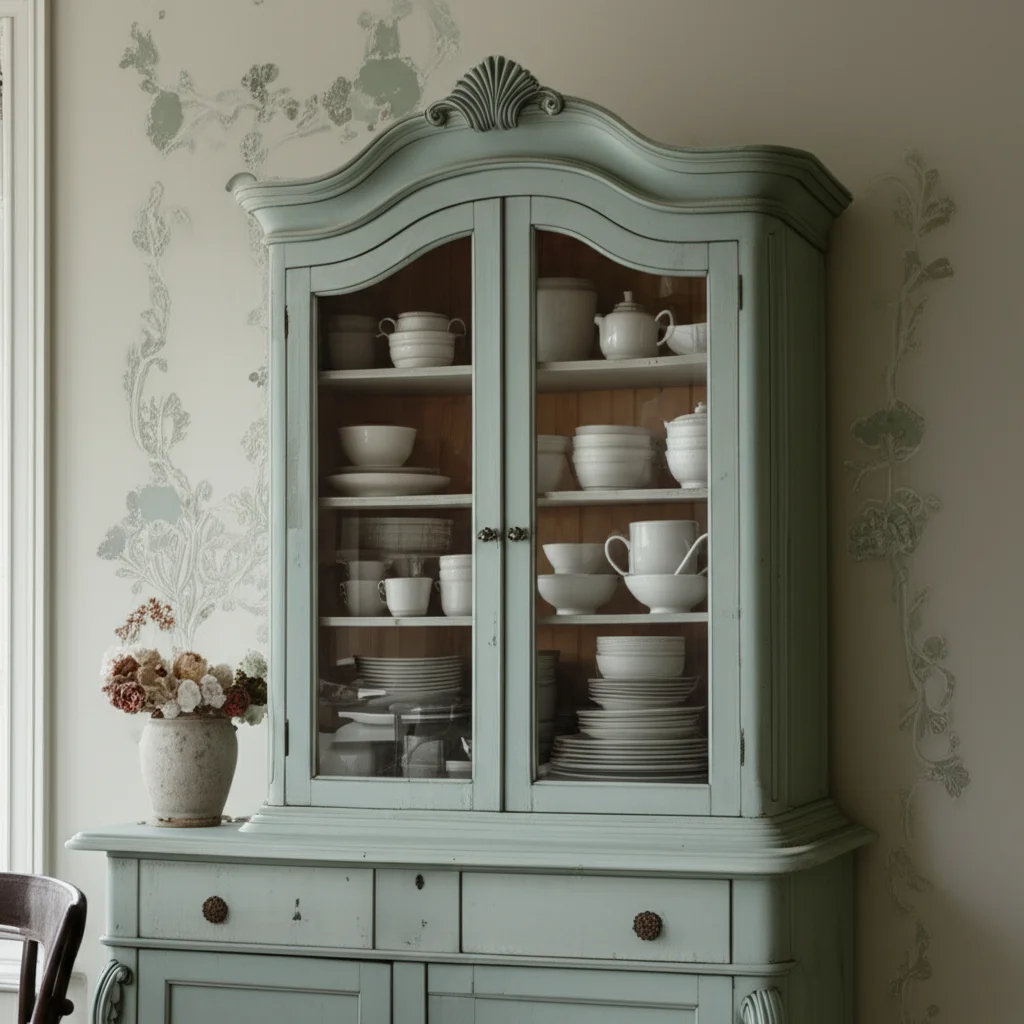
Unlock Your China Cabinet’s Potential: How To Paint China Cabinet for a Fresh Look
Do you own a china cabinet that looks tired or outdated? Perhaps its original finish no longer matches your home decor. Painting a china cabinet is a fantastic way to give it a new lease on life. This DIY project can save you money and create a beautiful, custom piece for your home.
Transforming an old cabinet can feel like a big project. However, with the right steps and tools, painting a china cabinet becomes a rewarding experience. This guide will walk you through everything. We will cover preparing your cabinet, choosing the right paint, and applying it for a smooth, lasting finish. Get ready to turn your dated cabinet into a stunning focal point.
Takeaway
- Gather all necessary tools and materials before starting.
- Properly prepare the cabinet surface through cleaning, sanding, and priming.
- Choose the correct type of paint and finish for durability and appearance.
- Apply multiple thin coats for a smooth, professional-looking finish.
- Allow proper drying and curing time for the paint and topcoat.
Painting a china cabinet involves disassembling components, thorough cleaning, light sanding, and applying a quality primer. Follow with two to three thin coats of paint, then seal with a durable topcoat. This process ensures a smooth, long-lasting, and beautiful transformation for your furniture piece.
Pre-Painting Essentials: Gathering Your Tools and Materials
Starting any painting project requires gathering all the necessary items first. Having everything ready saves time and prevents interruptions. For painting a china cabinet, you will need a variety of tools and specific materials. These items ensure a smooth and successful project from start to finish.
Think of this step as setting up your workstation. A well-organized space helps you focus on the task at hand. It also prevents spills and damage to other items. You want to make sure you have enough space to work comfortably. You also need good ventilation and protection for your surroundings.
Essential Tools for Painting Your China Cabinet
You will need several tools to prepare and paint your china cabinet. Each tool serves a specific purpose in the process. Make sure they are clean and in good working order before you begin. Quality tools make the job easier and improve the final result.
- Screwdrivers (Phillips and flathead): For removing hardware like hinges, pulls, and latches.
- Pliers: Can help with stubborn screws or removing small pieces.
- Drop cloths or old sheets: To protect your floors and other furniture from paint spills.
- Painter’s tape (blue or green): For taping off areas you do not want to paint, like glass or hardware.
- Sanding sponges or sandpaper (120-220 grit): For roughening the surface and ensuring paint adhesion. A sanding block can make this easier.
- Tack cloth or microfiber cloths: To remove dust and debris after sanding.
- Buckets and sponges: For cleaning the cabinet.
- Paint brushes (high-quality synthetic for latex/acrylic, natural for oil-based): Choose various sizes for detailed work and larger flat surfaces.
- Small foam rollers (dense foam): Great for smooth, even coverage on flat areas.
- Paint trays: For holding paint when using rollers.
- Stir stick: To mix paint thoroughly.
- Respirator mask: Essential for protecting your lungs from paint fumes and sanding dust.
- Safety glasses: To protect your eyes from dust and paint splatters.
- Gloves: To keep your hands clean and protected from chemicals.
- Utility knife or putty knife: For scraping off old paint or caulk if needed.
Having these tools at your disposal will make the entire process more efficient. It also helps you achieve a professional-looking finish. Do not skip on safety gear; your health is important.
Selecting the Right Materials
The materials you choose will impact the final look and durability of your painted china cabinet. Take time to research and pick products that suit your cabinet’s original finish and your desired outcome. High-quality paints and primers make a big difference.
- Degreaser or all-purpose cleaner: To thoroughly clean the cabinet before sanding. A good how to clean cabinet guide can help here.
- Wood filler or spackle: For filling any holes, dents, or imperfections in the wood.
- Primer (shellac-based or high-adhesion bonding primer): Crucial for paint adhesion, especially over glossy or tricky surfaces.
- Paint:
- Chalk paint: Minimal prep, matte finish, easy to distress.
- Milk paint: Creates a historical, soft look, often needs a bonding agent.
- Latex/Acrylic paint (furniture grade): Durable, easy cleanup, good for high-traffic areas. Look for self-leveling types. How to paint furniture with latex paint provides more details.
- Oil-based paint: Very durable, smooth finish, but takes longer to dry and has stronger fumes.
- Topcoat/Sealer:
- Polycrylic: Water-based, clear, non-yellowing, good for light colors.
- Polyurethane: Oil-based, very durable, can yellow over time, best for darker colors.
- Wax: Used with chalk or milk paint for a soft, protective finish.
- Varnish: A very durable finish, often used on fine furniture. Consider learning how to seal cabinet paint for long-lasting results.
- Paint thinner or mineral spirits: For oil-based paint cleanup, if you choose that type.
- Shop vac or vacuum cleaner: For quick clean-up of sanding dust.
Gathering these items before starting will set you up for success. It saves trips to the store and keeps your momentum going. Prepare your space, prepare your tools, and prepare yourself for a fun project.
Preparing Your China Cabinet for Painting: The Foundation of Success
Proper preparation is the most critical step in painting a china cabinet. Skimping on prep work leads to peeling paint, an uneven finish, and a frustrating outcome. A well-prepared surface ensures paint adhesion and durability. This step takes time, but it is worth every minute.
Think of it as building a strong foundation for a house. Without a solid base, the house will not stand strong. Similarly, without proper prep, your paint job will not last. This process involves disassembling the cabinet, thorough cleaning, and addressing any imperfections.
Disassembly and Cleaning: Essential First Steps for China Cabinet Painting
Before you can even think about applying paint, you must break down the cabinet and clean it. This sounds simple, but it is a vital part of the process. Taking your time here will prevent issues later on. You want to work with individual pieces where possible.
Start by carefully removing all movable parts. This includes doors, drawers, shelves, and any decorative trim. Label everything as you go. A good labeling system makes reassembly much easier. Place small hardware like screws and hinges into labeled plastic bags. This prevents losing small, crucial pieces.
- Remove glass panels: Many china cabinets have glass fronts or sides. Carefully remove these panels if possible. How to remove glass from cabinet doors can offer specific guidance. If glass cannot be removed, tape it off meticulously with painter’s tape. Press down firmly to create a good seal.
- Take off hardware: Unscrew all hinges, handles, knobs, and latches. Consider whether you want to reuse the old hardware or replace it. If reusing, you might want to how to clean old cabinet hardware to restore its shine.
- Remove shelves and drawers: Pull out all shelves and drawers. If drawers have glides, note how they are attached.
- Label everything: Use painter’s tape and a marker to label each piece and its corresponding hardware bag. For example, “Top Left Door” or “Drawer 1 (bottom left)“. This saves headaches during reassembly.
Once disassembled, it is time to clean. Furniture, especially older pieces, can accumulate years of grime, dust, and grease. Paint will not stick to a dirty surface. Use a strong degreaser or an all-purpose cleaner to thoroughly clean every surface you plan to paint.
- Mix your cleaner: Follow the cleaner’s instructions for dilution.
- Wipe down all surfaces: Use a sponge or rag to wipe down every part of the cabinet. Pay close attention to areas where hands touch often, as these tend to be greasier.
- Scrub stubborn spots: For tough grime, use a scrub brush.
- Rinse thoroughly: After cleaning, wipe down all surfaces with a clean, damp cloth to remove any cleaner residue. Any residue can prevent paint from adhering properly.
- Allow to dry completely: Ensure all surfaces are bone dry before moving on. Moisture trapped under paint can cause bubbling or peeling.
Addressing any imperfections is the next step. Old china cabinets might have chips, dents, or scratches. Fill these with wood filler or spackle.
- Apply filler: Use a putty knife to apply wood filler to any holes or cracks. Overfill slightly, as it will shrink as it dries.
- Allow to dry: Let the filler dry completely, following the product’s instructions. This usually takes a few hours.
- Sand smooth: Once dry, sand the filled areas smooth with fine-grit sandpaper (220 grit). Make sure they are flush with the surrounding surface.
This thorough cleaning and minor repair work create a smooth, clean canvas. It prepares your china cabinet for the next crucial step: sanding and priming.
Sanding and Priming Your China Cabinet: Creating the Perfect Base
Sanding and priming are vital steps in achieving a professional-looking paint finish on your china cabinet. Many people want to skip these, but they are crucial. Sanding creates a surface for the paint to grip. Priming ensures uniform color and better adhesion. Do not underestimate their importance.
Proper preparation ensures your paint job lasts for years. It prevents common problems like peeling, chipping, and uneven color. Investing time in these steps will save you effort later on. It will also give you a result you can be proud of.
The Purpose of Sanding
Sanding serves two main purposes when painting furniture. First, it removes any loose old finish, dirt, or minor imperfections. Second, it creates a “tooth” or texture on the surface. This tooth allows the new paint to adhere firmly. Without it, paint might simply slide off or chip easily.
You do not need to sand down to bare wood unless the old finish is severely damaged or peeling. A light scuff sand is often enough. This means just enough sanding to dull the existing glossy finish.
- Choose the right grit: Start with 120-grit sandpaper or a sanding sponge for initial sanding. This will remove minor imperfections and rough up the surface. Follow with 180-220 grit for a smoother finish before priming.
- Sand with the grain: Always sand in the direction of the wood grain. This prevents noticeable scratch marks.
- Focus on smooth surfaces: Ensure all flat surfaces and edges are evenly sanded. Pay attention to corners and detailed areas where paint might struggle to stick.
- Do not over-sand: Avoid sanding through to bare wood unless necessary. The goal is to dull the shine, not remove all the old finish.
- Dust removal: After sanding, thoroughly remove all dust. Use a vacuum cleaner first to get the bulk of the dust. Then, wipe down all surfaces with a tack cloth or a damp microfiber cloth. This is critical. Any dust left behind will mix with your paint and create a gritty texture.
For china cabinets with existing paint, particularly if it’s glossy or a difficult surface like laminate, you might need to use a more aggressive approach or specific primers. Consider researching how to paint over painted furniture or how to paint already painted cabinets for additional tips on these scenarios.
Why Priming is Essential
Primer acts as a bridge between the cabinet surface and your new paint. It creates a uniform, adhesive layer that promotes paint longevity and vibrancy. Skipping primer can lead to paint absorbing unevenly, or not sticking at all. This is especially true for dark wood or cabinets with stains.
- Block stains: Primer, especially shellac-based, can block tannins from bleeding through light-colored paint. These tannins are natural wood chemicals that can cause yellow or brown discoloration.
- Improve adhesion: Primer provides a rough surface for paint to grip onto, even if the underlying surface is smooth or glossy.
- Ensure even coverage: Primer creates a consistent base color. This means you will need fewer coats of your final paint color, saving time and money.
- Enhance durability: A good primer adds another layer of protection, making your paint job more durable and resistant to chipping.
Applying Primer
Once your cabinet is clean and dust-free after sanding, you are ready to prime.
- Choose the right primer:
- Shellac-based primer: Best for blocking stains and odors, excellent adhesion over glossy surfaces, and quick drying. It has strong fumes, so use in a well-ventilated area.
- High-adhesion bonding primer: Good for tricky surfaces like laminate, metal, or previously painted furniture.
- Water-based (latex) primer: Good for general use over raw wood or previously painted surfaces that are not prone to bleeding.
- Apply thin, even coats: Use a high-quality synthetic brush or a small foam roller. Apply one to two thin, even coats of primer. Avoid applying too much primer, as this can lead to drips and unevenness.
- Allow proper drying time: Read the primer can for specific drying times between coats and before painting. Rushing this step can ruin your finish.
- Light sand after priming (optional but recommended): Once the primer is fully dry, lightly sand with 220-grit sandpaper. This smooths any minor imperfections created by the primer and creates an even better surface for paint. Wipe off all dust with a tack cloth.
By diligently completing the sanding and priming steps, you lay the groundwork for a truly beautiful and durable paint finish on your china cabinet. It is the secret to a professional-looking result.
Choosing the Right Paint and Application Techniques for Your China Cabinet
Selecting the right paint and knowing how to apply it are crucial for a successful china cabinet makeover. Your paint choice impacts the final look, durability, and ease of application. Different paints offer different finishes and properties. Understanding these differences helps you make an informed decision.
Consider the amount of use your china cabinet will get. A piece in a high-traffic area might need a more durable paint. A decorative cabinet might allow for more artistic choices. Think about your desired aesthetic too. Do you want a matte, satin, or glossy finish?
Deciding on the Best Paint Type
Several types of paint are suitable for furniture. Each has its pros and cons for painting a china cabinet.
- Chalk Paint:
- Pros: Requires minimal surface prep (often no sanding or priming), dries quickly, creates a soft, matte, distressed look, and is easy to use.
- Cons: Not inherently durable; requires a topcoat (wax or polycrylic) for protection.
- Best for: Achieving a vintage, shabby chic, or farmhouse style.
- Milk Paint:
- Pros: All-natural, creates a very flat, porous finish. It can chip easily for an authentic antique look (chippy finish) or be used with a bonding agent for better adhesion.
- Cons: Can be messy to work with, requires a topcoat for durability, and needs a bonding agent for a non-chippy finish.
- Best for: Achieving a historical, rustic, or authentically distressed appearance.
- Latex/Acrylic Paint (Furniture Grade):
- Pros: Water-based, easy cleanup, low odor, durable, quick-drying, available in many colors and sheens (flat, eggshell, satin, semi-gloss, gloss). Look for paints specifically formulated for cabinets or furniture.
- Cons: Can show brush strokes if not applied carefully, may require more prep than chalk or milk paint.
- Best for: A durable, modern, or classic look. Good for high-use pieces. How to paint furniture with latex paint offers detailed instructions.
- Oil-Based Paint:
- Pros: Extremely durable, provides a very smooth, hard finish, excellent leveling properties (fewer brush strokes).
- Cons: Strong fumes, longer drying times, cleanup requires mineral spirits, can yellow over time, especially light colors.
- Best for: High-traffic pieces where extreme durability is paramount.
For most china cabinets, a good quality furniture-grade latex or acrylic paint with a satin or semi-gloss finish is a popular choice. It balances durability with ease of use. Chalk paint is also a favorite for its ease of application and charming finish.
Essential Application Techniques
How you apply the paint significantly impacts the final look. Using the right tools and techniques helps achieve a smooth, professional finish.
- Brushes:
- High-quality synthetic brushes: Best for latex and acrylic paints. They hold their shape and leave fewer brush marks.
- Natural bristle brushes: Best for oil-based paints.
- Sizes: Use a 1.5-2 inch angled brush for details, edges, and corners. A 2.5-3 inch flat brush is good for larger flat surfaces where rollers can’t reach.
- Technique: Load your brush with a moderate amount of paint. Apply paint in long, even strokes in the direction of the wood grain. Do not overwork the paint; brush marks appear if you brush paint as it starts to dry.
- Rollers:
- Small foam rollers (dense foam): Ideal for achieving a smooth, spray-like finish on flat surfaces like cabinet doors and sides. They leave minimal texture.
- Technique: Pour a small amount of paint into a paint tray. Roll the roller in the tray to evenly coat it. Apply paint in light, even pressure. Overlap your strokes slightly to avoid roller marks.
- Paint Sprayers:
- Pros: Fastest method, achieves the smoothest, most professional finish with no brush or roller marks.
- Cons: Requires practice, more setup and cleanup, needs proper ventilation and masking.
- Best for: If you want a flawless factory-like finish and are comfortable with the learning curve. Learning how to spray cabinet doors can be helpful if you go this route.
Regardless of your chosen method, remember to work in a well-ventilated area. Always wear your respirator mask and safety glasses.
Painting Your China Cabinet: Achieving a Smooth, Flawless Finish
With your china cabinet prepped and your paint chosen, it’s time for the most exciting part: applying the color. This stage requires patience and careful technique. Rushing through it can lead to drips, uneven coverage, and a less-than-perfect finish. Take your time to build up thin, even layers of paint.
Think of each coat as a light veil of color. It’s better to apply several thin coats than one thick coat. Thin coats dry faster, reduce drips, and create a more durable, smoother surface. Aim for consistent coverage rather than trying to get full opacity in the first coat.
Step-by-Step Painting Process
Follow these steps for applying paint to your china cabinet. This process works well for most types of furniture paint. Remember to work in a dust-free environment for the best results.
- Stir your paint: Before opening the can, shake it well. Then, open it and stir the paint thoroughly with a stir stick. This ensures the pigments are evenly mixed.
- Start with the inside and less visible areas: If you plan to paint the inside of cabinets, start there. It is easier to fix mistakes on interior parts. You can find guidance on how to paint inside of cabinets. Also, begin with the less visible areas first. This allows you to get a feel for the paint’s consistency and how it applies.
- Apply the first thin coat:
- Brushing: Dip your brush about one-third of the way into the paint. Tap off excess paint on the side of the can or paint tray. Apply paint in long, smooth, even strokes, always following the direction of the wood grain. Avoid overworking the paint.
- Rolling: Load your foam roller evenly in the paint tray. Roll it over the surface with light, even pressure. Overlap each pass slightly to prevent lines.
- Spraying: Follow your sprayer’s instructions. Keep the sprayer moving at a consistent speed and distance from the surface to avoid drips.
- Allow sufficient drying time: This is crucial. Read the paint can for specific “recoat” times. This is the minimum time before you can apply another coat. If you apply the next coat too soon, the paint can wrinkle or peel. Drying times can vary based on humidity and temperature.
- Lightly sand between coats (optional but recommended for smooth finish): After the first coat (and any subsequent coats), once completely dry, lightly sand the surface with 220-grit or finer sandpaper. This smooths any minor imperfections or brush marks. It also helps the next coat adhere better. Wipe off all sanding dust with a tack cloth before proceeding.
- Apply second coat (and third, if needed): Repeat step 3. Most projects require two coats for good coverage. Darker original finishes or lighter new paint colors might need a third coat. Always apply thin coats.
- Check for drips and imperfections: As you paint, constantly check for drips or heavy areas. Smooth them out immediately with your brush or roller. If a drip dries, you will need to sand it down and repaint that area.
- Paint doors and drawers flat: Always paint cabinet doors and drawers lying flat. This helps prevent drips and allows the paint to self-level better. Prop them up on painter’s pyramids or small blocks to get around the edges.
Painting Glass or Decorative Elements
China cabinets often feature glass panels or intricate carvings. Special attention is needed for these areas.
- Glass: If you could not remove the glass, ensure your painter’s tape is firmly pressed down. If any paint gets on the glass, clean it immediately with a damp cloth (for water-based paint) or mineral spirits (for oil-based paint). For dried paint on glass, a razor blade scraper can carefully remove it, but be very cautious. How to get paint off cabinets offers general advice on paint removal.
- Detail work: Use a smaller, angled brush for intricate carvings, trim, or recessed areas. Apply paint carefully to avoid getting it on adjacent, already painted flat surfaces. You can also decorate cabinet doors using different colors or techniques. Consider if you want to cover glass cabinet doors for a different look.
Once all coats of paint are applied and completely dry, your china cabinet will be ready for the final, protective steps. This attention to detail during the painting phase will ensure a beautiful and long-lasting finish.
Finishing and Curing Your Painted China Cabinet: Protecting Your Masterpiece
After all the painting is complete, your china cabinet looks fantastic. However, the work is not quite finished. Protecting your freshly painted surface with a topcoat is crucial. This step adds durability, prevents chipping and scratching, and makes the cabinet easier to clean. It also gives your paint job a professional, long-lasting finish.
The curing process is also essential. Paint might feel dry to the touch in a few hours, but it takes much longer to fully harden. Rushing the curing time can lead to marks, dents, or damage to your new finish. Be patient for the best results.
Applying the Topcoat/Sealer
The type of topcoat you choose often depends on the paint you used and your desired level of durability.
- Polycrylic:
- Best for: Water-based paints (latex, acrylic, some chalk paints). It is clear, non-yellowing, and dries quickly. Ideal for light-colored paints.
- Application: Apply with a good quality synthetic brush or foam applicator. Apply thin, even coats. Avoid overworking, as it dries quickly. Two to three coats are usually sufficient.
- Drying: Dries to the touch in a few hours. Recoat time is typically 2-4 hours.
- Polyurethane:
- Best for: Oil-based paints, or for maximum durability. It is very hard-wearing. Oil-based polyurethane can yellow light colors over time. Water-based polyurethane exists and offers some of the durability without the yellowing.
- Application: Apply thin coats. For oil-based, use a natural bristle brush. For water-based, use a synthetic brush.
- Drying: Can take longer to dry than polycrylic, often 6-8 hours between coats.
- **Wax
- paint china cabinet
- china cabinet makeover
- cabinet painting
- furniture painting
- DIY china cabinet
- antique china cabinet
- refinishing furniture

Todd Martin
Senior Writer
With over 15 years of experience in home renovation and design, I started HEG to share what I’ve learned with homeowners who want to create spaces that are both beautiful and functional. I’ve always believed in a hands-on approach, and over the years, I’ve picked up practical solutions that actually work. Through HEG, I aim to make home improvement more approachable, sharing real tips that help you create a home you truly love.